How to use a tattoo gun? Using a tattoo gun is an art that combines skill, precision, and a deep understanding of tattooing techniques. At tattooat.com, we provide you with the knowledge and skills necessary to master this art form, guiding you every step of the way from setup to aftercare. Learn how to choose the right equipment, master essential techniques, and troubleshoot common issues. Dive into the world of tattoo artistry with confidence. Whether it’s needle depth adjustment or sterilization protocols, explore valuable resources and expert tips.
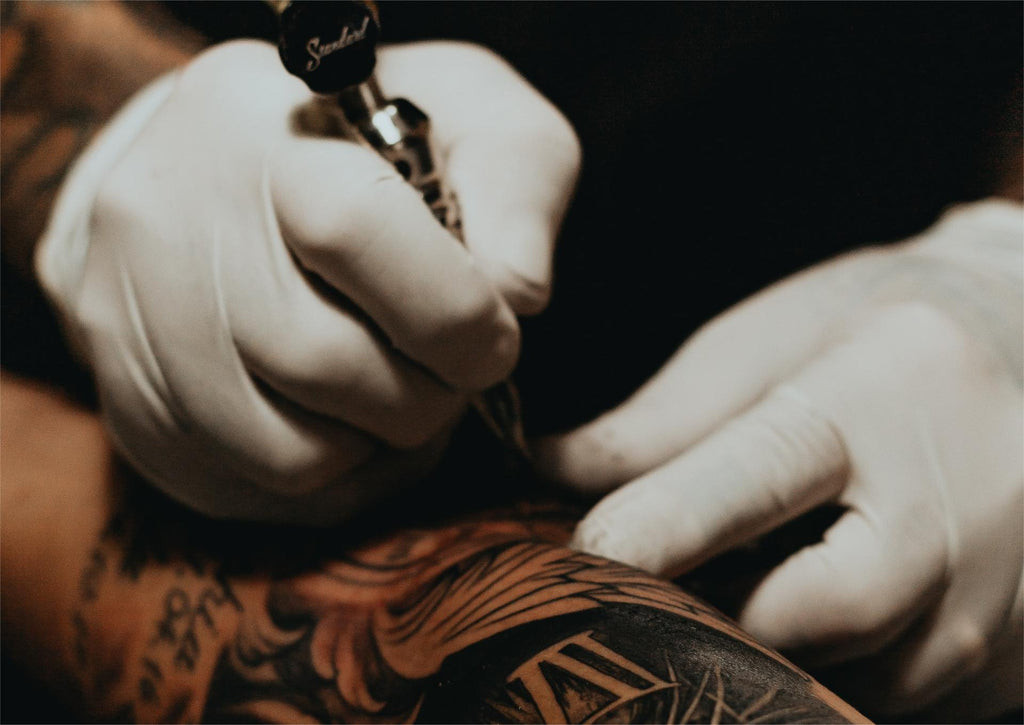
1. Understanding the Tattoo Gun
What is a tattoo gun, and how does it work? A tattoo gun, also known as a tattoo machine, is a handheld device used to inject ink into the skin’s dermis layer to create permanent designs. It works by using a motor to move needles up and down rapidly, piercing the skin and depositing ink with each puncture.
Tattoo machines have evolved significantly over time. Early models were bulky and less precise, but modern machines are lightweight, ergonomic, and offer greater control. According to research from Portland State University’s Art Department, in July 2023, the development of rotary machines has significantly improved the precision and ease of tattooing, allowing for more intricate and detailed designs. The two main types of tattoo machines are rotary and coil machines, each with its unique advantages:
- Rotary Tattoo Machines: These machines use a rotary motor to move the needles in a smooth, circular motion. They are known for their quiet operation, minimal vibration, and versatility, making them suitable for various tattooing styles, including lining, shading, and color packing. Rotary machines are often preferred by beginners due to their ease of use and consistent performance.
- Coil Tattoo Machines: Coil machines use electromagnetic coils to move the needles up and down. They are known for their power and distinctive buzzing sound. Coil machines are favored for their ability to create bold lines and pack colors effectively. They require more skill to operate than rotary machines but are valued for their reliability and traditional feel.
The choice between rotary and coil machines often comes down to personal preference and the specific tattooing style. Rotary machines are generally recommended for beginners due to their ease of use and versatility. However, many experienced artists use both types of machines depending on the design and desired effect.
 Understanding the Tattoo Gun
2. What Are The Essential Components of a Tattoo Gun?
What are the key parts of a tattoo gun, and what do they do? A tattoo gun consists of several essential components that work together to create a functional and precise instrument for tattooing. Each part plays a crucial role in the tattooing process, and understanding their functions is essential for any aspiring tattoo artist.
Here are the key components of a tattoo gun:
| Component | Function |
|---|---|
| Frame | Provides the structure and support for all other components. Frames are typically made of steel, aluminum, or brass. |
| Motor/Coils | Powers the movement of the needles. Rotary machines use a motor, while coil machines use electromagnetic coils. |
| Needle Bar | Connects the needles to the machine and transmits the up-and-down motion. |
| Needles | Pierces the skin and deposits ink. Needles come in various configurations for different purposes, such as lining, shading, and color packing. |
| Tube/Grip | Holds the needles in place and provides a comfortable grip for the artist. Tubes and grips are typically made of stainless steel or plastic. |
| Power Supply | Regulates the electrical current that powers the machine. |
| Foot Pedal | Controls the activation of the machine, allowing the artist to start and stop the needle movement. |
| Clip Cord/RCA Cord | Connects the power supply to the machine. |
Understanding these components and their functions is crucial for setting up and maintaining your tattoo gun. Proper assembly and adjustment of these parts ensure optimal performance and safety. According to Inked Magazine, regular maintenance and cleaning of your tattoo gun are essential for preventing malfunctions and ensuring longevity.
3. How To Properly Set Up Your Tattoo Gun?
How do you assemble and prepare your tattoo gun for use? Properly setting up your tattoo gun is a critical step in ensuring a safe and effective tattooing process. This involves assembling the machine, sterilizing the components, and adjusting the settings to suit your tattooing style and design.
Follow these steps to properly set up your tattoo gun:
- Sterilize Your Equipment: Before handling any part of the tattoo gun, sterilize all components, including the grip, tube, and needles. Use an autoclave to ensure thorough sterilization. According to the Centers for Disease Control and Prevention (CDC), proper sterilization is essential for preventing infections and ensuring client safety.
- Assemble the Machine: Attach the grip and tube to the machine frame. Ensure all parts are securely connected. Insert the needle bar into the tube and attach the needle grouping to the needle bar.
- Adjust Needle Depth: Adjust the needle depth to the appropriate level for your tattooing style. The needle should extend slightly beyond the tip of the tube. The ideal depth varies depending on the area of the body and the desired effect.
- Connect Power Supply: Connect the clip cord or RCA cord to the machine and the power supply. Set the voltage according to the manufacturer’s recommendations. Start with a lower voltage and gradually increase it until you achieve the desired needle speed and power.
- Test the Machine: Before tattooing, test the machine on a practice surface, such as artificial skin or a piece of fruit. This allows you to adjust the settings and get a feel for the machine’s performance.
Proper setup not only ensures a safe and hygienic tattooing environment but also allows you to achieve the best possible results. Taking the time to set up your machine correctly can significantly improve the quality and precision of your tattoos. At tattooat.com, you can find detailed guides and video tutorials to help you master the art of tattoo gun setup.
4. What Are The Safety Precautions to Consider Before Using a Tattoo Gun?
What safety measures should you take to protect yourself and your clients? Safety is paramount when using a tattoo gun. Proper precautions protect both the artist and the client from potential health risks, such as infections and allergic reactions.
Here are essential safety measures to consider before using a tattoo gun:
- Use Sterile Equipment: Always use sterile, single-use needles and tubes. Dispose of used needles in a sharps container.
- Wear Protective Gear: Wear gloves, a mask, and eye protection to prevent exposure to blood and bodily fluids.
- Clean and Disinfect the Workspace: Thoroughly clean and disinfect your work area before and after each tattoo session. Use a hospital-grade disinfectant to wipe down surfaces and equipment.
- Obtain Informed Consent: Ensure your client is aware of the risks involved in tattooing and has provided informed consent. Discuss any allergies or medical conditions they may have.
- Follow Proper Hygiene: Wash your hands thoroughly before and after each tattoo session. Use hand sanitizer regularly during the tattooing process.
- Educate Your Clients on Aftercare: Provide your clients with detailed aftercare instructions to promote proper healing and prevent infections.
According to the National Tattoo Association, adhering to strict safety protocols is crucial for maintaining a safe and professional tattooing environment. Neglecting these precautions can lead to serious health consequences for both the artist and the client.
 Safety Precautions to Consider Before Using a Tattoo Gun
5. How To Practice Proper Tattooing Techniques?
What are the fundamental techniques for creating tattoos? Mastering proper tattooing techniques is essential for creating high-quality, visually appealing tattoos. These techniques involve controlling the tattoo gun, applying consistent pressure, and using various methods for lining, shading, and color packing.
Here are fundamental tattooing techniques to practice:
- Lining: Lining involves creating clean, crisp outlines that define the tattoo design. Use a single-needle or small needle grouping and maintain a consistent speed and pressure. Move the machine in smooth, fluid motions to create even lines.
- Shading: Shading adds depth and dimension to the tattoo. Use larger needle groupings and vary the pressure and speed to create different shades of gray or color. Techniques such as stippling, whipping, and pendulum shading can be used to achieve various effects.
- Color Packing: Color packing involves filling in areas of the tattoo with solid colors. Use a large needle grouping and work in small, circular motions to saturate the skin with ink. Overlap each pass slightly to ensure even coverage.
- Blending: Blending involves smoothly transitioning between different colors or shades. Use a soft, feathering motion to blend the edges of each color together. Practice creating seamless gradients for a professional finish.
- Dot Work: Dot work involves creating designs using small dots of ink. Vary the spacing and density of the dots to create different shades and textures. This technique is often used for creating intricate and detailed designs.
Consistent practice on artificial skin or other practice surfaces is crucial for developing these techniques. Start with simple designs and gradually progress to more complex ones as your skills improve. According to renowned tattoo artist Ami James, mastering the fundamentals is the key to becoming a successful tattoo artist.
6. What Is The Role Of Stencils In Tattooing?
Why are stencils important, and how do you use them? Stencils play a crucial role in the tattooing process by providing a precise outline to follow. They ensure accuracy and consistency in the design, allowing the artist to focus on technique rather than freehand drawing.
Here’s how to use stencils effectively:
- Prepare the Skin: Clean and shave the area where the tattoo will be placed. Apply a stencil primer or transfer gel to help the stencil adhere to the skin.
- Apply the Stencil: Place the stencil on the prepared skin and press firmly for several seconds to ensure good contact. Remove the stencil carefully, leaving the design transferred onto the skin.
- Allow the Stencil to Dry: Allow the stencil to dry completely before starting the tattoo. This prevents the stencil from smudging or wiping off during the tattooing process.
- Follow the Outline: Use the stencil as a guide for the outline of the tattoo. Work carefully and precisely to follow the lines of the stencil.
- Remove the Stencil: Once the outline is complete, gently wipe away any remaining stencil marks with a clean, damp cloth.
Stencils are particularly useful for complex designs or tattoos that require precise symmetry. They save time and reduce the risk of errors, ensuring the final result matches the client’s expectations. According to tattoo artist Kat Von D, stencils are an indispensable tool for achieving accurate and professional-looking tattoos.
7. How To Choose The Right Needles For Different Tattooing Techniques?
What types of needles are available, and when should you use them? Choosing the right needles is crucial for achieving the desired effect in your tattoos. Needles come in various configurations, each designed for specific techniques such as lining, shading, and color packing.
Here’s a breakdown of the different types of needles and their uses:
| Needle Type | Configuration | Use |
|---|---|---|
| Round Liner (RL) | Tightly grouped needles in a circular pattern | Creating crisp, precise lines and outlines |
| Round Shader (RS) | Loosely grouped needles in a circular pattern | Soft shading and blending |
| Magnum (M1, M2) | Needles arranged in a straight line, either in a single or double layer | Color packing, shading large areas |
| Curved Magnum (CM) | Needles arranged in a curved line | Contouring, shading, and blending with smoother transitions |
| Flat (F) | Needles arranged in a straight line, used for creating geometric designs | Creating sharp lines, edges, and shading in small areas |
| Bugpin | Tightly grouped needles with a smaller diameter, used for fine details | Intricate details, fine lines, and smooth shading |
| Hollow Needles | Needles designed with an open center, used for efficient ink flow and packing | Solid color packing and minimizing skin trauma |
| Textured Needles | Needles with a textured surface, used for improved ink absorption and deposit | Enhancing color saturation and creating unique textures |
| Cartridge Needles | Pre-sterilized and disposable needles housed in a cartridge, designed for convenience and consistency | Quick needle changes and maintaining a sterile environment |
When choosing needles, consider the size, configuration, and taper. Smaller needles are ideal for fine lines and details, while larger needles are better for filling in large areas. Experiment with different needle types to find the ones that work best for your tattooing style and design. According to tattoo equipment supplier Bishop Rotary, using the right needles can significantly improve the quality and efficiency of your tattoos.
8. Understanding Ink Flow and Adjustment Techniques
How do you control the flow of ink for optimal results? Controlling ink flow is essential for achieving optimal results in your tattoos. Too little ink can result in faded or patchy areas, while too much ink can cause blowouts and blurred lines.
Here are techniques for controlling ink flow:
- Adjust Machine Speed: Adjust the voltage on your power supply to control the speed of the machine. Slower speeds allow for more ink flow, while faster speeds reduce ink flow.
- Adjust Needle Depth: Adjust the needle depth to control the amount of ink deposited into the skin. Deeper needle depths result in more ink flow, while shallower depths reduce ink flow.
- Use Proper Technique: Use consistent pressure and smooth, fluid motions to ensure even ink distribution. Avoid pressing too hard or moving too quickly, as this can result in uneven ink flow.
- Monitor Ink Consistency: Ensure your ink is properly mixed and has a consistent viscosity. Thin ink flows more easily, while thick ink is more difficult to control.
- Clean Needles Regularly: Clean your needles regularly during the tattooing process to prevent clogs and ensure consistent ink flow. Use a needle cleaning solution or sterile water to remove excess ink.
Mastering ink flow control requires practice and attention to detail. Experiment with different techniques and settings to find the optimal balance for your tattooing style. According to tattoo artist Nikko Hurtado, understanding ink flow is crucial for creating vibrant, long-lasting tattoos.
9. Common Mistakes to Avoid While Using a Tattoo Gun?
What are the common pitfalls, and how can you avoid them? Avoiding common mistakes is crucial for ensuring a safe and successful tattooing experience. These mistakes can range from improper setup and technique to neglecting safety precautions.
Here are common mistakes to avoid when using a tattoo gun:
- Using Unsterile Equipment: Always use sterile, single-use needles and tubes. Reusing or improperly sterilizing equipment can lead to infections and other health complications.
- Improper Needle Depth: Setting the needle depth too deep can cause blowouts and scarring, while setting it too shallow can result in faded or patchy tattoos.
- Inconsistent Pressure: Applying inconsistent pressure can result in uneven lines and shading. Maintain a consistent pressure throughout the tattooing process.
- Overworking the Skin: Overworking the skin can cause trauma, prolonged healing times, and scarring. Recognize the signs of overworked skin, such as excessive redness, swelling, and bleeding, and stop tattooing immediately.
- Poor Stencil Application: Applying the stencil incorrectly can result in an inaccurate or misaligned design. Ensure the skin is properly prepared, and the stencil is applied smoothly and evenly.
- Neglecting Aftercare: Failing to provide clients with proper aftercare instructions can lead to infections and poor healing. Educate your clients on how to care for their new tattoos properly.
- Using Low-Quality Ink: Using low-quality ink can result in faded colors and allergic reactions. Always use reputable brands of tattoo ink that are known for their safety and quality.
By avoiding these common mistakes, you can ensure a safe and successful tattooing experience for both yourself and your clients. At tattooat.com, we provide comprehensive resources and training to help you master the art of tattooing and avoid these pitfalls.
10. How To Maintain Your Tattoo Gun For Longevity?
Why is maintenance important, and what steps should you take? Proper maintenance is essential for ensuring the longevity and optimal performance of your tattoo gun. Regular cleaning, lubrication, and inspection can prevent malfunctions and extend the life of your equipment.
Here are steps to maintain your tattoo gun:
- Clean After Each Use: Disassemble the machine and clean all parts thoroughly after each use. Use an ultrasonic cleaner to remove ink and debris from hard-to-reach areas.
- Lubricate Regularly: Lubricate the machine regularly with a high-quality machine oil. Apply a small amount of oil to the moving parts to ensure smooth operation.
- Inspect for Wear and Tear: Inspect the machine regularly for signs of wear and tear, such as worn springs, loose screws, or damaged cords. Replace any worn or damaged parts immediately.
- Sterilize Properly: Sterilize all reusable parts, such as grips and tubes, in an autoclave after each use. Follow proper sterilization protocols to prevent infections.
- Store Properly: Store the machine in a clean, dry place when not in use. Protect it from dust, moisture, and extreme temperatures.
- Check Needle Alignment: Ensure the needle bar and tube alignment are correct. Improper alignment can cause uneven ink distribution and needle damage.
- Power Supply Care: Avoid moisture and extreme temperatures. Regularly inspect for frayed cords or loose connections and use a surge protector.
Regular maintenance not only ensures the longevity of your tattoo gun but also helps maintain its performance and safety. A well-maintained machine operates more smoothly and reliably, allowing you to create high-quality tattoos with confidence. According to tattoo equipment manufacturer Cheyenne Professional Tattoo Equipment, proper maintenance is a key factor in achieving consistent and professional results.
By following these guidelines and utilizing the resources available at tattooat.com, aspiring tattoo artists can confidently embark on their journey, creating stunning and lasting works of art. Remember to prioritize safety, practice diligently, and continuously seek knowledge to refine your skills.
Ready to explore the world of tattooing? Visit tattooat.com today to discover inspiring designs, find talented artists, and learn everything you need to know about creating amazing tattoos in the USA. Contact us at 1825 SW Broadway, Portland, OR 97201, United States, or call +1 (503) 725-3000 for more information.
FAQ: How to Use a Tattoo Gun
1. What is the difference between rotary and coil tattoo guns?
Rotary tattoo guns use a rotary motor for smooth, quiet operation and are versatile for various styles. Coil tattoo guns use electromagnetic coils for powerful, bold lines, requiring more skill to operate.
2. How do I sterilize a tattoo gun?
Disassemble the gun and use an autoclave to sterilize all reusable parts like grips and tubes. Follow CDC guidelines for proper sterilization to prevent infections.
3. What safety precautions should I take when using a tattoo gun?
Always use sterile equipment, wear protective gear (gloves, mask, eye protection), clean and disinfect your workspace, obtain informed consent, and educate clients on aftercare.
4. How do I adjust the needle depth on a tattoo gun?
Adjust the needle depth by loosening the set screw on the tube and adjusting the needle bar. The needle should extend slightly beyond the tip of the tube.
5. What are the different types of tattoo needles, and when should I use them?
Types include Round Liners (RL) for outlines, Round Shaders (RS) for soft shading, and Magnums (M1, M2) for color packing. Choose based on the technique you’re using.
6. How do I control ink flow while tattooing?
Adjust machine speed (voltage), needle depth, and use proper technique with consistent pressure. Monitor ink consistency and clean needles regularly.
7. What is the purpose of using stencils in tattooing?
Stencils provide a precise outline to follow, ensuring accuracy and consistency in the design, allowing the artist to focus on technique.
8. What common mistakes should I avoid when using a tattoo gun?
Avoid using unsterile equipment, improper needle depth, inconsistent pressure, overworking the skin, poor stencil application, neglecting aftercare, and using low-quality ink.
9. How do I maintain a tattoo gun for longevity?
Clean after each use, lubricate regularly, inspect for wear and tear, sterilize properly, store in a clean, dry place, and check needle alignment.
10. How can I learn more about using a tattoo gun and improving my skills?
Visit tattooat.com for detailed guides, video tutorials, inspiring designs, and expert tips to master the art of tattooing.