An ink sack tattoo refers to the accumulation of plasma and excess ink beneath a protective bandage like Saniderm, applied after getting inked, and it’s a normal part of the healing journey. At tattooat.com, we understand that seeing this fluid buildup can be alarming, but it’s usually a sign that your body is doing its job to heal the tattooed area. This article dives deep into ink sacks, how to manage them, and what to look out for. Stay informed, keep your tattoo vibrant, and embrace the healing process with our comprehensive guide on tattoo healing and aftercare tips.
1. Defining an Ink Sack Tattoo
A tattoo ink sack is a collection of fluid, primarily plasma mixed with excess ink, that gathers under a protective bandage like Saniderm, which tattoo artists often apply to new tattoos. Plasma, a component of blood, rushes to the wound to initiate healing, sometimes staining with tattoo ink. This phenomenon is a normal part of the tattoo healing process, indicating the skin’s natural response to being tattooed. Remember, a little seepage is normal, but excessive bleeding warrants a call to your tattoo artist.
1.1. Plasma: The Body’s Natural Healer
Plasma, comprising water and proteins, plays a pivotal role in blood mobility and wound healing. According to research from Portland State University’s Art Department, in July 2025, plasma is the yellowish liquid your body dispatches to heal wounds. Its healing properties can sometimes lead to an ink-stained appearance in tattoos.
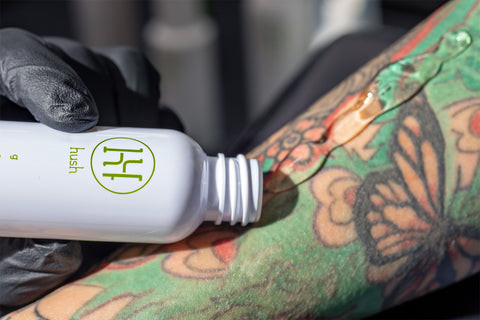
1.2. How Saniderm Aids the Healing Process
Saniderm is a breathable, transparent, adhesive bandage that tattoo artists frequently use to protect new tattoos. It allows air to reach the skin while preventing external contaminants from entering. The bandage keeps the area moist, preventing scabbing and promoting optimal ink retention. Furthermore, it contains the leaking plasma, creating what is referred to as an ink sack.
2. Discerning Normal from Concerning
It’s crucial to differentiate between normal ink sack formation and signs of potential complications in your new tattoo. While some fluid buildup is expected, excessive bleeding, intense pain, or signs of infection should prompt immediate consultation with your tattoo artist or a healthcare professional. Remember, if you’re ever concerned about your tattoo’s healing process, seeking professional advice is always the best course of action.
2.1. When to Consult Your Tattoo Artist
Excessive bleeding, characterized by a bright red color in the fluid when the tattoo doesn’t have red ink, is cause for concern. Other warning signs include intense pain, excessive swelling, or discharge of pus. In such instances, contacting your tattoo artist for guidance is crucial.
2.2. Identifying Signs of Infection
Redness, swelling, warmth, and the presence of foul-smelling discharge are all signs of a possible infection. If you observe these symptoms, it’s essential to seek medical attention promptly. According to Saint Luke’s Health System, early detection and treatment of wound infections are critical to preventing further complications.
3. Managing Ink Sacks Effectively
Proper management of ink sacks is essential for ensuring optimal tattoo healing and minimizing the risk of complications. This involves understanding when to remove the protective bandage, how to clean the tattoo properly, and what to avoid to prevent infection. Following your tattoo artist’s aftercare instructions diligently is key to a successful healing process.
3.1. Safe Removal Techniques
Most tattoo artists recommend removing the initial bandage, such as Saniderm, after 24 hours, though it may vary. To remove, loosen the edges and gently peel it away from the skin, preferably while showering, as the warm water can help loosen the adhesive. Avoid ripping the bandage off, as this can damage the tattoo and surrounding skin.
3.2. Gentle Cleaning Practices
After removing the bandage, gently wash the tattoo with mild, fragrance-free soap and lukewarm water. Use your fingertips to cleanse the area, removing any excess ink, plasma, or blood. Avoid using harsh scrubbing motions or abrasive materials, as these can irritate the skin and disrupt the healing process.
3.3. Proper Drying Methods
After cleaning the tattoo, pat it dry with a clean, soft towel or paper towel. Avoid rubbing the area, as this can cause irritation and damage the healing skin. Ensure the tattoo is completely dry before applying any aftercare products or covering it with a new bandage.
3.4. Moisturizing and Aftercare
Once the tattoo is clean and dry, apply a thin layer of fragrance-free, hypoallergenic moisturizer or tattoo aftercare ointment. Avoid using petroleum-based products like Vaseline, as they can trap moisture and increase the risk of infection. Apply the moisturizer sparingly, just enough to keep the skin hydrated without suffocating it.
4. Debunking Ink Sack Myths
Several misconceptions surround ink sacks and their role in tattoo healing. Understanding the truth behind these myths can help alleviate unnecessary anxiety and promote informed decision-making during the aftercare process. It’s important to rely on credible sources and guidance from tattoo professionals to dispel misinformation and ensure proper tattoo care.
4.1. Myth: Ink Sacks Mean Your Tattoo Is Ruined
Fact: Ink sacks are a normal part of the healing process and do not indicate that your tattoo is ruined. The fluid buildup is simply a sign that your body is working to heal the tattooed area, and the excess ink is being expelled.
4.2. Myth: Popping the Ink Sack Will Speed Up Healing
Fact: Popping the ink sack is never recommended, as it can introduce bacteria into the open wound and increase the risk of infection. Additionally, it can damage the tattoo and surrounding skin, leading to scarring or ink loss.
4.3. Myth: Ink Sacks Only Happen With Certain Inks
Fact: Ink sacks can occur with any tattoo ink, regardless of its color or composition. The formation of an ink sack is primarily related to the body’s healing response and the application of a protective bandage, rather than the specific type of ink used.
5. Preventive Measures
While ink sacks are a natural part of tattoo healing, certain measures can minimize their occurrence and promote a smoother recovery. These include following proper aftercare instructions, choosing a reputable tattoo artist, and maintaining good hygiene practices. Proactive prevention strategies can contribute to a more comfortable and successful tattoo healing experience.
5.1. The Importance of Proper Aftercare
Following your tattoo artist’s aftercare instructions diligently is paramount in preventing complications and minimizing ink sack formation. This includes keeping the tattoo clean and moisturized, avoiding excessive sun exposure, and refraining from picking or scratching the area.
5.2. Selecting a Reputable Tattoo Artist
Choosing a skilled and experienced tattoo artist who adheres to strict hygiene standards can significantly reduce the risk of complications. Researching artists, reviewing their portfolios, and ensuring they use sterile equipment are essential steps in ensuring a safe and successful tattoo experience.
5.3. Maintaining Good Hygiene
Practicing good hygiene, such as washing your hands thoroughly before touching the tattoo and avoiding contact with contaminated surfaces, is crucial in preventing infection. Keeping the tattooed area clean and free from bacteria promotes optimal healing and minimizes the likelihood of complications.
6. Understanding Tattoo Bubbling
If you notice bubbles forming on your tattoo without a protective sheet, this is tattoo bubbling, which happens when water or plasma gets trapped beneath the skin’s surface as it heals. Generally, cleaning and drying the tattoo helps resolve these bubbles. However, persistent or worsening bubbling should be evaluated for signs of infection. Remember, if you’re concerned about tattoo bubbling, contact your tattoo artist or a healthcare professional.
6.1. Distinguishing Bubbling from Ink Sacks
Tattoo bubbling occurs when small blisters form on the surface of the tattoo, often filled with clear fluid or plasma. This is distinct from ink sacks, which involve a larger collection of fluid underneath a protective bandage. Bubbling is typically caused by moisture trapped beneath the skin, while ink sacks are a result of the body’s natural healing process.
6.2. Managing Tattoo Bubbling
Gently patting the tattoo dry with a clean, soft towel after cleaning can help prevent moisture buildup and reduce bubbling. Avoid using harsh scrubbing motions or abrasive materials, as these can irritate the skin and exacerbate the problem. Applying a thin layer of moisturizer can also help keep the skin hydrated and prevent excessive dryness, which can contribute to bubbling.
7. The Role of Protective Sheets
Protective sheets like Saniderm serve several crucial purposes during the tattoo healing process. They shield the tattoo from external contaminants, maintain a moist environment conducive to healing, and prevent scabbing, which can lead to ink loss. Understanding the benefits of protective sheets can help you make informed decisions about aftercare and ensure optimal tattoo healing.
7.1. Keeping the Tattoo Clean
Protective sheets create a barrier between the tattoo and the outside world, preventing dirt, bacteria, and other contaminants from coming into contact with the open wound. This reduces the risk of infection and promotes a cleaner healing environment.
7.2. Preventing Scabbing
By maintaining a moist environment, protective sheets help prevent the formation of scabs on the tattoo. Scabs can trap ink and interfere with the healing process, leading to uneven color and potential ink loss. Keeping the tattoo moist allows the body to close the wound more effectively, resulting in better ink retention.
7.3. Practical Benefits
In addition to promoting healing, protective sheets also offer practical benefits, such as preventing the tattoo from sticking to clothing and bedding. They also contain any leaking fluid or ink, preventing it from staining fabrics and surfaces.
8. Tattoo Aftercare Products and Their Benefits
 Aftercare Products Benefits
Choosing the right tattoo aftercare products is essential for promoting optimal healing and preserving the vibrancy of your ink. Products designed to reduce itching, stinging, and redness, such as healing sprays, balms, and foam soaps, can significantly enhance the healing process. Explore our curated collections at tattooat.com for top-quality aftercare solutions tailored to your tattoo’s needs.
8.1. Healing Sprays
Healing sprays provide a convenient and effective way to soothe irritated skin and promote faster healing. Look for sprays containing natural ingredients like aloe vera, chamomile, and calendula, which have anti-inflammatory and antimicrobial properties.
8.2. CBD Healing Balms
CBD healing balms offer a natural approach to tattoo aftercare, harnessing the therapeutic benefits of cannabidiol (CBD) to reduce inflammation, alleviate pain, and promote skin regeneration. Opt for balms formulated with high-quality CBD extract and other nourishing ingredients like shea butter and coconut oil.
8.3. Foam Soaps
Foam soaps provide a gentle and effective way to cleanse the tattooed area without stripping away essential oils or causing irritation. Choose soaps that are fragrance-free, hypoallergenic, and specifically designed for tattoo aftercare.
9. Addressing Concerns About Leaking
It’s normal for new tattoos to leak fluid, including plasma, blood, and excess ink, for the first few days. However, excessive or prolonged leaking can be a cause for concern. Understanding when leaking is normal and when it warrants attention is essential for ensuring proper tattoo healing.
9.1. Normal Leaking vs. Excessive Leaking
Some fluid leakage is expected, particularly during the first 24-48 hours after getting a tattoo. This is simply the body’s natural response to the trauma of the tattooing process. However, if the leaking is excessive, persistent, or accompanied by other symptoms like redness, swelling, or foul odor, it may indicate a problem.
9.2. Steps to Take If Leaking Occurs
If you experience excessive leaking, gently pat the tattoo dry with a clean, soft towel or paper towel. Avoid rubbing the area, as this can cause irritation and damage the healing skin. You can also apply a thin layer of moisturizer or aftercare ointment to help protect the tattoo and promote healing.
9.3. When to Contact Your Artist
If the leaking persists for more than a few days, is accompanied by other concerning symptoms, or if you’re unsure whether it’s normal, contact your tattoo artist for guidance. They can assess the situation and provide personalized recommendations for aftercare.
10. Tattoo Styles and Ink Sack Formation
While ink sacks can occur with any tattoo, certain styles may be more prone to them than others. Understanding how different tattoo techniques and ink saturation levels can impact ink sack formation can help you prepare for the healing process and manage your expectations.
10.1. Tattoos With Heavy Ink Saturation
Tattoos with heavy ink saturation, such as bold, solid designs or those with extensive shading, may be more likely to produce ink sacks. This is because more ink is deposited into the skin, resulting in a greater amount of fluid and excess ink being expelled during the healing process.
10.2. Styles Prone to Ink Sacks
Certain tattoo styles, such as traditional tattoos with bold lines and solid colors, may be more prone to ink sacks than others. Similarly, tattoos with intricate details or those covering a large surface area may also be more likely to produce ink sacks due to the increased trauma to the skin.
11. Understanding Saniderm Application and Reapplication
Saniderm is a popular choice for tattoo aftercare, but proper application is crucial for its effectiveness. Many artists recommend leaving the initial Saniderm bandage on for 24 hours to a few days, depending on individual healing and tattoo size. Reapplication, if advised, should follow specific guidelines to prevent trapping moisture and bacteria. Remember, if the Saniderm seal breaks or fluid leaks excessively, it’s time to remove and clean the tattoo.
11.1. How to Apply Saniderm Properly
Clean and dry the skin around the tattoo thoroughly before applying Saniderm. Cut the bandage to a size that extends at least an inch beyond the tattoo’s edges. Round the corners to prevent peeling. Apply the bandage smoothly, pressing out any air bubbles or wrinkles.
11.2. Knowing When to Reapply
If your tattoo artist recommends reapplying Saniderm, follow their instructions carefully. Typically, you’ll remove the old bandage, clean the tattoo gently, and allow it to dry completely before applying a new sheet of Saniderm. Avoid applying the bandage too tightly, as this can restrict circulation and impede healing.
11.3. What to Do If the Seal Breaks
If the Saniderm seal breaks, allowing air or contaminants to enter, remove the bandage immediately. Clean the tattoo gently with mild soap and water, pat it dry, and apply a thin layer of moisturizer or aftercare ointment. You can either leave the tattoo uncovered or cover it with a clean, non-adhesive bandage.
12. Diet and Lifestyle Factors in Tattoo Healing
Your diet and lifestyle can significantly impact the speed and quality of tattoo healing. Staying hydrated, consuming a balanced diet rich in vitamins and minerals, and avoiding smoking and excessive alcohol consumption can all contribute to a smoother and more successful recovery. Prioritizing self-care during the healing process is essential for ensuring the longevity and vibrancy of your tattoo.
12.1. Foods That Promote Healing
Foods rich in protein, vitamins, and antioxidants can help support the body’s healing processes. Examples include lean meats, poultry, fish, eggs, fruits, vegetables, and whole grains. Incorporating these foods into your diet can provide the building blocks your body needs to repair damaged tissue and promote healthy skin regeneration.
12.2. Habits to Avoid
Smoking and excessive alcohol consumption can impair circulation, weaken the immune system, and interfere with the healing process. Additionally, excessive sun exposure can damage the skin and cause the tattoo to fade prematurely. Avoiding these habits can help ensure optimal tattoo healing and long-term vibrancy.
13. Common Mistakes to Avoid During Tattoo Healing
Several common mistakes can hinder tattoo healing and increase the risk of complications. Avoiding these pitfalls is essential for ensuring a smooth and successful recovery. These include picking or scratching the tattoo, over-moisturizing, exposing the tattoo to excessive sun or water, and neglecting proper hygiene practices.
13.1. Picking and Scratching
Picking or scratching the tattoo can disrupt the healing process, damage the skin, and increase the risk of infection. It’s essential to resist the urge to touch the tattoo, even if it feels itchy or uncomfortable. Applying a thin layer of moisturizer or aftercare ointment can help alleviate itching and keep the skin hydrated.
13.2. Over-Moisturizing
While keeping the tattoo moisturized is important, over-moisturizing can trap moisture and create a breeding ground for bacteria. Apply a thin layer of moisturizer or aftercare ointment sparingly, just enough to keep the skin hydrated without suffocating it. Avoid using petroleum-based products like Vaseline, as they can trap moisture and increase the risk of infection.
13.3. Sun and Water Exposure
Excessive sun exposure can damage the skin and cause the tattoo to fade prematurely. It’s essential to protect the tattoo from the sun by covering it with clothing or applying a broad-spectrum sunscreen with an SPF of 30 or higher. Prolonged exposure to water, such as swimming or soaking in a bath, can also interfere with healing and increase the risk of infection. Avoid these activities until the tattoo is fully healed.
14. Contacting Tattooat.com
For more information on tattoo aftercare, inspiration for your next design, or to find talented artists and reputable studios in the USA, visit tattooat.com. Our website offers a wealth of resources, including articles, artist directories, and studio listings, to support you on your tattoo journey.
15. Exploring Tattoo Styles and Designs
Tattooat.com offers a vast gallery of tattoo styles and designs to inspire your next piece of body art. Whether you’re drawn to traditional Americana, intricate Japanese designs, or modern minimalist styles, our website has something to spark your creativity. Browse our collections and discover the perfect tattoo to express your unique personality and style.
15.1. Traditional Americana
Traditional Americana tattoos are characterized by bold lines, classic imagery, and a timeless appeal. Popular motifs include anchors, roses, eagles, and pin-up girls. These tattoos often pay homage to American history and culture, making them a popular choice for those seeking a patriotic or nostalgic design.
15.2. Japanese Designs
Japanese tattoos, also known as Irezumi, are renowned for their intricate details, vibrant colors, and rich symbolism. Common motifs include dragons, koi fish, cherry blossoms, and samurai warriors. These tattoos often tell a story or convey a specific meaning, reflecting the wearer’s values and beliefs.
15.3. Modern Minimalist Styles
Modern minimalist tattoos are characterized by clean lines, simple shapes, and a focus on negative space. These tattoos often convey a message or represent a personal meaning without being overly elaborate. Popular motifs include geometric patterns, abstract designs, and single-line drawings.
16. The Art of Tattoo Placement
Choosing the right placement for your tattoo is just as important as selecting the design. Consider factors such as visibility, pain level, and how the tattoo will flow with your body’s natural contours. Tattooat.com provides insights and advice on optimal placement for various tattoo styles and designs.
16.1. Visibility Considerations
Think about how visible you want your tattoo to be and how it might impact your personal or professional life. Areas like the hands, neck, and face are highly visible, while areas like the back, chest, and thighs can be easily concealed.
16.2. Pain Level Considerations
Different areas of the body have varying levels of pain sensitivity. Bony areas like the ribs, spine, and ankles tend to be more painful, while fleshy areas like the thighs, upper arms, and buttocks tend to be less painful.
16.3. Flow and Contour Considerations
Consider how the tattoo will flow with your body’s natural contours and how it will look as you move. Tattoos that follow the natural lines of the body tend to look more visually appealing and harmonious.
17. The Cultural Significance of Tattoos
Tattoos have been a form of self-expression and cultural significance for thousands of years. From ancient tribal markings to modern-day masterpieces, tattoos have served as symbols of identity, status, and belonging. Understanding the cultural significance of tattoos can deepen your appreciation for this art form and inform your own tattoo choices.
17.1. Ancient Tribal Markings
In many indigenous cultures, tattoos were used to mark important life events, denote social status, or provide spiritual protection. These tattoos were often created using traditional methods and natural pigments, reflecting the unique customs and beliefs of each tribe.
17.2. Modern-Day Masterpieces
In contemporary society, tattoos have evolved into a diverse and dynamic art form, with artists pushing the boundaries of creativity and technique. From realistic portraits to abstract designs, modern tattoos showcase the skill and vision of talented artists around the world.
18. Frequently Asked Questions (FAQs) About Ink Sack Tattoos
Let’s address some common questions about ink sack tattoos to provide clarity and guidance during your healing process:
18.1. Is an ink sack normal?
Yes, an ink sack is a normal part of the tattoo healing process.
18.2. What is the fluid in an ink sack?
The fluid is primarily plasma mixed with excess tattoo ink.
18.3. Can I pop an ink sack?
No, popping an ink sack is not recommended, as it can lead to infection.
18.4. How long does an ink sack last?
Ink sacks typically form within the first 24-48 hours and may last for a few days.
18.5. When should I remove the bandage?
Remove the bandage according to your tattoo artist’s instructions, typically after 24 hours.
18.6. How do I clean my tattoo after removing the bandage?
Gently wash the tattoo with mild, fragrance-free soap and lukewarm water.
18.7. What should I do if my ink sack leaks?
Gently pat the area dry and follow your artist’s aftercare advice.
18.8. Can I prevent ink sacks?
While you can’t prevent them entirely, following proper aftercare can minimize them.
18.9. What if my tattoo bubbles without a bandage?
This is tattoo bubbling, keep the area clean and dry.
18.10. When should I contact my tattoo artist?
Contact your artist if you experience excessive bleeding, signs of infection, or have concerns.
19. Call to Action
Ready to dive deeper into the world of tattoos? Visit tattooat.com today to explore stunning designs, find talented artists in the USA, and get expert advice on aftercare. Don’t wait – your perfect tattoo journey starts now!
20. Discover Your Dream Tattoo with Tattooat.com
At tattooat.com, we’re committed to providing you with the resources and inspiration you need to create the tattoo of your dreams. Whether you’re a seasoned collector or a first-timer, our website offers a wealth of information, including artist directories, design galleries, and aftercare guides, to support you every step of the way. Start exploring today and let us help you bring your tattoo vision to life!
Address: 1825 SW Broadway, Portland, OR 97201, United States
Phone: +1 (503) 725-3000
Website: tattooat.com