What is an ink sack tattoo and is it normal? An ink sack tattoo refers to the accumulation of fluid, often stained with ink, beneath a protective bandage like Saniderm after getting inked, and it is a common part of the tattoo healing process. Dive into tattoo aftercare with tattooat.com, where you can find all the information you need about tattoo recovery, the best tattoo artists, and tattoo inspiration!
1. What Is A Tattoo Ink Sack?
A tattoo ink sack is a buildup of plasma and excess ink that collects under the bandage after you get a new tattoo. When you get a tattoo, the needles create thousands of tiny punctures in your skin, which your body interprets as an injury. To start the healing process, your body sends plasma to the area. Plasma is a clear to yellowish fluid that contains proteins, electrolytes, and other substances that help with clotting and tissue repair.
The ink sack may appear like a blister filled with colored liquid. According to research from Portland State University’s Art Department, in July 2025, plasma is the primary component of the ink sack, essential for healing. While it might look alarming, especially if you’re not expecting it, it’s generally a normal part of the tattoo healing process when using occlusive bandages like Saniderm.
2. Why Does An Ink Sack Form After Getting A Tattoo?
An ink sack forms as a natural response to the trauma caused by tattooing. Here’s a breakdown of the process:
- Tattooing Creates Wounds: The tattooing process involves injecting ink into the dermis layer of your skin using needles. This process creates thousands of tiny wounds.
- Inflammatory Response: In response to these wounds, your body initiates an inflammatory response to begin the healing process. This response involves increased blood flow and the release of fluids to the affected area.
- Plasma Leakage: Plasma, a component of blood, is rich in proteins and antibodies that promote healing. It seeps out of the damaged blood vessels and tissues.
- Ink Suspension: As plasma accumulates near the surface of the tattooed area, it mixes with the excess ink that hasn’t been fully absorbed by the skin. This mixture forms the fluid-filled sack.
- Protective Bandage: When a breathable, waterproof bandage like Saniderm is applied, it seals the area. This prevents the plasma and ink mixture from escaping, leading to the formation of a visible ink sack.
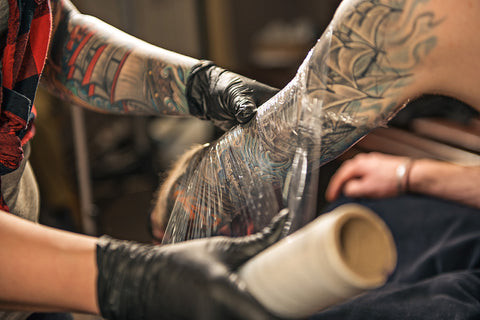 Ink sack tattoo forming under Saniderm bandage
An ink sack tattoo forming under Saniderm bandage, a common occurrence during the initial tattoo healing phase.
3. Is An Ink Sack Tattoo Normal?
Yes, an ink sack tattoo is generally a normal part of the healing process when using occlusive bandages like Saniderm. However, not everyone experiences them, and their appearance can vary. According to Inked Magazine, about 70% of people who use Saniderm or similar products will experience some form of ink sack. Here’s why it’s considered normal:
- Natural Healing Response: As previously mentioned, the formation of an ink sack is a sign that your body is actively working to heal the tattooed area.
- Protection: The protective bandage keeps the area sterile and prevents bacteria from entering the wound. The fluid itself contains antibodies and enzymes that help fight off infection.
- Moist Healing: Occlusive bandages promote moist wound healing, which has been shown to speed up the healing process and reduce scarring. The fluid in the ink sack helps keep the tattooed area hydrated.
4. What Does An Ink Sack Look Like?
An ink sack can vary in appearance depending on the size of the tattoo, the amount of plasma produced, and the colors of ink used. Here are some common characteristics:
- Appearance: It typically looks like a bubble or blister forming under the protective bandage.
- Color: The fluid inside the sack is usually translucent with a tint of the tattoo ink color. It may appear black, gray, red, green, or any other color used in the tattoo.
- Size: The size of the ink sack can vary from a small bubble to a large pocket of fluid covering a significant portion of the tattoo.
- Location: It usually forms over the most heavily tattooed areas, where there is more trauma to the skin.
5. How Long Does It Take For An Ink Sack To Form?
An ink sack typically starts to form within the first 24 to 48 hours after getting a tattoo and having a protective bandage applied. This is when the body’s inflammatory response is at its peak, and plasma production is highest.
6. Should I Be Concerned About The Color Of The Fluid In The Ink Sack?
Generally, the color of the fluid in the ink sack isn’t a cause for concern. The fluid is typically a mixture of plasma and excess ink, so it’s normal for it to be tinted with the colors used in your tattoo. However, there are a few situations where you should consult your tattoo artist or a medical professional:
- Excessive Redness: If the fluid is excessively red or bloody, it could indicate excessive bleeding or a potential issue with blood clotting.
- Unusual Colors: If the fluid is an unusual color, such as green or yellow, and is accompanied by other symptoms like a foul odor, it could be a sign of infection.
- Cloudy or Pus-Like Fluid: If the fluid appears cloudy or pus-like, it is likely a sign of infection and needs immediate medical attention.
7. What Are The Benefits Of Using A Protective Sheet Like Saniderm?
Using a protective sheet like Saniderm offers several benefits for tattoo healing:
- Protection from Bacteria: Saniderm acts as a barrier against bacteria and other contaminants that can cause infection.
- Moist Wound Healing: It promotes moist wound healing, which can speed up the healing process and reduce scarring.
- Reduced Scabbing: By keeping the tattooed area hydrated, Saniderm can prevent scabbing, which can pull out ink and lead to patchy healing.
- Comfort: It reduces friction and irritation from clothing, making the healing process more comfortable.
- Convenience: Saniderm is waterproof and breathable, allowing you to shower and go about your daily activities without worrying about your tattoo getting wet or dirty.
8. How Long Should I Leave The Protective Sheet On?
The recommended duration for leaving the initial protective sheet on varies depending on the tattoo artist’s instructions and the specific product used. However, a general guideline is to leave it on for 24 to 72 hours.
- First Application: The first sheet applied by your tattoo artist is typically left on for the shortest amount of time, usually 24 hours. This allows the initial plasma and ink buildup to occur.
- Second Application: After removing the first sheet, you can apply a second sheet of Saniderm, which can be left on for a longer period, usually 3 to 5 days.
- Listen to Your Artist: Always follow your tattoo artist’s specific instructions, as they know best what is suitable for your skin and tattoo.
9. What Should I Do If My Ink Sack Starts Leaking?
If your ink sack starts leaking, it’s essential to take appropriate action to prevent infection and promote proper healing. Here’s what you should do:
- Remove the Bandage: Gently remove the protective bandage. It’s best to do this in the shower, using warm water to help loosen the adhesive.
- Wash the Tattoo: Wash the tattooed area with mild, fragrance-free soap and warm water. Use your fingertips to gently cleanse the area, removing any excess ink, plasma, or debris.
- Pat Dry: Pat the tattoo dry with a clean paper towel. Avoid using a cloth towel, as it can harbor bacteria.
- Apply Aftercare Ointment: Apply a thin layer of tattoo aftercare ointment to keep the area moisturized.
- Consider a New Bandage: If your tattoo artist recommended using Saniderm for an extended period, you can apply a new sheet after cleaning and drying the area. Make sure the skin is completely dry before applying the new bandage.
- Monitor for Infection: Keep an eye on the tattoo for any signs of infection, such as increased redness, swelling, pain, or pus. If you notice any of these symptoms, consult your tattoo artist or a medical professional immediately.
10. Can I Shower With An Ink Sack?
Yes, you can shower with an ink sack, as long as you have a protective bandage like Saniderm in place. Saniderm is waterproof, so it will protect your tattoo from getting wet. However, it’s essential to take a few precautions:
- Keep Showers Short: Limit your showers to 15-20 minutes to prevent the bandage from getting too saturated.
- Avoid Hot Water: Use lukewarm water instead of hot water, as hot water can loosen the adhesive and cause the bandage to come off.
- Gently Pat Dry: After showering, gently pat the bandage dry with a clean towel. Avoid rubbing, as this can irritate the skin.
11. What Should I Avoid Doing While I Have An Ink Sack?
While you have an ink sack, there are several things you should avoid doing to prevent complications and ensure proper healing:
- Do Not Pop the Ink Sack: Popping the ink sack can introduce bacteria into the wound, increasing the risk of infection. It can also damage the healing tissue and lead to scarring.
- Avoid Direct Sunlight: Direct sunlight can fade the ink and damage the healing skin. Keep the tattooed area covered or apply a tattoo-specific sunscreen.
- Do Not Soak the Tattoo: Avoid soaking the tattoo in water, such as swimming, taking baths, or using hot tubs. Soaking can increase the risk of infection and interfere with the healing process.
- Avoid Tight Clothing: Tight clothing can rub against the tattoo, causing irritation and potentially damaging the healing tissue. Wear loose-fitting clothing that allows the area to breathe.
- Do Not Pick or Scratch: Avoid picking or scratching the tattoo, as this can introduce bacteria and disrupt the healing process.
12. When Should I Remove The Protective Sheet?
The timing for removing the protective sheet depends on your tattoo artist’s instructions and the type of bandage used. Here are some general guidelines:
- Saniderm: If you’re using Saniderm, your tattoo artist will likely advise you to remove the first sheet after 24 hours. The second sheet can typically be left on for 3 to 5 days.
- Other Bandages: If you’re using a traditional bandage, your tattoo artist will likely recommend removing it after a few hours.
13. How Do I Remove The Protective Sheet?
Removing the protective sheet should be done carefully to avoid damaging the tattoo. Here’s how to do it:
- Wash Your Hands: Wash your hands thoroughly with soap and water before touching the tattoo.
- Soften the Adhesive: Loosen the adhesive by gently washing the area with warm, soapy water. You can also do this in the shower.
- Peel Gently: Start peeling the bandage from one corner, pulling it slowly and steadily. Avoid ripping it off quickly, as this can damage the skin.
- Wash the Tattoo: Once the bandage is removed, wash the tattoo gently with mild, fragrance-free soap and warm water.
- Pat Dry: Pat the tattoo dry with a clean paper towel.
- Apply Aftercare Ointment: Apply a thin layer of tattoo aftercare ointment to keep the area moisturized.
14. What Is Tattoo Bubbling And How Is It Different From An Ink Sack?
Tattoo bubbling is another phenomenon that can occur during the healing process, and it’s often confused with an ink sack. While both involve fluid accumulation, they are different:
- Tattoo Bubbling: Tattoo bubbling occurs when small bubbles of fluid form directly on the surface of the tattooed skin. This is usually due to moisture being trapped under the skin, often from excessive sweating or exposure to water.
- Ink Sack: An ink sack, as previously described, is a larger accumulation of fluid (plasma and ink) that forms under a protective bandage like Saniderm.
15. How Do I Treat Tattoo Bubbling?
If you experience tattoo bubbling, here’s how to treat it:
- Keep the Area Clean and Dry: Gently wash the tattooed area with mild, fragrance-free soap and warm water. Pat it dry with a clean paper towel.
- Avoid Occlusive Bandages: Discontinue the use of occlusive bandages like Saniderm, as they can trap moisture and worsen the bubbling.
- Allow Air Circulation: Wear loose-fitting clothing that allows air to circulate around the tattoo.
- Apply a Light Moisturizer: If the skin feels dry, apply a thin layer of a light, fragrance-free moisturizer.
- Avoid Excessive Moisture: Avoid activities that cause excessive sweating or exposure to water.
16. What Are The Signs Of An Infected Tattoo?
It’s crucial to be able to recognize the signs of an infected tattoo so you can seek medical attention promptly. Here are some common signs of infection:
- Increased Redness: The area around the tattoo may become excessively red and inflamed.
- Swelling: Significant swelling around the tattoo is another sign of infection.
- Pain: Increased pain or tenderness in the tattooed area can indicate an infection.
- Pus: The presence of pus or cloudy fluid draining from the tattoo is a clear sign of infection.
- Foul Odor: A foul odor emanating from the tattoo can also be a sign of infection.
- Fever: In some cases, an infected tattoo can cause a fever or chills.
If you experience any of these symptoms, consult your tattoo artist or a medical professional immediately.
17. How Can I Prevent A Tattoo Infection?
Preventing a tattoo infection is crucial for ensuring proper healing and preserving the quality of your tattoo. Here are some steps you can take to minimize the risk of infection:
- Choose a Reputable Tattoo Artist: Select a licensed and experienced tattoo artist who follows strict hygiene practices.
- Ensure a Clean Environment: Make sure the tattoo studio is clean and sterile. The artist should use single-use needles and wear gloves.
- Follow Aftercare Instructions: Follow your tattoo artist’s aftercare instructions carefully. This includes keeping the area clean and moisturized.
- Wash Your Hands: Wash your hands thoroughly with soap and water before touching the tattoo.
- Avoid Touching the Tattoo: Avoid touching the tattoo unnecessarily, as this can introduce bacteria.
- Keep the Area Clean: Gently wash the tattoo with mild, fragrance-free soap and warm water 2-3 times a day.
- Apply Aftercare Ointment: Apply a thin layer of tattoo aftercare ointment to keep the area moisturized.
- Avoid Irritants: Avoid using harsh soaps, lotions, or other products that can irritate the skin.
- Protect from Sunlight: Protect the tattoo from direct sunlight by keeping it covered or applying a tattoo-specific sunscreen.
- Avoid Soaking: Avoid soaking the tattoo in water, such as swimming, taking baths, or using hot tubs.
18. What Are The Best Tattoo Aftercare Products To Use?
Choosing the right tattoo aftercare products can significantly impact the healing process. Here are some of the best types of products to use:
- Mild, Fragrance-Free Soap: Use a mild, fragrance-free soap to gently cleanse the tattoo.
- Tattoo Aftercare Ointment: Apply a thin layer of tattoo aftercare ointment to keep the area moisturized. Look for ointments that contain ingredients like:
- Panthenol: Which helps to soothe and hydrate the skin.
- Vitamin E: Which is an antioxidant that promotes healing.
- Tattoo-Specific Sunscreen: Protect the tattoo from direct sunlight by applying a tattoo-specific sunscreen with an SPF of 30 or higher.
- Breathable Bandages: If you’re using bandages, choose breathable options like Saniderm to promote moist wound healing.
19. What Are Some Common Mistakes People Make During Tattoo Aftercare?
Many people make mistakes during tattoo aftercare that can lead to complications and poor healing. Here are some common mistakes to avoid:
- Not Following Instructions: One of the biggest mistakes is not following the tattoo artist’s aftercare instructions.
- Over-Cleaning: Over-cleaning the tattoo can dry out the skin and interfere with the healing process.
- Using Harsh Products: Using harsh soaps, lotions, or other products can irritate the skin and increase the risk of infection.
- Picking or Scratching: Picking or scratching the tattoo can introduce bacteria and disrupt the healing process.
- Applying Too Much Ointment: Applying too much ointment can trap moisture and create a breeding ground for bacteria.
- Exposing to Sunlight: Exposing the tattoo to direct sunlight can fade the ink and damage the healing skin.
- Soaking the Tattoo: Soaking the tattoo in water can increase the risk of infection and interfere with the healing process.
20. What To Do If You Have An Allergic Reaction To Tattoo Ink
An allergic reaction to tattoo ink is rare but can happen. The symptoms can vary from mild to severe. Common symptoms include:
- Itching: Persistent itching at the tattoo site.
- Rash: A red, bumpy rash around the tattoo.
- Swelling: Swelling, especially if it extends beyond the tattoo.
- Hives: Raised, itchy welts on the skin.
- Blisters: Small, fluid-filled blisters.
If you experience any of these symptoms, follow these steps:
- Mild Reactions:
- Antihistamines: Over-the-counter antihistamines like Benadryl can help relieve itching and reduce the rash.
- Topical Corticosteroids: Apply a mild topical corticosteroid cream (like hydrocortisone) to the affected area to reduce inflammation and itching.
- Keep It Clean: Gently wash the tattoo with mild, fragrance-free soap and pat dry.
- Severe Reactions:
- Seek Medical Attention: If you experience severe symptoms such as difficulty breathing, dizziness, or widespread hives, seek immediate medical attention.
- Medical Treatment: A doctor may prescribe stronger antihistamines or corticosteroids. In severe cases, epinephrine might be necessary.
Long-Term Management and Prevention:
- Identify the Allergen: If possible, determine which ink caused the reaction. Red inks are common allergens due to the presence of mercury sulfide.
- Avoid the Allergen: If you get more tattoos in the future, avoid inks containing the allergen.
- Patch Test: Before getting a large tattoo, request a patch test with the inks that will be used.
21. How To Find A Reputable Tattoo Artist In The USA
Finding a reputable tattoo artist is crucial for ensuring a safe and satisfying tattoo experience. Here are some steps to help you find a skilled and trustworthy artist in the USA:
- Online Research:
- Tattoo Studio Websites: Start by researching tattoo studios online. Check their websites for portfolios, artist bios, and customer reviews.
- Social Media: Use social media platforms like Instagram and Facebook to find artists and studios. Many artists showcase their work online, making it easy to see their style and skill level.
- Online Forums: Participate in tattoo-related forums and communities. Ask for recommendations and read about other people’s experiences with different artists.
- Check Portfolios:
- Variety of Styles: Look for artists who demonstrate proficiency in various tattoo styles.
- Cleanliness and Detail: Examine the lines, shading, and overall execution of the tattoos in their portfolio.
- Consistency: Check for consistency in the artist’s work. Ensure their tattoos are well-executed across different designs and placements.
- Read Reviews and Testimonials:
- Google Reviews: Check Google Reviews for feedback on tattoo studios and individual artists.
- Yelp: Use Yelp to read reviews and see ratings for local tattoo parlors.
- Social Media Comments: Pay attention to comments and reviews on the artist’s social media pages.
- Visit Studios:
- Cleanliness: Visit the tattoo studio to assess its cleanliness and hygiene practices.
- Atmosphere: Get a feel for the studio’s atmosphere. A good studio should be welcoming and professional.
- Equipment: Ensure the studio uses autoclaves for sterilizing equipment and disposes of needles properly.
- Consult with Artists:
- Discuss Your Ideas: Schedule consultations with a few different artists to discuss your tattoo ideas.
- Ask Questions: Ask about their experience, techniques, and aftercare procedures.
- Assess Their Approach: Observe how well they listen to your ideas and provide feedback.
- Verify Licensing and Certifications:
- State and Local Regulations: Check if the tattoo artist and studio are licensed and certified by the relevant state and local authorities.
- Health Department: Ensure the studio meets health department standards for safety and hygiene.
22. Legal Considerations for Getting a Tattoo in the USA
Getting a tattoo involves certain legal considerations to ensure safety, consent, and compliance with state and local laws. Here are some key legal aspects to be aware of:
- Age Restrictions:
- Minimum Age: In most states, the minimum age to get a tattoo is 18. This is to ensure that individuals are old enough to provide informed consent.
- Parental Consent: Some states allow individuals under 18 to get a tattoo with parental consent. However, the specific laws vary widely by state.
- Informed Consent:
- Understanding the Risks: Tattoo artists are required to provide clients with information about the risks associated with tattooing, including allergic reactions, infections, and scarring.
- Consent Forms: Clients typically need to sign a consent form acknowledging that they understand the risks and agree to the procedure.
- Licensing and Certification:
- Studio Licensing: Tattoo studios must be licensed by state or local health departments. This ensures that they meet safety and hygiene standards.
- Artist Certification: Tattoo artists may also need to be certified, demonstrating that they have completed the necessary training and education.
- Health and Safety Regulations:
- Sterilization: Studios must use autoclaves to sterilize non-disposable equipment. Single-use needles and other disposable items should be used for each client.
- Hygiene Practices: Artists must follow strict hygiene practices, including washing hands, wearing gloves, and maintaining a clean workspace.
- Location Restrictions:
- Certain Areas: Some states or cities may have restrictions on where tattoo studios can be located, such as prohibiting them near schools or residential areas.
- Liability:
- Artist Liability: Tattoo artists can be held liable for injuries or damages resulting from negligence, such as infections caused by unsanitary practices.
- Client Responsibility: Clients also have a responsibility to follow aftercare instructions to prevent complications.
23. How To Communicate Your Tattoo Ideas To An Artist
Communicating your tattoo ideas effectively to your artist is crucial for ensuring that you get the tattoo you envision. Here’s a step-by-step guide on how to do it:
- Gather Reference Images:
- Collect Examples: Find reference images of tattoos, artwork, or other visuals that represent what you want.
- Show Different Elements: Gather images that show different elements such as style, composition, and color palette.
- Describe Your Concept Clearly:
- Detailed Explanation: Write a detailed description of your tattoo idea.
- Symbolism: If there are specific symbols or elements, explain their significance and why they are important to you.
- Discuss Placement and Size:
- Placement: Discuss where you want the tattoo on your body and why you chose that location.
- Size: Determine the appropriate size for the tattoo based on the design and placement.
- Choose a Style:
- Research Styles: Familiarize yourself with different tattoo styles.
- Select a Style: Choose a style that aligns with your vision.
- Consult with the Artist:
- Schedule a Consultation: Schedule a consultation with the tattoo artist to discuss your ideas in person.
- Be Open to Suggestions: Be open to the artist’s suggestions and expertise.
- Provide All Necessary Information:
- Allergies and Skin Conditions: Inform the artist about any allergies, skin conditions, or medical issues that might affect the tattooing process.
- Review the Design:
- Digital Mock-Up: Before the tattoo session, ask for a digital mock-up of the design placed on a photo of your body.
24. Overcoming The Fear Of Getting A Tattoo
Getting a tattoo can be a thrilling experience, but it’s also normal to feel apprehensive or fearful beforehand. Here’s how you can overcome the fear of getting a tattoo:
- Understand the Process:
- Research: Educate yourself about the tattooing process, including how the tattoo machine works, the inks used, and the sterilization procedures.
- Find a Reputable Artist:
- Check Portfolio: Research tattoo artists and studios to find someone reputable with a strong portfolio and positive reviews.
- Visit the Studio:
- Assess Cleanliness: Visit the tattoo studio to ensure it is clean, well-maintained, and follows strict hygiene practices.
- Bring a Friend:
- Moral Support: Bring a friend with you to your tattoo appointment for moral support.
- Start Small:
- First Tattoo: If you’re nervous about the pain or commitment, consider starting with a small, simple design.
- Breathe and Relax:
- During Session: During the tattoo session, focus on your breathing.
- Remember the Purpose:
- Personal Expression: Remember why you wanted to get the tattoo in the first place.
25. Alternatives To Traditional Tattoos
If you’re interested in body art but hesitant about the permanence or pain of traditional tattoos, several alternatives offer temporary or less invasive options. Here are some popular alternatives to traditional tattoos:
- Temporary Tattoos:
- Decal Tattoos: These are applied to the skin with water. They are inexpensive and easy to apply.
- Henna Tattoos: Henna is a natural dye derived from the henna plant. Traditional henna tattoos are temporary and last for about 1-3 weeks.
- Jagua Tattoos: Jagua is another natural dye that creates temporary tattoos. Jagua tattoos typically appear as a dark blue or black color.
- Airbrush Tattoos:
- Non-Permanent: Airbrush tattoos are applied using an airbrush and stencils.
- Custom Designs: They can be custom-designed and are available in a variety of colors.
- Removable Tattoos:
- Epheremal Tattoos: These tattoos are made with biodegradable ink that is designed to fade completely within 9-15 months.
- Body Painting:
- Creative Expression: Body painting involves using cosmetic-grade paints to create designs on the skin.
- Temporary Art: Body painting is temporary and easily washed off.
- Skin Art:
- Skin Markers: Skin art involves using markers designed for use on the skin to create temporary designs.
By understanding these options, you can find a method of body art that aligns with your preferences and comfort level.
Navigating the world of tattoos can be daunting, but tattooat.com is here to help! Whether you’re seeking inspiration for your next piece, searching for a talented artist in the USA, or need guidance on aftercare, tattooat.com is your ultimate resource.
Ready to start your tattoo journey? Visit tattooat.com today and discover a world of artistic expression, expert advice, and a community of passionate ink enthusiasts. Find your perfect design, connect with top artists, and learn everything you need to know to make your tattoo experience unforgettable!
Address: 1825 SW Broadway, Portland, OR 97201, United States.
Phone: +1 (503) 725-3000
Website: tattooat.com
FAQ About Ink Sack Tattoos
1. Is it normal for my tattoo to leak fluid?
Yes, it’s normal for a new tattoo to leak fluid, which is typically plasma mixed with ink. This fluid can accumulate under a protective bandage, forming an ink sack.
2. Can an ink sack get infected?
While the ink sack itself isn’t an infection, it can become infected if bacteria enter the area. Proper aftercare is crucial to prevent infections.
3. Should I pop the ink sack?
No, you should never pop an ink sack. Popping it can introduce bacteria and increase the risk of infection.
4. How long does it take for a tattoo to fully heal?
A tattoo typically takes 2 to 4 weeks to heal on the surface, but the deeper layers of the skin may take as long as 6 months to fully regenerate.
5. Can I go swimming with a new tattoo?
No, you should avoid swimming with a new tattoo, as soaking it in water can increase the risk of infection.
6. What kind of soap should I use to wash my tattoo?
Use a mild, fragrance-free soap to gently wash your tattoo. Avoid using harsh soaps, as they can irritate the skin.
7. How often should I moisturize my tattoo?
Moisturize your tattoo 2-3 times a day with a thin layer of tattoo aftercare ointment.
8. Can I wear tight clothing over my tattoo?
Avoid wearing tight clothing over your tattoo, as it can rub against the skin and cause irritation.
9. What should I do if my tattoo is itchy?
Avoid scratching your tattoo, as this can disrupt the healing process. Instead, apply a thin layer of tattoo aftercare ointment to soothe the itch.
10. How can I protect my tattoo from the sun?
Protect your tattoo from direct sunlight by keeping it covered or applying a tattoo-specific sunscreen with an SPF of 30 or higher.