So, you’re thinking about getting a tattoo sleeve? That’s awesome! Before you book your appointment, let’s walk through everything you need to consider, from the initial design ideas to the tattooing process and crucial aftercare. Understanding these key steps will set you up for a tattoo sleeve you’ll be proud to show off for years to come.
Many guys get caught up in common mistakes and misunderstandings when planning a sleeve. I want to share these insights with you so you can approach your own tattoo sleeve with knowledge and confidence.
Design Phase Rules: Setting the Foundation for Your Sleeve
First and Foremost: Go Big or Go Home. Don’t do things by halves. Aim for an epic tattoo sleeve that you’ll love for a lifetime. Your arms are prime real estate for tattoos, often on display, so make them count.
Take Your Time with the Design. Rushing the design process is the biggest mistake you can make. This is the blueprint of your sleeve. If you hurry through this stage, you might end up regretting design choices later and wondering what you were thinking.
Come Prepared with Ideas. Don’t approach a tattoo artist about a sleeve if you’re unsure what you want. Starting a sleeve with a vague idea and expecting to add elements as you go disrupts the overall design flow. A sleeve is a cohesive piece of art.
Think of your arm as a single canvas, and envision the entire artwork coming together as a unified piece, not just a collection of random tattoos. This leads to the next point…
Ensure Subject Matter Harmony. Your entire sleeve should ideally follow a consistent theme, like mythology, nature, or abstract art. If not a strict theme, at least choose subjects that complement each other visually, creating good contrast and flow, such as traditional skulls and roses or geometric patterns with organic elements.
Avoid Overcrowding Your Sleeve. Resist the urge to cram in every single idea you have. Too many elements can make your sleeve look cluttered and messy – a visual jumble. A good approach is to break down the arm into sections: outer bicep, outer forearm, inner bicep, inner forearm, and then use filler pieces to smoothly connect everything.
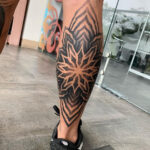
Respect the Canvas Size. It’s easy to underestimate the area you’re working with, especially with leg sleeves, which are significantly larger than arm sleeves. More space means more sessions and potentially larger individual tattoo pieces. Even with arm sleeves, remember the back of your bicep – it’s a substantial area often overlooked but perfect for incorporating into the design.
Be Realistic About Inspiration. Don’t bring in photos of incredible sleeves done by famous artists unless you’re prepared to invest the same level of budget and time as the clients in those photos. High-quality, extensive tattoo sleeves are a significant investment of both time and money. If you want something comparable, be ready for a similar commitment. Remember, you truly get what you pay for, and great tattoos take time to create.
Strategic Placement: Don’t Start on the Inner Forearm. This is a crucial point. When someone looks at your sleeve, they primarily see the outside of your arm. This outer area is your prime visual real estate and should form the core of your sleeve design. Starting with an inner forearm piece compromises this valuable space.
Imagine drawing a circle on your inner forearm where a tattoo would go. Now, look at your arm from the front. You’ll see that circle extends onto the outer forearm. Any subsequent tattoo on the outer forearm would need to be designed around this pre-existing inner forearm piece. It’s a more effective design strategy to establish the outer forearm piece first and let the rest of the sleeve develop from that foundation.
If you’re hesitant about starting on your outer arm, it might indicate that you’re not fully ready to commit to a complete sleeve.
For leg sleeves, a similar issue arises when starting with shin pieces, which can encroach on the prime calf area.
Consider Your Skin Condition. Be honest about your skin health. If you work outdoors and your outer forearm is heavily sun-damaged, extremely detailed tattoos might not heal well in that area and could appear messy over time. For sun-damaged skin, consider tattoo styles that are less detail-intensive, more open in design, and rely on strong contrast.
Areas like hands and knees can also be problematic. Some people’s knees, for example, don’t hold tattoo ink well.
Design with Your Body’s Shape, Not Against It. Your body isn’t a flat surface. Muscle definition and contours will affect how a tattoo looks. For instance, a portrait placed incorrectly across a bicep might distort facial features as the muscle moves. Work with your body’s natural shape to enhance the tattoo’s appearance, not fight against it.
Don’t Cut Corners on Cost. This is a tattoo you’ll have for life. Don’t choose an artist or a design based solely on price. Think of it like this: imagine your first car was the only car you could ever own. Would you want it to be the cheapest, most unreliable option? Your tattoo sleeve is a similar long-term investment. If you can’t afford the high-quality sleeve you truly want right now, it’s better to save up and wait until you can commit to the level of artistry you deserve.
Instead of getting your sleeve done piecemeal over a long period, it’s generally better to save until you can afford to get it done in a series of consecutive sessions. This approach is more efficient and yields a more cohesive result.
Tattoo Execution Phase Rules: During Your Sessions
Avoid Mid-Sleeve Changes of Heart. Once the design and plan are set, stick to it. Changing your mind halfway through a sleeve project is disruptive and impractical. Think of it like a house renovation: you wouldn’t ask for major structural changes when the project is nearing completion. Tattooing is a similar commitment.
Finish Strong: Sleeves to the Shoulder. Arm sleeves that stop short of the shoulder often look incomplete. For the best visual impact, extend your sleeve to the top of your shoulder. Be aware that the shoulder area can bleed more and may be more painful than other areas. It’s worth it for the finished look, though!
Leg sleeves are a bit more flexible. Stopping at the lower leg or just above the shorts line can still look complete.
Healing Phase Rules: Protecting Your Investment
Don’t Skimp on Aftercare. You’ve invested time, pain, and money into your sleeve. Proper aftercare is non-negotiable. A tattoo is essentially an open wound and needs diligent care to heal correctly and look its best. Follow your artist’s aftercare instructions precisely.
Maintain Session Continuity. Avoid long gaps between tattoo sessions for a sleeve. Continuing a sleeve project a year or two later is not ideal. The existing tattoo might have faded, requiring touch-ups to match the fresh sections, adding extra cost. Plus, from the artist’s perspective, resuming a long-delayed project isn’t as creatively engaging as working on a continuous piece.
My Approach to Creating Arm Sleeves
For me, arm sleeves are significant projects, and I treat them as such. Each sleeve involves considerable thought, planning, and collaboration to achieve a stunning final result.
Whenever possible, I schedule clients for consecutive days – ideally 2, 3, or 4 days. If a client is new to extensive tattooing and unsure about their tolerance, I usually recommend a two-day initial session.
Day one typically starts with finalizing the design, focusing on the outer arm. I aim to create a unified composition across this area, using either interacting subjects, complementary elements, contrasting themes, or a single large-scale piece. This initial outer arm design sets the tone and cohesion for the entire sleeve.
Once the design is stenciled onto the skin, we begin the tattooing process.
For a full arm sleeve, we often reach the shoulder area around day 3 or 4, which, as mentioned, can be more prone to bleeding. If a client opts for a two-day session initially, we’ll hold off on tattooing the shoulder until their next session to ensure we’re working on fresh skin in that sensitive area, rather than tattooing it at the end of a multi-day session when the skin might be more fatigued. For leg sleeves, the thigh area can present a similar challenge.
Typically, tattooing the outer arm takes me 3-4 days, and the outer lower leg takes about 2 days. However, timing always depends on factors like design complexity, skin type, and size. Highly detailed or color-rich designs will naturally require more time.
Ready to start planning your tattoo sleeve? Send me a booking enquiry and let’s bring your vision to life.
You might also find these posts helpful:
Want the best realism tattoo possible? Read these tips
How to get a tattoo you won’t regret
How to find the best tattoo reference images