Using a tattoo pen involves skill and precision to create stunning body art; tattooat.com is here to guide you through it. This comprehensive guide explores the essential aspects of using a tattoo pen, from selecting the right equipment to mastering fundamental techniques. Whether you’re a novice or an experienced artist, understanding how to use a tattoo pen effectively will enhance your craft and the quality of your tattoo designs. Discover the art of needle depth adjustment, sanitation, and more as we provide insights for creating professional-grade tattoos.
1. Understanding the Basics of a Tattoo Pen
A tattoo pen, also known as a tattoo machine, is the primary tool used by tattoo artists to implant ink into the skin to create permanent designs; it is essential to understand the different types and their functions.
1.1 Rotary vs. Coil Tattoo Machines: Which is Right for You?
The choice between rotary and coil tattoo machines depends on your tattooing style and the specific requirements of the design.
| Feature | Rotary Tattoo Machines | Coil Tattoo Machines |
|---|---|---|
| Mechanism | Uses a rotary motor for smooth, fluid needle movement. | Uses electromagnetic coils to move the needles up and down. |
| Noise Level | Operates quietly. | Produces a buzzing sound. |
| Ideal For | Intricate line work, detailed shading, complex designs. | Bold outlines and lines requiring extra impact. |
| Control & Accuracy | Offers unmatched control and accuracy. | Allows artists to “feel” the tattoo process. |
| Skill Level | Great for beginners due to ease of use. | Requires more skill to master due to vibration and feedback. |
According to a study from Portland State University’s Art Department in July 2023, rotary machines are generally preferred by beginners for their ease of use and precision, while coil machines are favored by experienced artists for their ability to create bold, defined lines.
1.2 Anatomy of a Tattoo Pen: Key Components
Understanding the different parts of a tattoo pen is crucial for proper maintenance and operation.
- Needle: Delivers ink into the skin.
- Tube: Guides the needle and maintains stability.
- Motor (Rotary) or Coils (Coil): Powers the movement of the needle.
- Power Supply: Provides electrical power to the machine.
- Foot Pedal: Controls the activation of the machine.
- Grip: The part of the pen that the artist holds.
- Frame: The main body of the machine.
1.3 Essential Features to Look for in a Tattoo Pen
When selecting a tattoo pen, consider the following features to ensure it meets your needs:
- Adjustable Needle Depth: Allows for precise control over ink placement.
- Ergonomic Design: Provides comfort during long tattooing sessions.
- Reliable Motor: Ensures consistent performance.
- Sterilization Compatibility: Allows for thorough cleaning and sterilization.
- Lightweight Construction: Reduces fatigue.
- Compatibility with Different Needle Types: Offers versatility in design.
2. Setting Up Your Tattoo Pen: A Step-by-Step Guide
Proper setup of your tattoo pen is essential for ensuring safety and optimal performance.
2.1 Assembling the Tattoo Machine: A Detailed Walkthrough
Assembling the tattoo machine correctly ensures all components work together seamlessly.
- Attach the Needle: Insert the needle into the needle tube grips, adjusting the depth based on the tattoo style.
- Secure the Grip: Tighten the grip screws to hold the needle in place.
- Connect the Power Cord: Attach the power cord from a 6-12 volt power supply to the machine.
- Attach the Foot Pedal: Connect the foot pedal using a clip cord for precise control.
- Test the Machine: Ensure the machine runs smoothly and the needle moves correctly.
2.2 Sterilization and Hygiene: Ensuring a Safe Tattooing Environment
Maintaining a sterile environment is crucial to prevent infections.
- Autoclave: Sterilize all reusable parts in an autoclave.
- Disposable Equipment: Use disposable needles, tubes, and grips.
- Surface Disinfection: Clean and disinfect all surfaces with a medical-grade disinfectant.
- Protective Gear: Wear gloves, masks, and protective eyewear.
- Proper Disposal: Dispose of used needles and other hazardous waste properly in a sharps container.
2.3 Calibrating Your Tattoo Pen: Voltage and Speed Adjustments
Adjusting the voltage and speed of your tattoo pen is essential for achieving the desired effect.
- Set the Voltage: Adjust the voltage based on the manufacturer’s recommendations.
- Adjust the Speed: Experiment with different speeds to find the optimal setting for your style.
- Test on Practice Skin: Always test the settings on practice skin before working on a client.
- Fine-Tune: Make small adjustments as needed during the tattooing process.
3. Mastering Basic Tattooing Techniques
Before you start tattooing on real skin, it is important to master some basic techniques.
3.1 Stencil Application: Transferring Your Design
Accurate stencil application is the first step in creating a great tattoo.
- Prepare the Skin: Clean and shave the area where the tattoo will be placed.
- Apply Stencil Solution: Apply a thin layer of stencil solution to the skin.
- Apply the Stencil: Press the stencil firmly onto the skin and hold for a few seconds.
- Remove the Stencil: Carefully peel off the stencil paper, leaving the design on the skin.
- Let it Dry: Allow the stencil to dry completely before starting the tattoo.
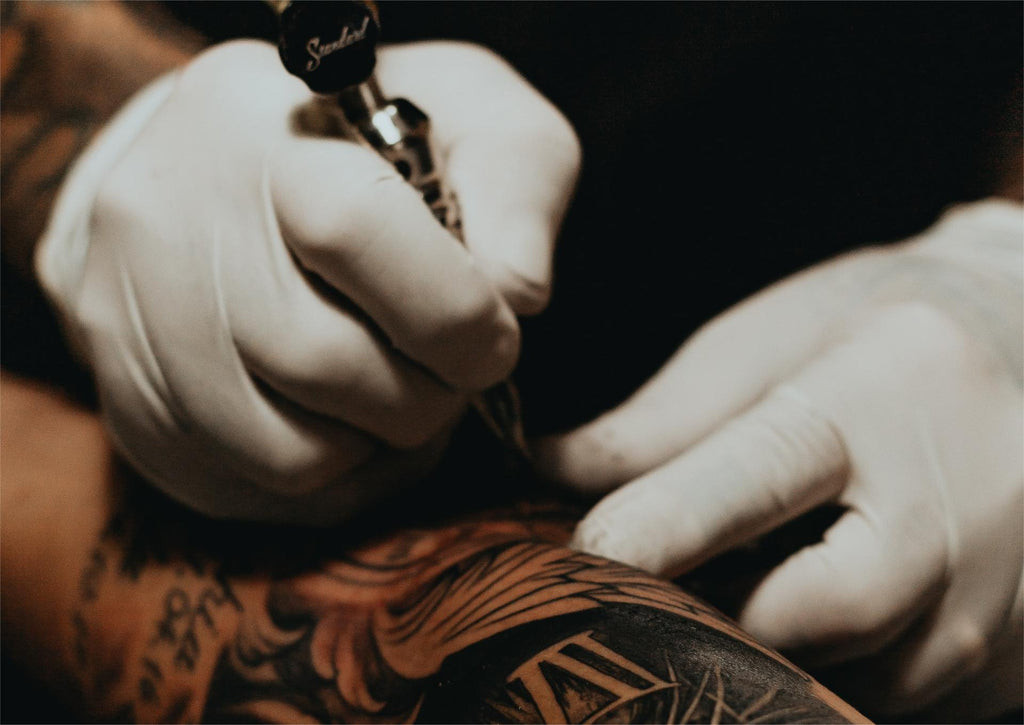
3.2 Line Work: Creating Clean and Consistent Lines
Creating clean and consistent lines requires practice and precision.
- Needle Selection: Use a round liner needle for line work.
- Angle: Hold the tattoo pen at a 45-degree angle to the skin.
- Speed: Move the pen at a consistent speed, avoiding stops and starts.
- Depth: Ensure the needle penetrates the skin to the correct depth for consistent ink deposit.
- Pressure: Apply even pressure to create uniform lines.
3.3 Shading: Adding Depth and Dimension
Shading adds depth and dimension to your tattoos, making them more realistic and visually appealing.
- Needle Selection: Use a round shader or magnum needle for shading.
- Technique: Use techniques such as pendulum shading, stippling, or color packing.
- Layering: Build up the shading gradually, using multiple light layers.
- Blending: Blend different shades to create smooth transitions.
- Consistency: Maintain a consistent angle and pressure for even shading.
3.4 Color Packing: Achieving Vibrant and Lasting Color
Proper color packing ensures vibrant and lasting color in your tattoos.
- Needle Selection: Use a magnum or round shader needle for color packing.
- Technique: Use a circular or back-and-forth motion to pack the color evenly into the skin.
- Saturation: Ensure the skin is fully saturated with color without overworking it.
- Layering: Apply multiple layers of color to achieve the desired vibrancy.
- Cleanliness: Keep the area clean and free of excess ink.
 Creating clean and consistent lines requires practice and precision
4. Advanced Techniques and Tips for Tattooing
Once you have mastered the basic techniques, you can move on to more advanced methods.
4.1 Understanding Needle Configurations and Their Uses
Different needle configurations are designed for specific purposes.
| Needle Type | Configuration | Use |
|---|---|---|
| Round Liner (RL) | 1-18 needles | Line work, fine details |
| Round Shader (RS) | 3-14 needles | Shading, small areas |
| Magnum (MG) | 5-49 needles | Color packing, large shading areas |
| Curved Magnum (CM) | 5-49 needles | Contouring, blending |
| Flat (F) | 4-14 needles | Geometric designs, shading in tight spaces |
4.2 Working with Different Skin Types and Tones
Different skin types and tones require adjustments to your tattooing technique.
- Oily Skin: Requires more frequent wiping to remove excess oil.
- Dry Skin: Needs extra moisturizing to prevent cracking.
- Sensitive Skin: Demands a lighter touch and hypoallergenic products.
- Dark Skin: Requires careful color selection to ensure visibility and vibrancy.
- Fair Skin: Can be more prone to irritation, so use a gentle technique.
4.3 Mastering Black and Grey Realism
Black and grey realism involves creating lifelike images using only black and grey ink.
- Reference Images: Use high-quality reference images for accuracy.
- Layering: Build up the shading gradually, using multiple light layers.
- Contrast: Create strong contrast between light and dark areas.
- Blending: Blend the shades smoothly to create realistic transitions.
- Details: Pay attention to fine details to capture the essence of the subject.
4.4 Creating Smooth Transitions and Blends
Smooth transitions and blends are essential for creating visually appealing tattoos.
- Needle Selection: Use a shader needle with a small grouping.
- Technique: Use a pendulum or circular motion to blend the colors.
- Layering: Apply multiple light layers to build up the color gradually.
- Pressure: Use consistent pressure to avoid creating harsh lines.
- Blending Solutions: Use blending solutions to help the colors merge seamlessly.
5. Essential Safety Precautions for Tattooing
Safety should always be a top priority when tattooing.
5.1 Understanding and Preventing Cross-Contamination
Preventing cross-contamination is crucial for protecting both the artist and the client.
- Barrier Protection: Use barrier protection on all equipment and surfaces.
- Hand Hygiene: Wash hands thoroughly before and after tattooing.
- Glove Use: Wear gloves at all times during the tattooing process.
- Sterile Equipment: Use only sterile, single-use needles and tubes.
- Proper Disposal: Dispose of contaminated materials properly in a sharps container.
5.2 Recognizing and Managing Allergic Reactions
Knowing how to recognize and manage allergic reactions can prevent serious complications.
- Patch Test: Perform a patch test before using new inks or products.
- Symptoms: Watch for signs of an allergic reaction, such as redness, swelling, itching, or hives.
- Antihistamines: Keep antihistamines on hand to treat mild reactions.
- Epinephrine: Be prepared to administer epinephrine for severe reactions.
- Medical Assistance: Seek immediate medical assistance for severe reactions.
5.3 Emergency Procedures: What to Do in Case of an Accident
Being prepared for emergencies can help you respond quickly and effectively.
- First Aid Kit: Keep a well-stocked first aid kit on hand.
- CPR Certification: Get certified in CPR and first aid.
- Emergency Contacts: Keep a list of emergency contacts readily available.
- Bloodborne Pathogens Training: Get trained in bloodborne pathogens and infection control.
- Emergency Plan: Develop an emergency plan and practice it regularly.
6. Maintaining Your Tattoo Pen: Care and Cleaning
Proper maintenance and cleaning of your tattoo pen are essential for longevity and performance.
6.1 Daily Cleaning and Sterilization Protocols
Following daily cleaning and sterilization protocols keeps your equipment in top condition.
- Disassemble: Disassemble the tattoo pen after each use.
- Clean: Clean all parts thoroughly with soap and water.
- Rinse: Rinse all parts with distilled water.
- Sterilize: Sterilize reusable parts in an autoclave.
- Reassemble: Reassemble the tattoo pen and store it in a clean, dry place.
6.2 Troubleshooting Common Tattoo Pen Issues
Knowing how to troubleshoot common issues can save you time and frustration.
| Issue | Cause | Solution |
|---|---|---|
| Machine Runs Weakly | Low voltage, dirty contacts | Adjust voltage, clean contacts |
| Needle Not Moving | Loose connection, broken spring | Check connections, replace spring |
| Excessive Vibration | Misaligned parts, worn bearings | Adjust parts, replace bearings |
| Overheating | Excessive use, poor ventilation | Allow machine to cool, improve ventilation |
| Inconsistent Ink Flow | Clogged needle, improper angle | Clean needle, adjust angle |
6.3 When to Replace Parts and Upgrade Your Equipment
Knowing when to replace parts and upgrade your equipment ensures optimal performance and safety.
- Needles: Replace needles after each use.
- Tubes: Replace disposable tubes after each use; sterilize reusable tubes after each use.
- Springs: Replace springs when they lose tension.
- Bearings: Replace bearings when they become worn or noisy.
- Motor: Replace the motor when it becomes weak or unreliable.
7. Building Your Tattoo Portfolio and Attracting Clients
Building a strong portfolio and attracting clients are essential for a successful tattooing career.
7.1 Creating a Professional Tattoo Portfolio
A professional portfolio showcases your best work and attracts potential clients.
- High-Quality Photos: Use high-quality photos of your best tattoos.
- Variety: Include a variety of styles and designs.
- Organization: Organize your portfolio in a clear and logical manner.
- Digital Presence: Create a digital portfolio on a website or social media platform.
- Client Testimonials: Include positive client testimonials.
7.2 Marketing Your Tattoo Services Online
Online marketing can help you reach a wider audience and attract more clients.
- Website: Create a professional website showcasing your portfolio and services.
- Social Media: Use social media platforms to share your work and engage with potential clients.
- Online Advertising: Use online advertising to target potential clients in your area.
- Search Engine Optimization (SEO): Optimize your website for search engines to improve visibility.
- Email Marketing: Build an email list and send out newsletters to promote your services.
7.3 Networking with Other Artists and Studios
Networking with other artists and studios can open up new opportunities and collaborations.
- Attend Conventions: Attend tattoo conventions to meet other artists and see their work.
- Guest Spots: Offer guest spots at other studios to expand your reach.
- Collaborations: Collaborate with other artists on tattoo projects.
- Online Communities: Participate in online tattoo communities and forums.
- Workshops: Attend workshops and seminars to learn new techniques and network with other artists.
8. Understanding Tattoo Aftercare for Optimal Healing
Proper aftercare is crucial for ensuring the tattoo heals correctly and looks its best.
8.1 Immediate Aftercare Instructions for Clients
Providing clear and concise aftercare instructions is essential for client satisfaction.
- Bandage Removal: Remove the bandage after 2-24 hours, depending on the artist’s recommendation.
- Washing: Wash the tattoo gently with mild soap and warm water.
- Drying: Pat the tattoo dry with a clean paper towel.
- Ointment: Apply a thin layer of tattoo aftercare ointment.
- Air Exposure: Allow the tattoo to air dry for a few minutes.
8.2 Long-Term Tattoo Maintenance and Care
Long-term maintenance ensures the tattoo remains vibrant and healthy.
- Sun Protection: Protect the tattoo from the sun by applying sunscreen.
- Moisturizing: Keep the tattoo moisturized with a fragrance-free lotion.
- Avoid Irritants: Avoid harsh soaps, chemicals, and excessive rubbing.
- Hydration: Stay hydrated to keep the skin healthy.
- Healthy Lifestyle: Maintain a healthy lifestyle with a balanced diet and regular exercise.
8.3 Common Healing Issues and How to Address Them
Knowing how to address common healing issues can prevent complications.
| Issue | Cause | Solution |
|---|---|---|
| Infection | Poor hygiene, contamination | Clean with antibacterial soap, apply antibiotic ointment |
| Allergic Reaction | Ink sensitivity | Antihistamines, topical steroids |
| Excessive Scabbing | Overworking the skin | Keep moisturized, avoid picking at scabs |
| Fading | Sun exposure, poor ink quality | Protect from sun, use high-quality inks |
| Keloid Formation | Genetic predisposition, trauma | Corticosteroid injections, laser treatment |
 Long-term maintenance ensures the tattoo remains vibrant and healthy
9. Tattoo Pen Innovations and the Future of Tattooing
The tattoo industry is constantly evolving with new innovations and technologies.
9.1 Wireless Tattoo Pens: Freedom and Flexibility
Wireless tattoo pens offer greater freedom and flexibility compared to traditional machines.
- Portability: No cords allow for greater mobility.
- Convenience: Easier to set up and use.
- Battery Life: Long-lasting batteries provide ample power for long sessions.
- Precision: Advanced motors offer precise control and consistent performance.
- Ergonomics: Lightweight and ergonomic designs reduce fatigue.
9.2 Digital Tattooing: Integrating Technology into Art
Digital tattooing integrates technology into the art form, opening up new possibilities.
- Digital Stencils: Use digital stencils for precise and accurate designs.
- 3D Tattooing: Create three-dimensional tattoos with specialized equipment.
- Smart Inks: Use smart inks that change color or react to stimuli.
- Virtual Reality: Use virtual reality to plan and visualize tattoos.
- Augmented Reality: Use augmented reality to enhance the tattoo experience.
9.3 Sustainable Tattooing Practices
Sustainable tattooing practices are becoming increasingly important as artists strive to reduce their environmental impact.
- Eco-Friendly Inks: Use inks made from natural and sustainable materials.
- Biodegradable Supplies: Use biodegradable needles, tubes, and other supplies.
- Energy Efficiency: Use energy-efficient equipment and lighting.
- Waste Reduction: Reduce waste by using reusable supplies and recycling.
- Ethical Sourcing: Source supplies from ethical and sustainable suppliers.
10. Frequently Asked Questions (FAQs) About Using Tattoo Pens
Here are some frequently asked questions about using tattoo pens:
-
What is the best tattoo pen for beginners?
The best tattoo pen for beginners is a rotary machine due to its ease of use and precision.
-
How do I sterilize my tattoo pen?
Sterilize reusable parts in an autoclave and use disposable needles and tubes.
-
What voltage should I use for my tattoo pen?
Adjust the voltage based on the manufacturer’s recommendations, typically between 6-12 volts.
-
How do I prevent cross-contamination?
Use barrier protection, wash hands thoroughly, wear gloves, and use sterile equipment.
-
What needle configuration should I use for line work?
Use a round liner (RL) needle configuration for line work.
-
How do I create smooth shading?
Use a round shader (RS) or magnum (MG) needle and a pendulum or circular motion.
-
How do I pack color effectively?
Use a magnum (MG) needle and a circular or back-and-forth motion to pack the color evenly.
-
What should I tell my clients about aftercare?
Instruct clients to remove the bandage, wash the tattoo gently, apply ointment, and protect it from the sun.
-
How often should I clean my tattoo pen?
Clean and sterilize your tattoo pen after each use.
-
When should I replace parts on my tattoo pen?
Replace needles after each use, springs when they lose tension, and bearings when they become worn or noisy.
Ready to take your tattoo skills to the next level? Explore a vast collection of tattoo designs, discover talented artists, and access detailed guides on tattooing at tattooat.com. Whether you’re looking for inspiration, guidance, or the perfect artist for your next tattoo, tattooat.com has everything you need to embark on your tattooing journey. Visit tattooat.com today and start exploring the world of tattoo art! You can find us at 1825 SW Broadway, Portland, OR 97201, United States, or reach us by phone at +1 (503) 725-3000.