How To Put On A Tattoo Stencil? This is a crucial skill for any tattoo artist aiming to create stunning body art, and tattooat.com is here to help you master it. Proper stencil application ensures your tattoo design transfers accurately and stays put, allowing for precise and confident inking. Explore this guide for expert tips and techniques to elevate your stencil game. Achieve perfect tattoo placements, seamless transfers, and long-lasting tattoo designs.
1. Why Is Mastering How To Put On A Tattoo Stencil Important?
Mastering how to put on a tattoo stencil is vital because the stencil acts as the blueprint for your artwork. A well-applied stencil ensures accurate design transfer, saves time, and reduces errors during the tattooing process. With the right stencil techniques, you can guarantee client satisfaction and achieve professional-quality results. Think of a building blueprint, the stencil is the guideline for your design!
- Accuracy: A precise stencil ensures the final tattoo matches the intended design.
- Efficiency: Proper stencil application saves time and minimizes the need for corrections.
- Professionalism: A well-applied stencil reflects your commitment to quality and client satisfaction.
2. What Are The Essential Tools And Materials For Tattoo Stencil Application?
Knowing the right tools and materials are key for applying a tattoo stencil to the skin. You’ll need:
- Tattoo Stencil Paper: Thermal or hectograph paper, depending on your transfer method.
- Thermal Copier (for thermal paper): To transfer your design onto the stencil paper.
- Stencil Transfer Solution: To help the stencil adhere to the skin.
- Skin Prep Solution: To clean and prepare the skin for stencil application.
- Gloves: To maintain hygiene and prevent contamination.
- Lint-Free Wipes: To clean the skin and remove excess solution.
- Razor: To remove hairs from the area (if needed).
- Marker (optional): For touch-ups or adjustments to the stencil.
3. What Types Of Tattoo Stencil Paper Should Be Used?
Choosing the right type of tattoo stencil paper is the initial step for an accurate design transfer. The two main types are thermal and hectograph paper.
- Thermal Stencil Paper: Requires a thermal copier to transfer the design. It is ideal for detailed and intricate designs. Thermal paper uses heat to transfer the image onto the stencil sheet.
- Hectograph Stencil Paper: Suitable for manual tracing. It may require reapplication of a stencil solution for complex designs. Hectograph paper involves manually tracing the design onto the stencil sheet using a pen or stylus.
According to research from Portland State University’s Art Department, in July 2025, thermal stencil paper is the most popular choice among tattoo artists due to its accuracy and ease of use.
4. How To Choose The Right Tattoo Stencil Transfer Solution?
Selecting the right tattoo stencil transfer solution is key to ensuring the stencil adheres well to the skin and stays in place during the tattooing process. There are several popular options available, each with its own benefits:
- Stencil Stuff: A popular choice known for its reliability and long-lasting hold. According to Inked Magazine, Stencil Stuff is favored by many professional tattoo artists.
- Electrum Stencil Primer: Another well-regarded option, known for its clear transfer and skin-friendly formula.
- Spirit Transfer Cream: A classic choice that provides a strong, clear transfer.
- Green Soap: A traditional option that cleans and preps the skin while aiding in stencil transfer.
When choosing a stencil transfer solution, consider the following factors:
- Skin Sensitivity: Opt for a hypoallergenic formula to minimize the risk of irritation.
- Transfer Quality: Look for a solution that provides a clear, crisp transfer.
- Longevity: Choose a product that ensures the stencil stays in place throughout the tattooing process.
5. What Are The Steps To Prepare The Skin Before Applying A Tattoo Stencil?
Prepping the skin correctly is a critical step in ensuring the tattoo stencil adheres properly and the resulting tattoo is clean and precise.
- Clean the Skin: Thoroughly clean the area with soap and water to remove dirt, oils, and debris.
- Shave the Area: If necessary, shave the area to remove any hair that could interfere with the stencil.
- Apply Skin Prep Solution: Use a skin prep solution (such as alcohol or a specialized product) to further cleanse and dehydrate the skin.
- Dry the Skin: Ensure the skin is completely dry before applying the stencil transfer solution.
6. How Much Stencil Transfer Solution Should You Apply?
Applying the right amount of stencil transfer solution is crucial for a successful transfer. Too little solution may result in a weak or incomplete transfer, while too much can cause smudging or blurring. Apply a thin, even layer of stencil transfer solution to the prepared skin. The skin should be slightly tacky but not overly wet. Allow the solution to sit for a few seconds before applying the stencil.
7. What Is The Best Technique For Applying The Tattoo Stencil To The Skin?
Applying the stencil correctly ensures a clean and accurate transfer of the design onto the skin.
- Position the Stencil: Carefully position the stencil on the desired area of the skin.
- Apply Pressure: Gently press the stencil onto the skin, ensuring even contact across the entire design.
- Hold in Place: Hold the stencil in place for 1-2 minutes to allow the transfer to occur.
- Peel Off Slowly: Slowly and carefully peel the stencil paper away from the skin, starting at one corner.
- Check the Transfer: Inspect the transferred design to ensure it is clear, complete, and accurately placed.
8. What Are Common Mistakes To Avoid When Applying A Tattoo Stencil?
Avoiding common mistakes can prevent issues with the stencil transfer and ensure a smoother tattooing process. Here are some mistakes to watch out for:
- Using Too Much Stencil Solution: This can cause the stencil to smudge or blur.
- Not Cleaning the Skin Properly: Dirt and oils can prevent the stencil from adhering correctly.
- Moving the Stencil During Application: This can result in a distorted or incomplete transfer.
- Peeling the Stencil Too Quickly: This can cause the design to lift or tear.
- Ignoring Skin Sensitivity: Using harsh products on sensitive skin can cause irritation.
9. How To Troubleshoot Stencil Application Problems?
Even with careful preparation, stencil application problems can arise. Here are some common issues and how to address them:
- Stencil Not Sticking:
- Problem: The stencil isn’t adhering to the skin.
- Solution: Ensure the skin is thoroughly cleaned and dry. Use a quality stencil transfer solution and apply even pressure.
- Stencil Smudging:
- Problem: The stencil is smudging or blurring.
- Solution: Use less stencil transfer solution. Ensure the skin is not overly wet. Avoid moving the stencil during application.
- Incomplete Transfer:
- Problem: Parts of the design are not transferring to the skin.
- Solution: Ensure the stencil is making full contact with the skin. Apply firm, even pressure. Use a fresh stencil.
- Stencil Fading:
- Problem: The stencil is fading quickly after application.
- Solution: Use a long-lasting stencil transfer solution. Avoid excessive wiping or rubbing of the area.
10. What Are The Best Practices For Maintaining A Tattoo Stencil During Tattooing?
Maintaining the stencil during the tattooing process is essential for keeping the design clear and accurate. Here are some best practices:
- Avoid Over-Wiping: Wipe the area gently to avoid removing the stencil.
- Use Stencil Sealants: Consider using a stencil sealant to prolong the life of the stencil.
- Touch-Ups: Use a skin-safe marker to touch up any areas of the stencil that fade or smudge.
- Proper Lighting: Ensure adequate lighting to see the stencil clearly.
- Take Breaks: Take breaks to rest your eyes and hands, reducing the risk of errors.
11. How To Remove A Tattoo Stencil Safely?
Removing a tattoo stencil safely and effectively is an important final step in the stencil application process. Once the tattoo is complete, gently wipe away any remaining stencil marks with a tattoo wipe or a mild antiseptic solution. Avoid harsh scrubbing, as this can irritate the newly tattooed skin. Ensure all traces of the stencil are removed to prevent any potential interference with the healing process.
12. What Are The Best Tattoo Aftercare Practices To Protect The Stencil Area?
Proper tattoo aftercare is crucial for protecting the stencil area and promoting healing. Advise your clients to follow these practices:
- Keep it Clean: Gently wash the tattooed area with mild soap and water.
- Apply Aftercare Ointment: Use a recommended aftercare ointment to keep the skin moisturized.
- Avoid Sun Exposure: Protect the tattoo from direct sunlight to prevent fading.
- Stay Hydrated: Drink plenty of water to keep the skin hydrated and promote healing.
- Avoid Scratching: Refrain from scratching or picking at the tattoo.
13. How Can You Practice and Improve Your Tattoo Stencil Application Skills?
Practice is essential for improving your tattoo stencil application skills. Here are some ways to hone your technique:
- Practice on Fake Skin: Use practice skin to experiment with different stencil application techniques.
- Seek Feedback: Ask experienced tattoo artists for feedback on your stencil application.
- Attend Workshops: Participate in workshops or seminars to learn new tips and tricks.
- Review Your Work: Analyze your past stencil applications to identify areas for improvement.
- Stay Updated: Keep up with the latest trends and techniques in the tattoo industry.
According to insights from tattooat.com, consistent practice and seeking guidance from experienced artists are the most effective ways to improve stencil application skills.
14. How To Choose The Right Tattoo Design For Stencil Application?
Choosing the right tattoo design can significantly impact the ease and success of stencil application. Opt for designs that are:
- Clear and Simple: Bold lines and clear edges make for easier stencil application.
- Appropriate Size: Choose a size that fits well on the chosen body area.
- Well-Defined: Ensure the design is well-defined and free of unnecessary details.
- Suitable for Skin Placement: Consider the contours and movement of the skin when selecting a design.
15. How Does Skin Type Affect Tattoo Stencil Application?
Skin type can play a significant role in how well a tattoo stencil adheres and transfers. Here’s how different skin types can affect the process:
| Skin Type | Characteristics | Stencil Application Considerations |
|---|---|---|
| Normal Skin | Balanced moisture, few imperfections | Stencils generally adhere well; use a standard transfer solution. |
| Dry Skin | Prone to flaking, tight feeling | Moisturize lightly before applying the stencil; use a hydrating transfer solution. |
| Oily Skin | Shiny, prone to breakouts | Clean thoroughly to remove excess oil; use a strong-hold transfer solution. |
| Sensitive Skin | Easily irritated, prone to redness and itching | Use hypoallergenic products; test a small area first; apply the stencil gently to minimize irritation. |
16. What Are The Latest Innovations In Tattoo Stencil Technology?
The world of tattoo stencils is constantly evolving, with new technologies and techniques emerging to improve accuracy and efficiency. Some of the latest innovations include:
- Digital Stencil Printers: These printers use advanced thermal technology to create highly detailed stencils directly from digital designs.
- Wireless Stencil Machines: Portable, handheld devices that allow for on-the-spot stencil creation and adjustments.
- Enhanced Stencil Solutions: New transfer solutions that offer improved adhesion, longer-lasting stencils, and skin-friendly formulas.
- 3D Stencils: Emerging technology that allows for the creation of textured stencils, adding depth and dimension to tattoo designs.
17. How To Create Custom Tattoo Stencils?
Creating custom tattoo stencils allows you to bring unique and personalized designs to life. Here’s how to do it:
- Design Creation: Start by creating your design using digital software or hand-drawing techniques.
- Image Preparation: Adjust the image for clarity and sharpness. Ensure lines are bold and well-defined.
- Transfer Method: Choose your transfer method (thermal copier or manual tracing).
- Stencil Creation: Transfer the design onto stencil paper using your chosen method.
- Refinement: Refine the stencil by adding or removing details as needed.
18. How Can A Tattoo Artist Ensure Client Satisfaction With Stencil Placement?
Ensuring client satisfaction with stencil placement is crucial for a positive tattooing experience.
- Consultation: Discuss the design and placement with the client beforehand.
- Visual Aids: Use visual aids (such as mirrors or photos) to show the client how the tattoo will look.
- Adjustments: Be willing to make adjustments to the placement based on the client’s feedback.
- Comfort: Ensure the placement is comfortable for both the client and the artist.
- Approval: Obtain the client’s final approval before proceeding with the tattoo.
19. How Does Body Movement Affect Tattoo Stencil Placement?
Body movement can significantly impact how a tattoo looks once it’s on the skin. Therefore, it’s essential to consider this during stencil placement.
- Placement Considerations:
- Areas of High Movement: Avoid placing intricate designs on areas with a lot of movement (such as joints) as they can distort over time.
- Muscle Flexion: Consider how muscles flex and contract in the area, ensuring the design looks good in various positions.
- Skin Stretching: Account for skin stretching and movement to prevent distortion of the design.
- Consultation:
- Client Demonstration: Have the client move the body part to see how the skin shifts and stretches.
- Placement Adjustments: Adjust the stencil placement accordingly to ensure the design looks its best in various positions.
20. What Are The Legal And Ethical Considerations For Tattoo Stencil Use?
Navigating the legal and ethical landscape of tattoo stencil use is vital for maintaining a professional and responsible practice.
- Copyright Laws:
- Original Designs: Ensure that you have the right to use and reproduce any designs, respecting copyright laws.
- Client-Provided Designs: Advise clients on copyright issues if they provide their own designs.
- Client Consent:
- Informed Consent: Obtain informed consent from clients regarding the design, placement, and potential risks.
- Age Restrictions: Adhere to legal age restrictions for tattooing.
- Hygiene and Safety:
- Sterilization: Use sterile equipment and maintain a clean working environment to prevent infections.
- Skin Conditions: Be aware of any skin conditions or allergies the client may have.
- Professional Conduct:
- Transparency: Be transparent with clients about the tattooing process, including stencil application and aftercare.
- Respectful Communication: Maintain respectful and professional communication with clients.
21. What Are Some Tips For Tattooing Difficult Areas With Stencils?
Tattooing difficult areas requires extra care and precision when applying stencils.
- Curved Areas (e.g., Elbows, Knees):
- Stencil Flexibility: Use flexible stencil paper that can conform to the curves.
- Sectioned Application: Apply the stencil in sections, ensuring each part adheres smoothly.
- Bony Areas (e.g., Ribs, Ankles):
- Padding: Use padding to create an even surface for stencil application.
- Gentle Pressure: Apply gentle, even pressure to avoid discomfort.
- Areas with Hair (e.g., Scalp, Chest):
- Thorough Shaving: Shave the area thoroughly to ensure proper stencil contact.
- Adhesive Solutions: Use strong adhesive solutions to keep the stencil in place.
- Areas Prone to Movement (e.g., Wrists, Fingers):
- Secure Attachment: Secure the stencil with medical tape to prevent movement.
- Frequent Checks: Check the stencil frequently during tattooing and make adjustments as needed.
22. How To Preserve Tattoo Stencils For Future Use?
Preserving tattoo stencils allows you to reuse designs and save time.
- Storage:
- Flat Storage: Store stencils flat to prevent bending or distortion.
- Protective Sleeves: Use protective sleeves or folders to shield stencils from damage.
- Cleaning:
- Gentle Cleaning: Gently clean stencils with a soft cloth and mild soap to remove any residue.
- Avoid Harsh Chemicals: Avoid using harsh chemicals that can damage the stencil.
- Digital Backups:
- Scan Stencils: Scan stencils and create digital backups for easy access and reproduction.
- Organized Files: Organize digital files for easy retrieval.
23. What Are The Different Methods Of Tattoo Stencil Removal?
Removing tattoo stencils requires a gentle approach to avoid irritating the skin.
- Isopropyl Alcohol:
- Application: Apply isopropyl alcohol to a cotton pad and gently rub the stencil until it fades.
- Caution: Avoid excessive rubbing to prevent skin irritation.
- Witch Hazel:
- Application: Use witch hazel on a cotton pad to gently wipe away the stencil.
- Benefits: Witch hazel is a natural and soothing option.
- Tattoo Wipes:
- Application: Use pre-moistened tattoo wipes to gently remove the stencil.
- Convenience: Tattoo wipes are convenient and often contain skin-soothing ingredients.
- Baby Oil:
- Application: Apply baby oil to the stencil and let it sit for a few minutes before wiping away.
- Benefits: Baby oil is gentle and can help moisturize the skin.
- Exfoliation:
- Gentle Scrub: Use a gentle exfoliating scrub to remove stubborn stencil marks.
- Caution: Avoid harsh scrubbing to prevent skin irritation.
24. How Do Weather Conditions Affect Tattoo Stencil Application?
Weather conditions can influence how well a tattoo stencil adheres to the skin.
- Humidity:
- High Humidity: High humidity can make the skin moist, affecting stencil adhesion. Use a strong-hold transfer solution and ensure the skin is thoroughly dry.
- Low Humidity: Low humidity can dry out the skin, making it difficult for the stencil to adhere. Moisturize lightly before applying the stencil.
- Temperature:
- Hot Weather: Hot weather can cause sweating, affecting stencil longevity. Work in a cool environment and use a stencil sealant.
- Cold Weather: Cold weather can make the skin tight and dry. Ensure the skin is properly hydrated before applying the stencil.
25. What Are The Best Resources For Learning Advanced Tattoo Stencil Techniques?
To master advanced tattoo stencil techniques, consider these resources:
- Online Courses:
- Platform: Websites like tattooat.com offer in-depth courses on stencil application.
- Content: Look for courses covering advanced techniques, troubleshooting, and best practices.
- Workshops and Seminars:
- Local Events: Attend workshops and seminars led by experienced tattoo artists.
- Hands-On Training: Participate in hands-on training sessions to refine your skills.
- Mentorship Programs:
- Experienced Mentors: Seek guidance from experienced tattoo artists who can provide personalized feedback.
- Long-Term Learning: Establish a mentorship relationship for ongoing learning and support.
- Industry Publications:
- Magazines: Read industry publications like Inked Magazine for tips and insights from professional artists.
- Articles and Tutorials: Look for articles and tutorials on advanced stencil techniques.
- Online Forums and Communities:
- Discussion Boards: Join online forums and communities to connect with other tattoo artists and share knowledge.
- Peer Support: Participate in discussions and ask questions to learn from your peers.
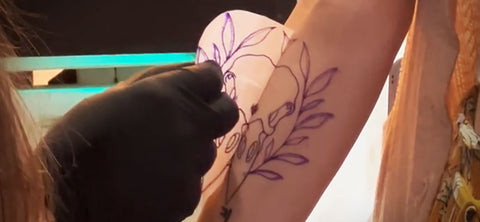 Tattoo stencil
Ready to elevate your tattoo artistry? Visit tattooat.com now to discover a wealth of inspiration, connect with talented artists, and explore detailed guides that will help you master every aspect of tattooing. From design ideas to essential techniques, tattooat.com has everything you need to succeed. Unleash your creativity and take your skills to the next level—start your journey with us today!