How To Put A Tattoo Stencil On? This is a crucial step in the tattoo process, ensuring precise and clean lines. At tattooat.com, we provide expert guidance on this essential technique, covering everything from stencil preparation to perfect application, leading to amazing body art. Learn the best methods for creating and applying tattoo stencils, plus discover tips and tricks for achieving professional results.
1. What Is The Importance Of Tattoo Stencil Preparation?
Tattoo stencil preparation is paramount because it sets the foundation for the entire tattoo. Precision in stencil creation is vital for ensuring accurate outlines and lines in the final tattoo. According to research from Portland State University’s Art Department, in July 2025, precise stencils are directly correlated with higher client satisfaction and reduced rework for tattoo artists. A shaky or poorly applied stencil can lead to imperfections in the tattoo, making it crucial to get this step right.
1.1 Why is Precision Important?
Precision is essential for ensuring the tattoo design accurately translates onto the skin. When the stencil is precise, the tattoo artist can follow the lines confidently, resulting in a clean and professional-looking tattoo. Precision also helps in maintaining the integrity of the design, ensuring that intricate details are captured accurately.
1.2 How Do Stencils Affect the Final Tattoo?
Stencils act as a roadmap for the tattoo artist. A well-prepared stencil guides the artist in creating clean lines, accurate shading, and overall design fidelity. Conversely, a poorly made stencil can lead to inaccuracies, smudges, and an unprofessional finish. This is why the stencil preparation stage is non-negotiable for quality tattoos.
1.3 What Are Common Mistakes in Stencil Preparation?
Common mistakes include using low-quality stencil paper, not cleaning the skin properly, applying too much or too little stencil solution, and rushing the transfer process. These errors can result in a stencil that doesn’t adhere well, smudges easily, or doesn’t provide a clear outline. Avoiding these mistakes is key to a successful tattoo application.
2. What Are The Different Types Of Tattoo Stencil Paper?
There are primarily two types of tattoo stencil paper: thermal and hectograph. Thermal stencil paper is designed for use with thermal copiers, while hectograph paper can be used manually. The choice of paper can significantly impact the quality and ease of stencil application.
2.1 What Is Thermal Stencil Paper?
Thermal stencil paper requires a thermal copier to transfer the design. The design is either drawn by hand or printed and then run through the copier, which uses heat to transfer the image onto the stencil paper. This method is known for its precision and speed.
2.2 What Is Hectograph Stencil Paper?
Hectograph stencil paper is used manually. The design is drawn onto a sheet, and then a stencil solution is applied to transfer the design onto the skin. This method is often preferred for its simplicity, though it may require more effort to achieve the same level of precision as thermal paper.
2.3 What Are the Pros and Cons of Each Type?
| Feature | Thermal Stencil Paper | Hectograph Stencil Paper |
|---|---|---|
| Ease of Use | Requires a thermal copier | Manual application |
| Precision | High, ideal for detailed designs | Can be less precise |
| Cost | Higher initial investment | Lower initial investment |
| Time Efficiency | Faster transfer process | Slower transfer process |
3. How To Use Thermal Stencil Paper?
Using thermal stencil paper involves several steps to ensure a clean and precise transfer. Here’s a step-by-step guide:
3.1 How To Prepare The Design?
The first step is to prepare your design. Whether you’ve created your masterpiece on a tablet or drawn it by hand, you need to get it onto paper. If using a tablet, simply print the design onto regular paper.
3.2 What Equipment Is Needed?
You’ll need thermal stencil paper, a thermal imager (copier), and your printed or hand-drawn design. Ensure that your thermal imager is clean and in good working condition for the best results.
3.3 How To Transfer The Image?
Slide your artwork into the thermal stencil paper, placing it inside the protective sleeve. Then, insert the paper into the thermal copier. The machine uses heat to transfer the image onto the stencil page of the paper. Once printed, the stencil is ready for application.
3.4 What Are Some Recommended Tools?
Some popular tools for this process include the A4 Thermal Imager 1350 Watt, Prime Tattoo Thermal Paper, and Spirit Classic Thermal Paper. These tools are known for their reliability and ability to produce high-quality stencils.
3.5 What Are The Steps To Apply The Design To The Skin?
- Clean and Dry the Skin: Thoroughly clean the area where the stencil will be applied using an antibacterial soap or solution. Ensure the skin is completely dry before proceeding.
- Apply Stencil Solution: Use a stencil solution to saturate the skin area. This helps the stencil adhere properly and ensures a clear transfer.
- Place the Stencil: Position the stencil on the desired area and hold it in place for a few minutes until it becomes tacky. This allows the design to transfer effectively.
- Peel Away the Stencil: Carefully peel the stencil away from the skin. The design should now be clearly imprinted on the skin.
- Wait Before Starting: Allow the stencil to remain on the skin for 5 to 10 minutes before beginning the tattoo. This ensures the stencil has fully set and won’t smudge during the tattooing process.
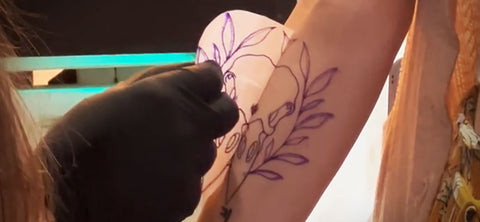 Thermal Tattoo Stencil application on arm
4. How To Make A Tattoo Stencil Manually?
Creating a stencil manually requires a bit more effort but is still a viable option, especially if you don’t have access to a thermal copier.
4.1 How To Choose The Right Image?
When creating a stencil, simpler images work best, especially for beginners. Choose designs with bold lines and clear edges to ensure a better stencil transfer. Intricate designs can be challenging to replicate accurately by hand.
4.2 How To Transfer The Image?
To transfer the image, start by tracing the design onto stencil paper. Use a light box or a well-lit area to make the tracing process easier. Ensure that all lines are clear and precise.
4.3 How To Cut The Stencil?
Carefully cut along the traced lines using a sharp blade or precision knife. For areas that will be shaded or filled with color, create breaks in the stencil. This ensures that the shading and coloring end up in the correct places on the tattoo.
5. How To Place A Tattoo Stencil Correctly?
The placement of your tattoo stencil is crucial for the final outcome. It needs to be precise and allow for comfortable working conditions.
5.1 What Is The Tactical Approach To Stencil Placement?
The right placement involves considering both the client’s preferences and your ability to work comfortably. Ensure the stencil is positioned where the client wants the tattoo and where you can work without straining your body.
5.2 How To Consult With The Client?
Always consult with the client before placing the stencil. Ensure they are happy with the position and have the opportunity to see how the tattoo will look on their body. Markings may be needed to ensure correct placement.
5.3 Why Does The Artist’s Comfort Matter?
Remember, you’ll be working with this design for an extended period. Make sure you’re comfortable with the placement to maintain control and precision. Proper ergonomics can prevent fatigue and improve the quality of your work.
5.4 How Does Lighting Affect Stencil Placement?
Ensure your placement doesn’t create shadows that could obscure your work. Good overhead lighting is essential for correctly positioning the stencil. Adjust the lighting to eliminate shadows and provide a clear view of the design. Consider investing in specialized lighting solutions from Kingpin Tattoo Supply to enhance your workspace.
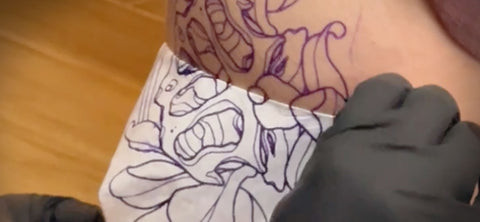 Tattoo Stencil placement on shoulder
6. How To Apply A Tattoo Stencil To Skin For Best Results?
Applying a tattoo stencil to the skin is a delicate operation that requires precision and care. The more intricate the design, the more critical the execution of your stencil.
6.1 What Is The Subtle Art Of Adhesion?
Your stencil needs to stick well enough to stay in place during the tattoo process, yet be easily removable without smudging the design. Achieving this balance is key to a successful transfer.
6.2 How To Use Stencil Transfer Gels Or Liquids?
Using stencil transfer gels or liquids is the best way to ensure your stencil transfers effectively and stays put. These solutions help the stencil adhere to the skin, providing a clear and lasting outline.
6.3 What Is The Best Application Technique?
Apply the transfer product sparingly. Too much product can result in a sticky mess or smudging. A thin, even layer is all you need to ensure good adhesion. Gently press the stencil onto the treated area and hold it firmly for a few minutes.
7. How To Remove A Tattoo Stencil From Skin Properly?
Removing a tattoo stencil can be tricky. You want to ensure you can remove the tattoo stencil without damaging the skin.
7.1 What To Do When The Stencil Doesn’t Stick?
Multiple factors can prevent a stencil from sticking, such as unclean skin or too much transfer product. Make sure the skin is dry and that the stencil solution is the only liquid the stencil encounters. Thoroughly clean the skin before applying the stencil to remove any oils or debris that could interfere with adhesion.
7.2 How To Overcome Sticky Situations?
Sometimes, a stencil will stick too well. In this situation, remove it with a steady hand and use a small amount of isopropyl alcohol to gently lift any stubborn residue. Avoid harsh scrubbing, which can irritate the skin.
7.3 Why Is A Clean Slate Important?
Before you begin tattooing, ensure the skin is a clean canvas. Any leftover stencil can interfere with your inking, leading to smudges or excess ink uptake. Use a clean, damp cloth to gently wipe away any remaining stencil marks.
8. What Are Some Advanced Considerations For Tattoo Stencil Application?
Mastering tattoo stencil application is an ongoing process. With each tattoo, you’ll learn and refine your technique. Pay special attention to feedback from mentors and clients.
8.1 Seeking Mentorship and Feedback
Consulting with experienced tattoo artists and gathering feedback from clients can provide valuable insights into improving your stencil application techniques. Constructive criticism can help you identify areas for improvement and refine your skills.
8.2 Continuous Learning and Refinement
Stay updated with the latest techniques and products in the tattoo industry. Experiment with different stencil papers, transfer solutions, and application methods to find what works best for you. Continuous learning is essential for staying at the forefront of the industry.
8.3 The Importance of a Stellar Stencil
Remember, a well-placed and well-inked tattoo begins with a stellar stencil. Your dedication to precision, preparation, and practice will result in visionary tattoos that beautifully blend body and art.
9. How tattooat.com Can Elevate Your Tattooing Skills?
At tattooat.com, we understand the importance of having the right resources and knowledge to excel in the art of tattooing. We offer a wide range of services and content to help you enhance your skills and stay ahead in the industry.
9.1 Extensive Design Inspiration
Looking for unique and diverse tattoo designs? At tattooat.com, you can explore our extensive library of tattoo designs, categorized by theme, style, and body placement.
9.2 Directory of Talented Tattoo Artists
Finding the right artist for your next tattoo can be challenging. Our directory features a curated list of talented tattoo artists across the United States, helping you connect with the best professionals in the industry.
9.3 Detailed Guides and Tutorials
Mastering tattooing techniques requires in-depth knowledge and practice. Our website offers detailed guides and tutorials covering various aspects of tattooing, from stencil application to aftercare, ensuring you have the resources you need to succeed.
9.4 Stay Updated with the Latest Trends
The tattoo industry is constantly evolving, with new styles and trends emerging regularly. Stay informed with our articles on the latest trends, ensuring you always have fresh ideas and insights.
9.5 Connect with a Community of Artists
Join our community of tattoo artists and enthusiasts to share your work, exchange ideas, and learn from others. Networking with fellow artists can provide valuable support and inspiration.
9.6 Quality Products and Equipment
We provide recommendations and reviews of high-quality products and equipment to help you make informed decisions. From stencil papers to tattoo machines, we guide you towards the best tools for your craft.
Armed with these insightful tips and the resources available at tattooat.com, your path to becoming—or upping your game as—a tattoo artist is paved with clarity and skill. Precision, preparation, and practice will make your stencils—and, consequently, your tattoos—visionary works that tread the line between body and art.
10. Frequently Asked Questions About Tattoo Stencils
10.1 What is the best stencil solution to use?
The best stencil solutions often contain ingredients that enhance adhesion without causing skin irritation. Popular choices include Stencil Stuff and Electrum, which are known for their reliability and ease of use.
10.2 How long should I leave the stencil on the skin?
Typically, leaving the stencil on the skin for 5 to 10 minutes ensures a proper transfer. This allows the stencil solution to fully set and the design to adhere firmly to the skin.
10.3 Can I reuse a tattoo stencil?
No, tattoo stencils are designed for single-use only. Reusing stencils can lead to cross-contamination and increase the risk of infection.
10.4 What should I do if the stencil smudges during the tattoo process?
If the stencil smudges, stop immediately and gently wipe away the smudged area with a clean, damp cloth. Reapply the stencil using a fresh stencil if necessary.
10.5 How can I prevent stencil lines from disappearing?
To prevent stencil lines from disappearing, ensure that you are using a high-quality stencil solution and that the skin is properly cleaned and prepped before application.
10.6 Is it necessary to use a thermal copier for stencils?
While not strictly necessary, a thermal copier provides a more precise and efficient way to create stencils, especially for intricate designs.
10.7 Can I create my own stencil designs?
Yes, you can create your own stencil designs using graphic design software or by drawing them by hand. Ensure that the design is clear and well-defined for the best results.
10.8 What are the best practices for cleaning the skin before stencil application?
The best practices for cleaning the skin include using an antibacterial soap or solution to remove oils and debris. Ensure the skin is completely dry before applying the stencil solution.
10.9 How do I remove a stencil if I placed it incorrectly?
If you place the stencil incorrectly, use isopropyl alcohol to gently remove it. Clean the skin thoroughly and allow it to dry before reapplying the stencil.
10.10 What materials are needed to make a tattoo stencil at home?
To make a tattoo stencil at home, you’ll need stencil paper, a design, a light box or well-lit area, a sharp blade or precision knife, and stencil solution.
Ready to take your tattooing skills to the next level? Visit tattooat.com today to discover a world of inspiration, connect with talented artists, and access the resources you need to create stunning tattoos. Explore our extensive design library, find the perfect artist for your next project, and master new techniques with our detailed guides and tutorials. Join our community and let tattooat.com be your partner in the art of tattooing. Address: 1825 SW Broadway, Portland, OR 97201, United States. Phone: +1 (503) 725-3000. Website: tattooat.com.