Tattoo paper work is essential for transferring designs onto the skin, ensuring precision and artistry in tattooing. At tattooat.com, we offer a comprehensive guide to understanding tattoo transfer paper, its types, and how it enhances the tattooing process. This guide provides insights, tips, and resources to help both aspiring and experienced tattoo artists achieve exceptional results.
1. What is Tattoo Transfer Paper and How Does It Work?
Tattoo transfer paper is a specialized material used to transfer a design stencil onto the skin before a tattoo session. It works by allowing artists to accurately map out the tattoo, ensuring precise placement and design adherence. According to research from Portland State University’s Art Department, in July 2023, accurate stencils created with transfer paper significantly reduce errors during the tattooing process.
1.1. What are the Key Components of Tattoo Transfer Paper?
Tattoo transfer paper typically consists of multiple layers, each serving a specific function:
- Top Layer (White or Transparent): This is the layer on which the design is either drawn by hand or printed.
- Protective Layer: A thin, translucent sheet that protects the design layer from smudging before use.
- Carbon or Ink Layer: This layer contains the pigment that transfers the design to the skin. It is usually purple or blue.
- Backing Sheet (Yellow or Brown): The bottom layer provides support and keeps the other layers together.
1.2. How Does the Transfer Process Work?
The transfer process involves several key steps:
- Creating the Design: The design is created either by hand on the top layer or printed using a thermal printer.
- Preparing the Skin: The skin is cleaned and shaved to ensure a smooth surface for the transfer.
- Applying Stencil Solution: A stencil solution is applied to the skin, helping the ink adhere.
- Transferring the Design: The transfer paper is placed on the skin with the design facing down, and gentle pressure is applied to transfer the ink.
- Removing the Paper: The paper is carefully peeled away, leaving the design on the skin as a guide for the tattoo artist.
 Tattoo Transfer Paper Layers
1.3. What are the Benefits of Using Tattoo Transfer Paper?
Using tattoo transfer paper offers several advantages:
- Accuracy: Ensures the design is precisely placed on the skin.
- Efficiency: Saves time by providing a clear guide for the artist.
- Client Satisfaction: Allows clients to preview the tattoo before it’s permanent.
- Intricate Designs: Facilitates the creation of complex and detailed tattoos.
- Reduces Errors: Minimizes the risk of mistakes during the tattooing process.
2. What are the Different Types of Tattoo Transfer Paper?
There are two primary types of tattoo transfer paper: thermal (thermographic) and manual (hectograph). Thermal transfer paper uses heat to transfer the design, while manual transfer paper requires hand-tracing.
2.1. What is Thermal (Thermographic) Transfer Paper?
Thermal transfer paper, also known as thermal stencil paper, uses heat to transfer the design from the paper to the skin. This type of paper is ideal for use with a tattoo stencil printer, which applies heat to create a clear, precise stencil.
2.1.1. How Does Thermal Transfer Paper Work?
Thermal transfer paper typically consists of four layers:
- Top Layer: A white or transparent layer on which the design is printed.
- Protective Layer: A thin layer that protects the design before transfer.
- Carbon Layer: A layer containing the ink that will be transferred to the skin.
- Backing Sheet: A yellow or brown sheet that provides support.
The tattoo stencil printer heats specific areas of the paper, causing the ink from the carbon layer to transfer to the top layer and create the stencil.
2.1.2. What are the Advantages of Using Thermal Transfer Paper?
- Precision: Creates highly accurate and detailed stencils.
- Efficiency: Fast and easy to use with a thermal printer.
- Consistency: Provides consistent results every time.
- Cleanliness: Reduces the risk of smudging or errors.
- Professional Results: Favored by professional tattoo artists for its reliability.
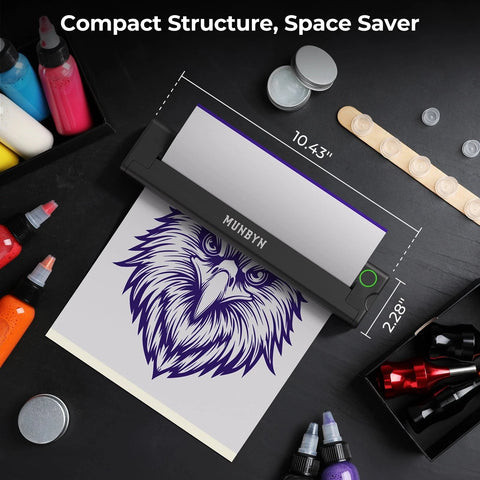 Thermal Tattoo Stencil Printer
2.2. What is Manual (Hectograph) Transfer Paper?
Manual transfer paper, also known as hectograph paper, is used for hand-tracing designs. This type of paper is simpler and more cost-effective but requires more manual effort.
2.2.1. How Does Manual Transfer Paper Work?
Manual transfer paper usually consists of three layers:
- Top Layer: A white layer on which the design is traced.
- Carbon Layer: A layer containing the ink that will be transferred.
- Backing Sheet: A sheet that provides support.
To use manual transfer paper, the design is drawn on the top layer with a pen or stylus, and the pressure transfers the ink to the carbon layer, creating the stencil.
2.2.2. What are the Advantages of Using Manual Transfer Paper?
- Cost-Effective: More affordable than thermal transfer paper and printers.
- Simplicity: Easy to use without special equipment.
- Accessibility: Widely available and suitable for small projects.
- Traditional Method: Preferred by some artists for its hands-on approach.
- No Electricity Needed: Can be used anywhere without power.
2.3. Thermal vs. Manual Transfer Paper: Which is Right for You?
The choice between thermal and manual transfer paper depends on your specific needs and preferences. Here’s a comparison to help you decide:
| Feature | Thermal Transfer Paper | Manual Transfer Paper |
|---|---|---|
| Precision | High | Medium |
| Efficiency | Very High | Low |
| Cost | Higher (requires printer) | Lower |
| Complexity | Requires printer setup | Simple hand-tracing |
| Best For | Detailed designs, professional use | Simple designs, hobbyists |
| Equipment | Tattoo stencil printer | Pen or stylus |
| Design Method | Digital printing | Hand-drawing |
3. What are the Applications of Tattoo Transfer Paper?
Tattoo transfer paper is primarily used for creating stencils for tattoos, but it also has various applications in arts and crafts.
3.1. How is Tattoo Transfer Paper Used in Tattooing?
In tattooing, transfer paper is used to transfer the design onto the skin before the actual tattooing process begins. This ensures that the artist has a clear and accurate guide to follow.
3.1.1. Preparing the Skin for Transfer
- Cleaning: The area of skin where the tattoo will be placed is thoroughly cleaned with antibacterial soap.
- Shaving: Any hair in the area is shaved to create a smooth surface.
- Applying Stencil Solution: A thin layer of stencil solution (also known as transfer gel or stencil stuff) is applied to the skin. This helps the stencil adhere and ensures a clear transfer.
3.1.2. Transferring the Design
- Placing the Stencil: The tattoo transfer paper is placed on the prepared skin, with the ink side facing down.
- Applying Pressure: Gentle, even pressure is applied to the back of the transfer paper to ensure the design is fully transferred.
- Removing the Paper: The paper is carefully peeled away, leaving the stencil on the skin.
3.1.3. Inspecting the Transferred Design
- Clarity: The artist checks the stencil for clarity and completeness.
- Placement: The artist ensures the stencil is correctly positioned and aligned.
- Adjustments: If necessary, the stencil can be adjusted or reapplied to ensure perfection.
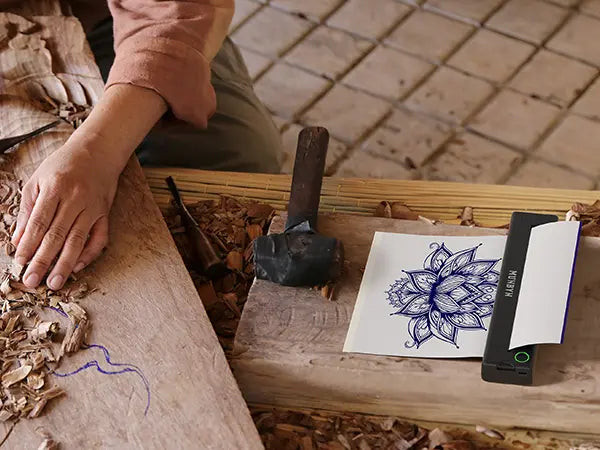
 Printed Tattoo Stencil
3.2. How is Tattoo Transfer Paper Used in Arts and Crafts?
Tattoo transfer paper can also be used to transfer designs onto various surfaces, such as wood, fabric, and ceramics. This makes it a versatile tool for DIY projects and creative crafts.
3.2.1. Transferring Designs onto Wood
- Preparing the Wood: The wood surface is sanded smooth and cleaned to remove any dust or debris.
- Applying the Stencil: The tattoo transfer paper is placed on the wood, with the design facing down.
- Transferring the Image: Pressure is applied to the back of the transfer paper using a burnishing tool or a smooth, hard object.
- Removing the Paper: The paper is carefully peeled away, leaving the design on the wood.
- Finishing: The design can be painted, carved, or burned into the wood.
3.2.2. Transferring Designs onto Fabric
- Preparing the Fabric: The fabric is washed and ironed to remove any wrinkles or sizing.
- Applying the Stencil: The tattoo transfer paper is placed on the fabric, with the design facing down.
- Transferring the Image: Heat is applied to the back of the transfer paper using an iron or heat press.
- Removing the Paper: The paper is carefully peeled away, leaving the design on the fabric.
- Finishing: The design can be painted, embroidered, or embellished.
3.2.3. Transferring Designs onto Ceramics
- Preparing the Ceramic: The ceramic surface is cleaned and dried.
- Applying the Stencil: The tattoo transfer paper is placed on the ceramic, with the design facing down.
- Transferring the Image: Pressure is applied to the back of the transfer paper using a burnishing tool.
- Removing the Paper: The paper is carefully peeled away, leaving the design on the ceramic.
- Finishing: The design can be painted with ceramic paints and fired in a kiln.
4. What Materials Do I Need to Use Tattoo Transfer Paper Effectively?
To use tattoo transfer paper effectively, you’ll need a few essential materials, depending on whether you’re hand-drawing or printing your designs.
4.1. Materials for Hand-Drawing Tattoo Designs
- Tattoo Transfer Paper: Manual (hectograph) transfer paper.
- Pen or Stylus: For tracing the design onto the transfer paper.
- Smooth, Clean Surface: To work on while tracing the design.
- Original Design: A reference image to trace.
- Stencil Solution: To prepare the skin for transfer.
- Gloves: To maintain hygiene.
- Razor: To shave the area of skin.
- Antibacterial Soap: To clean the skin.
4.2. Materials for Printing Tattoo Designs
- Tattoo Transfer Paper: Thermal (thermographic) transfer paper.
- Digital Device: Phone, tablet, or PC for creating or storing the design.
- Design Software or App: For creating or editing the design.
- Tattoo Stencil Printer: A thermal printer specifically designed for tattoo stencils.
- Stencil Solution: To prepare the skin for transfer.
- Gloves: To maintain hygiene.
- Razor: To shave the area of skin.
- Antibacterial Soap: To clean the skin.
4.3. Why is a Tattoo Stencil Printer Important?
A tattoo stencil printer is crucial for achieving high-quality, detailed designs. It ensures that the stencil is accurate and clean, which is essential for a professional-looking tattoo.
4.3.1. Advantages of Using a Tattoo Stencil Printer
- Precision: Creates highly accurate stencils with fine details.
- Efficiency: Prints stencils quickly and easily.
- Consistency: Provides consistent results every time.
- Professional Quality: Ensures the stencil is clean and clear.
- Time-Saving: Reduces the time spent on creating stencils manually.
 Tattoo Stencil Printer
4.4. Recommended Brands for Tattoo Stencil Printers
Several brands offer reliable tattoo stencil printers. Some of the most recommended include:
- MUNBYN: Known for their portable and Bluetooth-enabled tattoo stencil printers.
- Brother: Offers high-quality thermal printers suitable for stencil creation.
- Epson: Provides versatile printers that can be used for various applications, including tattoo stencils.
5. How to Make Tattoos Using Tattoo Transfer Paper: A Step-by-Step Guide
Creating tattoos with tattoo transfer paper involves a series of steps to ensure accuracy and precision. Here’s a detailed guide on how to use a tattoo stencil printer to create tattoos:
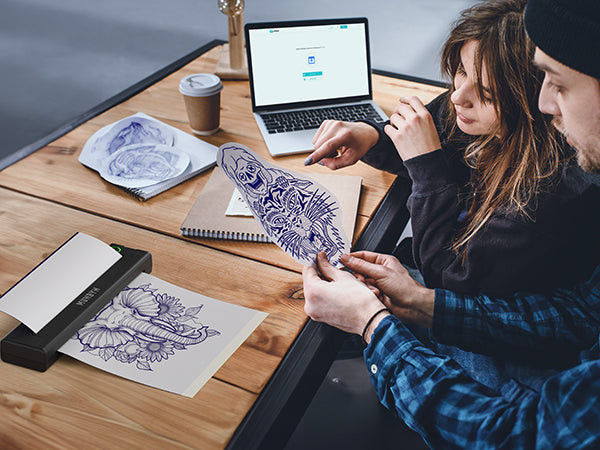
5.1. Step 1: Design Tattoo on Devices
Start by creating your tattoo design on a digital device using design software or an app. Ensure the design is clear, well-defined, and matches your vision.
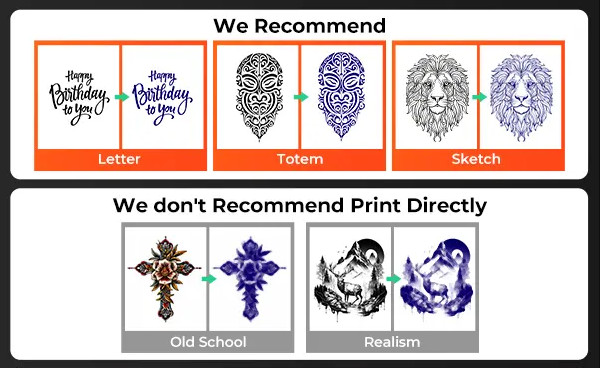
5.1.1. Tips for Designing a Tattoo
- Resolution: Use high-resolution images to ensure clarity.
- Details: Pay attention to fine details and line work.
- Mirroring: Mirror the design if necessary, so it appears correctly when transferred.
- Simplicity: Avoid overly complex designs that may be difficult to transfer or tattoo.
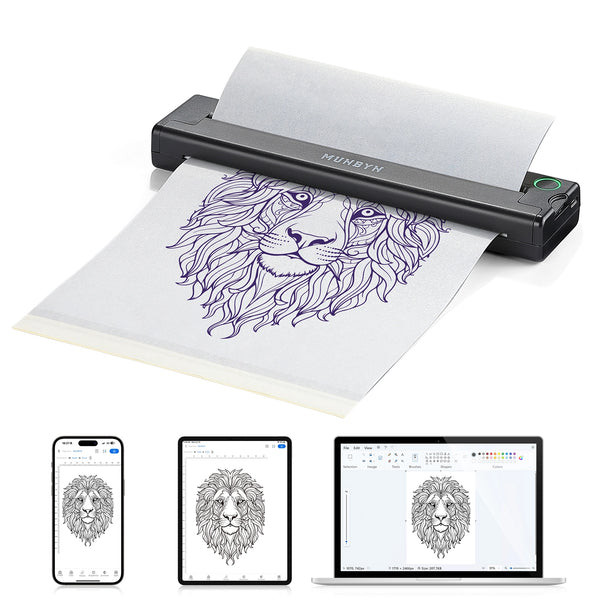
5.2. Step 2: Set the Tattoo Stencil Printer and Print the Design
Load your tattoo stencil printer with the tattoo transfer paper. Follow the printer’s instructions to ensure the design is printed correctly onto the paper.
5.2.1. Setting Up the Printer
- Connect the Printer: Connect the printer to your digital device via Bluetooth or USB.
- Load the Paper: Place the tattoo transfer paper into the printer, following the manufacturer’s instructions.
- Adjust Settings: Adjust the printer settings for optimal stencil quality.
5.2.2. Printing the Design
- Select the Design: Choose the design you want to print from your digital device.
- Print Settings: Ensure the print settings are correct, including size and resolution.
- Print the Stencil: Start the printing process and wait for the stencil to be printed.
5.3. Step 3: Put the Transfer Paper on the Body Parts
Carefully place the tattoo transfer paper with the printed design onto the desired body part. Make sure it adheres well to the skin.
5.3.1. Preparing the Skin
- Clean the Area: Clean the area with antibacterial soap and water.
- Shave the Area: Shave any hair in the area to create a smooth surface.
- Apply Stencil Solution: Apply a thin layer of stencil solution to the skin.
5.3.2. Applying the Stencil
- Position the Stencil: Place the stencil on the prepared skin, ensuring it is correctly positioned.
- Adhere the Stencil: Gently press the stencil onto the skin to ensure it adheres well.
- Avoid Wrinkles: Make sure there are no wrinkles or air bubbles under the stencil.
5.4. Step 4: Wet Down the Tattoo Design Paper
Dampen the back of the tattoo transfer paper with a sponge or cloth. Ensure it’s wet enough to transfer the design but not overly soaked.
5.4.1. Dampening the Paper
- Use a Sponge or Cloth: Use a clean sponge or cloth to dampen the back of the transfer paper.
- Apply Evenly: Apply moisture evenly across the paper.
- Avoid Over-Soaking: Ensure the paper is damp but not dripping wet.
5.5. Step 5: Press the Tattoo Transfer Paper
Press down firmly on the transfer paper to ensure the design is fully transferred onto the skin. Hold for several seconds before gently lifting the paper off.
5.5.1. Pressing the Paper
- Apply Firm Pressure: Apply firm, even pressure to the transfer paper.
- Hold for Several Seconds: Hold the pressure for at least 30 seconds to ensure the design transfers.
- Avoid Shifting: Do not shift or move the paper while pressing.
5.6. Step 6: Check the Results
Inspect the transferred design carefully. Make any necessary adjustments to ensure it looks perfect before beginning the actual tattooing process.
5.6.1. Inspecting the Stencil
- Clarity: Check the stencil for clarity and completeness.
- Placement: Ensure the stencil is correctly positioned and aligned.
- Adjustments: If necessary, remove the stencil and reapply it to correct any errors.
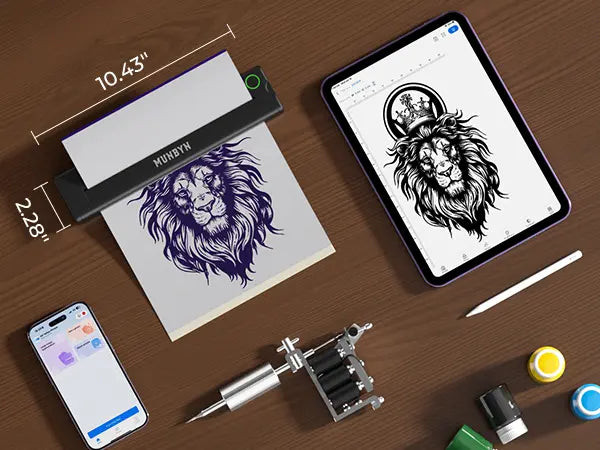 Print Tattoo Stencil Design
6. How to Transfer Images onto Crafts Using Tattoo Transfer Paper
Tattoo transfer paper can also be used to transfer images onto various craft surfaces. Here’s how to do it:
6.1. Step 1: Print Out the Tattoo Design
Create and print your design on tattoo transfer paper using a tattoo stencil printer. Ensure that the design is mirrored if necessary, so it appears correctly when transferred.
6.1.1. Preparing the Design
- Create or Select a Design: Choose a design that is suitable for the craft surface.
- Mirror the Design: Mirror the design if necessary, so it appears correctly when transferred.
- Print the Design: Print the design on tattoo transfer paper using a tattoo stencil printer.
6.2. Step 2: Clean the Surfaces of Your Crafts
Make sure the surface of your craft item is clean and dry to ensure the transfer adheres properly. Use mild soap and water to clean surfaces like wood or ceramic, and let them dry completely before proceeding. For fabrics, make sure they are free of lint and pre-washed to remove any sizing agents.
6.2.1. Cleaning Different Surfaces
- Wood: Sand the surface smooth and clean with a damp cloth.
- Fabric: Wash and iron the fabric to remove any wrinkles or sizing.
- Ceramic: Clean the surface with mild soap and water and dry thoroughly.
6.3. Step 3: Transfer the Images onto Crafts
Place the tattoo transfer paper onto the craft surface, ensuring it sticks well. Apply even pressure with your hands or a flat object like a squeegee to ensure full contact between the paper and the surface.
6.3.1. Applying the Transfer
- Position the Paper: Place the transfer paper on the craft surface, with the design facing down.
- Apply Pressure: Use your hands or a squeegee to apply even pressure to the back of the paper.
- Ensure Contact: Ensure that the paper is in full contact with the surface.
6.4. Step 4: Crave According to the Image
Carve, paint, or burn along the lines of the transferred image to complete your art piece. For fabric projects, consider using fabric markers or paint to trace the transferred design. When working with wood or ceramics, use appropriate tools like carving knives or specialized paints.
6.4.1. Finishing the Design
- Wood: Carve, paint, or burn the design into the wood.
- Fabric: Use fabric markers or paint to trace the design.
- Ceramic: Paint the design with ceramic paints and fire in a kiln.
 Print Crafts with Transfer Paper
7. What are Some Pro Tips for Using Tattoo Transfer Paper?
To achieve the best results with tattoo transfer paper, consider these professional tips:
7.1. Ensure the Design is Clear
Ensure your design is sharp and well-defined before transferring it. High-resolution images work best, and fine details can be achieved more easily with clear, bold lines. According to Inked Magazine, clarity in design is key to a successful tattoo.
7.2. Test on a Small Area First
Always do a test transfer on a small area to see how the paper reacts with the material. This step helps you understand the transfer process better and ensures no unexpected reactions spoil your project.
7.3. Keep the Paper Moist (for Skin Use)
When applying to skin, make sure the tattoo transfer paper remains adequately moist to allow for a full transfer. However, since we’re focusing on crafts, this may not always apply.
7.4. Align Carefully
Take your time to align the paper precisely where you want the design to appear. Measure and mark the desired position lightly with a pencil if needed to guide your placement.
7.5. Use High-Quality Paper
Opt for high-quality tattoo transfer paper for the best results. Cheaper alternatives might not provide the same level of detail and adherence, leading to subpar final results.
7.6. Remove Air Bubbles
Smooth out any air bubbles under the transfer paper for an even application. Use a squeegee or a credit card to gently press out any trapped air, starting from the center and moving outward.
 Tattoo Printing Image
8. What are Common Mistakes to Avoid When Using Tattoo Transfer Paper?
Avoiding common mistakes can significantly improve the quality of your tattoo stencils and transfers.
8.1. Using Low-Quality Transfer Paper
Low-quality transfer paper may not transfer the design clearly or may tear easily, leading to a subpar stencil.
8.2. Not Cleaning the Skin Properly
Failing to clean the skin properly can prevent the stencil from adhering correctly and may lead to infections.
8.3. Applying Too Much or Too Little Stencil Solution
Using too much stencil solution can cause the stencil to smudge, while using too little may result in a weak transfer.
8.4. Not Allowing the Stencil to Dry
Not allowing the stencil to dry completely before starting the tattoo can cause it to smear during the tattooing process.
8.5. Using Too Much Pressure
Applying too much pressure when transferring the stencil can cause it to distort or tear.
8.6. Rushing the Process
Rushing the process can lead to mistakes and a poor-quality stencil.
9. How Do I Choose the Right Tattoo Artist and Studio?
Choosing the right tattoo artist and studio is crucial for a safe and satisfying tattoo experience.
9.1. Research and Reviews
- Online Reviews: Look for reviews on websites like Google, Yelp, and tattoo-specific forums.
- Social Media: Check the artist’s and studio’s social media pages for examples of their work.
9.2. Portfolio Review
- Style: Ensure the artist’s style matches your desired tattoo style.
- Quality: Look for clean lines, solid colors, and attention to detail.
9.3. Studio Visit
- Cleanliness: The studio should be clean and well-maintained.
- Sterilization: Ask about their sterilization procedures and ensure they use disposable needles and equipment.
9.4. Consultation
- Communication: The artist should be willing to discuss your ideas and provide feedback.
- Professionalism: The artist should be professional, respectful, and knowledgeable.
9.5. Licensing and Certification
- Check Credentials: Ensure the artist and studio are licensed and certified by the local health department.
10. Frequently Asked Questions (FAQs) About Tattoo Transfer Paper
10.1. What is the best type of tattoo transfer paper to use?
The best type depends on your needs; thermal transfer paper is excellent for detailed designs and professional use, while manual transfer paper is suitable for simple designs and hobbyists.
10.2. Can I use a regular printer for tattoo stencils?
No, regular inkjet or thermal printers are not suitable for tattoo stencils. You need a specialized tattoo stencil printer that uses thermal transfer paper.
10.3. How do I prevent the stencil from smudging?
Ensure the skin is properly cleaned and prepared, use a high-quality stencil solution, and allow the stencil to dry completely before starting the tattoo.
10.4. How long does a tattoo stencil last on the skin?
A well-applied stencil can last for several hours, but it may fade over time. Avoid excessive rubbing or sweating to prolong its lifespan.
10.5. Can I reuse tattoo transfer paper?
No, tattoo transfer paper is designed for single-use only. Reusing it can lead to poor stencil quality and potential contamination.
10.6. What is stencil solution and why is it important?
Stencil solution helps the stencil adhere to the skin and ensures a clear, long-lasting transfer. It also has antiseptic properties that help prevent infection.
10.7. How do I remove a tattoo stencil from the skin?
Use rubbing alcohol or a stencil remover solution to gently wipe away the stencil. Avoid harsh scrubbing, which can irritate the skin.
10.8. Can I use tattoo transfer paper for temporary tattoos?
Yes, you can use tattoo transfer paper to create stencils for temporary tattoos using body-safe paints or markers.
10.9. What should I do if the stencil doesn’t transfer completely?
Reapply the stencil solution and try transferring the stencil again, applying firm, even pressure.
10.10. Where can I buy high-quality tattoo transfer paper and stencil printers?
High-quality tattoo transfer paper and stencil printers are available at tattoo supply stores, online retailers, and directly from manufacturers like MUNBYN.
Conclusion
Tattoo transfer paper is a versatile and indispensable tool for both creating tattoos and working on arts and crafts. By understanding the types of transfer papers, the steps involved, and the best practices for their use, you can easily master the process and achieve professional-quality results. Whether you’re a tattoo artist or a DIY enthusiast, tattoo transfer paper can help you bring your creative visions to life with precision and ease.
Ready to elevate your tattoo artistry? Explore a wide range of designs, connect with talented artists, and discover essential tattooing knowledge at tattooat.com. Your journey to exceptional tattoos starts here!
Address: 1825 SW Broadway, Portland, OR 97201, United States. Phone: +1 (503) 725-3000. Website: tattooat.com.