Tattoo transfer paper is essential for transferring your envisioned tattoo design onto the skin, acting as a blueprint for flawless tattoo artwork. At tattooat.com, we’ll guide you through mastering its use with expert tips and techniques, ensuring precision and professionalism in your tattoo application. Dive in to learn more about stencil preparation, design transfer, and skin preparation – all crucial for achieving a stunning tattoo.
1. What is Tattoo Transfer Paper and Why is It Important?
Tattoo transfer paper, also known as stencil paper, is a specialized material used to transfer tattoo designs onto the skin before the actual tattooing process begins. It’s like a temporary tattoo that guides the artist. According to Inked Magazine, the precision offered by transfer paper ensures the final tattoo closely resembles the intended design. This is important for several reasons:
- Accuracy: It allows artists to accurately replicate intricate designs.
- Client Satisfaction: Ensures the final tattoo matches the client’s expectations.
- Efficiency: Saves time and minimizes errors during the tattooing process.
- Professionalism: Demonstrates attention to detail and commitment to quality.
1.1 What are the Key Components of Tattoo Transfer Paper?
Typically, tattoo transfer paper consists of four layers:
- Top Sheet (White or Transparent): This is the layer where the design is either drawn by hand or printed using a thermal printer.
- Protective Sheet (Thin and Translucent): This layer protects the carbon layer from accidental marks or smudges. It’s usually discarded before use.
- Carbon Layer (Blue or Purple): This layer contains the pigment that transfers the design onto the skin.
- Backing Sheet (Yellow or Brown): This sheet provides support and prevents the carbon layer from transferring onto unwanted surfaces.
1.2 What are the Benefits of Using Tattoo Transfer Paper?
Using tattoo transfer paper offers several advantages for both tattoo artists and clients:
- Precise Design Placement: Ensures the tattoo is placed in the exact desired location on the body.
- Consistent Results: Helps maintain consistency across multiple sessions for larger, more complex tattoos.
- Time-Saving: Reduces the time spent freehanding designs directly onto the skin.
- Improved Communication: Allows artists to clearly communicate the design and placement with clients before committing to the tattoo.
- Versatility: Suitable for a wide range of tattoo styles and sizes.
**1.3 Is Tattoo Transfer Paper Only Used for Tattoos?
While primarily used for tattooing, tattoo transfer paper has found applications in various other fields:
- Crafting: Transferring designs onto wood, fabric, leather, and other materials.
- Textile Design: Creating stencils for fabric painting and printing.
- Fine Arts: Assisting in the creation of detailed drawings and illustrations.
- DIY Projects: Personalizing items with custom designs.
 Close-up of tattoo transfer paper
2. What are the Different Types of Tattoo Transfer Paper?
There are primarily two types of tattoo transfer paper available:
- Thermal Transfer Paper (Thermographic Paper)
- Hectograph Transfer Paper (Manual Transfer Paper)
Each type has its own unique characteristics, advantages, and disadvantages.
2.1 What is Thermal Transfer Paper?
Thermal transfer paper, also known as thermographic paper, is designed for use with thermal printers. These printers use heat to transfer the design from the paper to the skin.
- Layers: Typically consists of four layers – a top white layer, a protective layer, a carbon layer, and a backing sheet.
- Usage: The design is printed onto the top layer using a thermal printer. The heat from the printer activates the carbon layer, transferring the design onto the paper.
- Pros:
- High precision and accuracy
- Clean, crisp lines
- Suitable for intricate designs
- Fast and efficient
- Cons:
- Requires a thermal printer
- Can be more expensive than hectograph paper
- May not be suitable for all skin types
2.2 What is Hectograph Transfer Paper?
Hectograph transfer paper, also known as manual transfer paper, is designed for hand-drawn designs. It doesn’t require a printer and is a more traditional method.
- Layers: Typically consists of three layers – a top white layer, a carbon layer, and a backing sheet.
- Usage: The design is drawn onto the top layer using a pen or stylus. The pressure from the drawing transfers the carbon onto the bottom layer, creating the stencil.
- Pros:
- No printer required
- Cost-effective
- Suitable for simple designs
- Easy to use
- Cons:
- Less precise than thermal transfer paper
- Can be prone to smudging
- Not suitable for intricate designs
- Requires more manual effort
2.3 Thermal Transfer Paper vs. Hectograph Transfer Paper: Which is Better?
The choice between thermal and hectograph transfer paper depends on several factors, including the complexity of the design, the artist’s skill level, and budget constraints. Here’s a comparison table to help you decide:
| Feature | Thermal Transfer Paper | Hectograph Transfer Paper |
|---|---|---|
| Precision | High | Low |
| Intricacy | Suitable for intricate designs | Suitable for simple designs |
| Equipment | Requires thermal printer | No printer required |
| Cost | More expensive | Cost-effective |
| Ease of Use | Easy (with printer) | Easy (manual) |
| Speed | Fast | Slower |
| Smudging | Less prone to smudging | More prone to smudging |
| Best For | Professional tattoo artists, intricate designs | Beginners, simple designs |
2.4 Can I Use Regular Paper Instead of Tattoo Transfer Paper?
No, you cannot use regular paper instead of tattoo transfer paper. Regular paper lacks the necessary carbon layer to transfer the design onto the skin. Additionally, regular paper may not be sterile, which can increase the risk of infection.
3. What Supplies Do I Need to Use Tattoo Transfer Paper?
To effectively use tattoo transfer paper, you’ll need a few essential supplies. The specific supplies may vary depending on whether you’re using thermal or hectograph transfer paper.
3.1 Supplies for Thermal Transfer Paper
- Thermal Transfer Paper: Choose high-quality thermal transfer paper for best results.
- Thermal Printer: A thermal printer specifically designed for tattoo stencils.
- Design Software: Software for creating or editing tattoo designs.
- Digital Device: A computer, tablet, or smartphone to connect to the printer.
- Stencil Solution: A solution to prepare the skin for stencil application.
- Gloves: To maintain hygiene and prevent contamination.
- Surface Cleaner: To clean the skin before applying the stencil.
3.2 Supplies for Hectograph Transfer Paper
- Hectograph Transfer Paper: Choose high-quality hectograph transfer paper.
- Pens or Styluses: Fine-tipped pens or styluses for drawing the design.
- Light Source: A light source to help see the design while tracing.
- Stencil Solution: A solution to prepare the skin for stencil application.
- Gloves: To maintain hygiene and prevent contamination.
- Surface Cleaner: To clean the skin before applying the stencil.
3.3 What is a Stencil Solution and Why Do I Need It?
A stencil solution, also known as stencil stuff or transfer gel, is a product used to prepare the skin for stencil application. It helps the stencil adhere to the skin and ensures a clear, long-lasting transfer. According to tattoo artist Sarah Miller, “Using a quality stencil solution is key to getting a crisp, clean stencil that won’t smudge or fade during the tattooing process.”
Benefits of using a stencil solution:
- Improved Adhesion: Helps the stencil stick to the skin, even in areas with curves or hair.
- Clearer Transfer: Ensures a sharp, well-defined transfer of the design.
- Longer Lasting: Prevents the stencil from smudging or fading during the tattooing process.
- Skin Protection: Some stencil solutions contain ingredients that help protect the skin and reduce irritation.
3.4 Where Can I Purchase Tattoo Transfer Paper and Supplies?
Tattoo transfer paper and supplies can be purchased from a variety of sources:
- Tattoo Supply Stores: These stores specialize in tattoo equipment and supplies.
- Online Retailers: Websites like Amazon, eBay, and tattooat.com offer a wide selection of tattoo transfer paper and supplies.
- Art Supply Stores: Some art supply stores carry tattoo transfer paper and related materials.
- Directly from Manufacturers: Some manufacturers sell their products directly to consumers.
When purchasing tattoo transfer paper and supplies, it’s important to choose reputable brands and suppliers to ensure quality and safety.
4. How to Use Tattoo Transfer Paper: A Step-by-Step Guide
Using tattoo transfer paper is a relatively straightforward process, but it’s important to follow the steps carefully to ensure a successful transfer. Here’s a step-by-step guide for both thermal and hectograph transfer paper.
4.1 How to Use Thermal Transfer Paper
- Create or Select Your Design: Use design software to create your tattoo design or select a pre-made design. Ensure the design is clear, well-defined, and properly sized.
- Prepare the Thermal Printer: Load the thermal printer with thermal transfer paper, following the manufacturer’s instructions.
- Print the Design: Connect your digital device to the thermal printer and print the design onto the thermal transfer paper.
- Prepare the Skin: Clean the area of skin where the tattoo will be placed with a surface cleaner or antiseptic wipe. Shave the area if necessary.
- Apply Stencil Solution: Apply a thin, even layer of stencil solution to the prepared skin.
- Apply the Stencil: Carefully place the thermal transfer paper onto the skin, ensuring the design is properly aligned.
- Press and Hold: Press down firmly on the transfer paper for 30-60 seconds to allow the design to transfer onto the skin.
- Remove the Paper: Gently peel off the transfer paper, leaving the stencil on the skin.
- Allow to Dry: Allow the stencil to dry completely before beginning the tattooing process.
4.2 How to Use Hectograph Transfer Paper
- Create or Select Your Design: Draw your tattoo design onto a piece of paper or select a pre-made design. Ensure the design is clear, well-defined, and properly sized.
- Prepare the Hectograph Paper: Place the hectograph transfer paper over the design, with the top white layer facing up.
- Trace the Design: Use a fine-tipped pen or stylus to trace the design onto the top layer of the hectograph paper. Apply firm, even pressure to transfer the carbon onto the bottom layer.
- Prepare the Skin: Clean the area of skin where the tattoo will be placed with a surface cleaner or antiseptic wipe. Shave the area if necessary.
- Apply Stencil Solution: Apply a thin, even layer of stencil solution to the prepared skin.
- Apply the Stencil: Carefully place the hectograph transfer paper onto the skin, ensuring the design is properly aligned.
- Press and Hold: Press down firmly on the transfer paper for 30-60 seconds to allow the design to transfer onto the skin.
- Remove the Paper: Gently peel off the transfer paper, leaving the stencil on the skin.
- Allow to Dry: Allow the stencil to dry completely before beginning the tattooing process.
4.3 What If the Stencil Smudges or Doesn’t Transfer Properly?
If the stencil smudges or doesn’t transfer properly, don’t panic. Here are a few troubleshooting tips:
- Clean the Skin Again: Remove the stencil and clean the skin with a surface cleaner or antiseptic wipe.
- Reapply Stencil Solution: Apply a fresh layer of stencil solution to the skin.
- Use More Pressure: When applying the stencil, press down firmly and evenly to ensure a complete transfer.
- Try a Different Stencil Solution: If the stencil solution isn’t working, try a different brand or type.
- Check the Transfer Paper: Make sure the transfer paper is fresh and hasn’t expired.
- Adjust Printer Settings: If using a thermal printer, adjust the heat settings to ensure proper transfer.
4.4 How Can I Ensure the Stencil Stays in Place During Tattooing?
To ensure the stencil stays in place during the tattooing process, follow these tips:
- Use a High-Quality Stencil Solution: Choose a stencil solution that is known for its strong adhesive properties.
- Apply Thin Layers of Petroleum Jelly: Apply thin layers of petroleum jelly over the stencil to protect it from smudging or fading.
- Work in Small Sections: Tattoo the design in small sections to avoid accidentally wiping away the stencil.
- Avoid Over-Wiping: Avoid excessive wiping of the area during tattooing to prevent the stencil from fading.
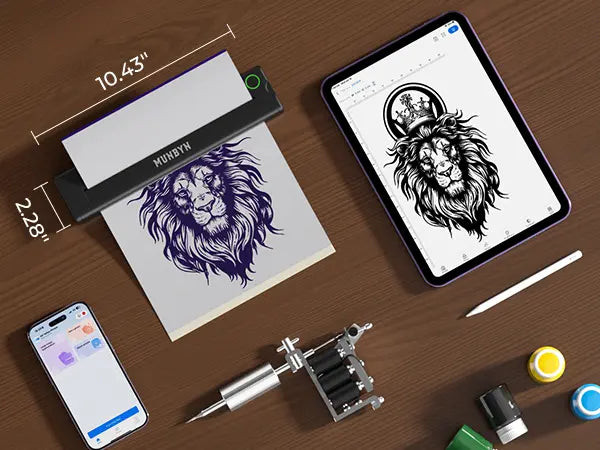
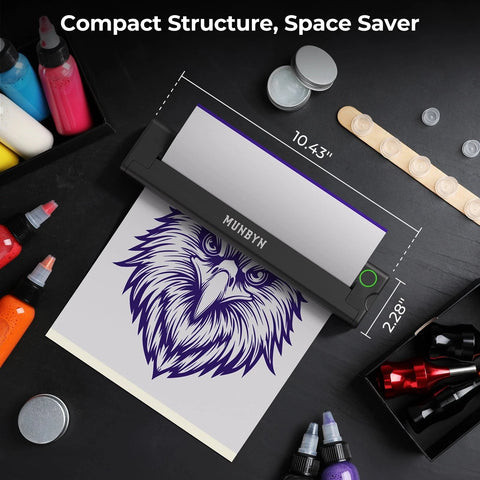 Thermal tattoo stencil printer
5. Pro Tips for Using Tattoo Transfer Paper
To achieve the best possible results with tattoo transfer paper, consider these pro tips from experienced tattoo artists:
5.1 Design Considerations
- Keep it Simple: Avoid overly complex designs with too many fine details. Simple, bold designs tend to transfer better and are easier to tattoo.
- Size Matters: Ensure the design is properly sized for the area of skin where it will be placed. Too small or too large designs can be difficult to work with.
- Mirror Image: Remember to mirror the design before printing or tracing it, especially if it contains text or asymmetrical elements.
5.2 Skin Preparation
- Exfoliate: Gently exfoliate the skin before applying the stencil to remove dead skin cells and create a smooth surface.
- Avoid Lotions and Oils: Do not apply lotions, oils, or moisturizers to the skin before applying the stencil, as these can interfere with the transfer process.
- Consider Skin Type: Different skin types may require different stencil solutions or application techniques. Consult with experienced artists or dermatologists for specific recommendations.
5.3 Application Techniques
- Use a Light Touch: When applying the stencil, use a light touch to avoid pressing too hard and distorting the design.
- Work from the Center Out: Start applying the stencil from the center and work your way outwards to ensure even distribution of pressure.
- Check Alignment: Before pressing down firmly, double-check the alignment of the stencil to ensure it is properly positioned.
5.4 Troubleshooting
- Practice Makes Perfect: Don’t be discouraged if your first few attempts are not perfect. Practice with different designs, stencil solutions, and application techniques to improve your skills.
- Seek Feedback: Ask experienced tattoo artists for feedback on your stencils and application techniques.
- Stay Updated: Keep up with the latest trends and techniques in tattoo art by attending workshops, seminars, and online forums.
5.5 What Are Common Mistakes to Avoid When Using Tattoo Transfer Paper?
Here are some common mistakes to avoid when using tattoo transfer paper:
- Not Cleaning the Skin Properly: Failing to clean the skin thoroughly can prevent the stencil from adhering properly.
- Using Expired Transfer Paper: Expired transfer paper may not transfer the design effectively.
- Applying Too Much Stencil Solution: Applying too much stencil solution can cause the stencil to smudge.
- Not Allowing the Stencil to Dry: Tattooing over a wet stencil can cause it to smudge or fade.
- Using Too Much Pressure: Applying too much pressure when transferring the stencil can distort the design.
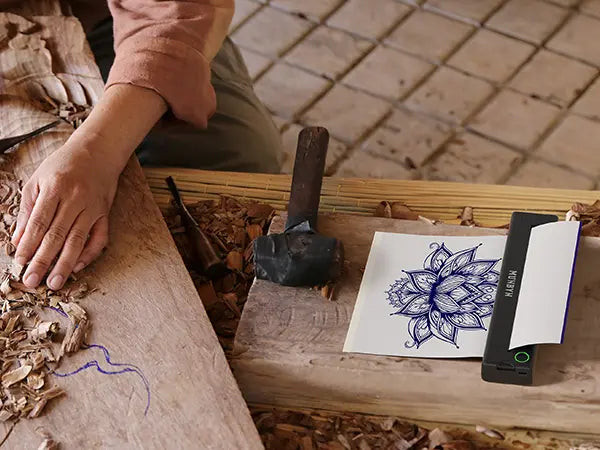
 Tattoo stencil ready to be applied
6. How to Transfer Images onto Other Surfaces with Tattoo Transfer Paper
While primarily used for tattooing, tattoo transfer paper can also be used to transfer images onto other surfaces, such as wood, fabric, and ceramics. Here’s how to do it:
6.1 Preparing the Surface
- Clean the Surface: Clean the surface thoroughly with soap and water or a suitable cleaner to remove dirt, grease, and other contaminants.
- Sand the Surface: If working with wood or other rough surfaces, sand the surface smooth to ensure proper adhesion.
- Prime the Surface: Apply a primer to the surface to create a smooth, even base for the transfer.
6.2 Transferring the Image
- Print or Trace the Design: Print or trace the design onto tattoo transfer paper, following the same steps as for tattooing.
- Apply Adhesive: Apply a thin layer of adhesive to the surface where the image will be transferred.
- Place the Transfer Paper: Carefully place the transfer paper onto the surface, ensuring the design is properly aligned.
- Press and Hold: Press down firmly on the transfer paper for 30-60 seconds to allow the image to transfer onto the surface.
- Remove the Paper: Gently peel off the transfer paper, leaving the image on the surface.
6.3 Sealing the Image
- Apply a Sealant: Apply a sealant to the surface to protect the transferred image and prevent it from fading or peeling.
- Use Multiple Coats: Apply multiple coats of sealant for added protection.
- Allow to Dry: Allow the sealant to dry completely before handling the item.
6.4 What Types of Crafts Can I Create Using Tattoo Transfer Paper?
Tattoo transfer paper can be used to create a wide variety of crafts, including:
- Custom T-Shirts: Transfer designs onto T-shirts and other clothing items.
- Personalized Mugs: Transfer images onto mugs and other ceramic items.
- Decorated Wood Signs: Transfer designs onto wood signs and plaques.
- Unique Phone Cases: Transfer images onto phone cases and other accessories.
- Custom Stickers: Create custom stickers with unique designs.
 Transfer paper crafts
7. How to Choose the Right Tattoo Artist?
Choosing the right tattoo artist is crucial for ensuring a positive and satisfying tattoo experience. Here are some factors to consider when selecting a tattoo artist:
7.1 Portfolio
- Review the Artist’s Portfolio: Look at the artist’s portfolio to get a sense of their style, skill level, and experience.
- Look for Consistency: Look for consistency in the artist’s work. The best artists consistently produce high-quality tattoos.
- Consider Your Style: Choose an artist whose style matches your own. If you want a traditional tattoo, look for an artist who specializes in traditional tattoos.
7.2 Reputation
- Read Reviews: Read online reviews to get a sense of the artist’s reputation.
- Ask for Recommendations: Ask friends, family, or other tattoo enthusiasts for recommendations.
- Check for Certifications: Check to see if the artist is certified by a reputable organization.
7.3 Hygiene
- Visit the Studio: Visit the tattoo studio to check for cleanliness and hygiene.
- Look for Sterilization Equipment: Make sure the studio uses proper sterilization equipment and follows strict hygiene protocols.
- Ask About Safety Procedures: Ask the artist about their safety procedures and what steps they take to prevent infection.
7.4 Communication
- Schedule a Consultation: Schedule a consultation with the artist to discuss your design and placement options.
- Communicate Clearly: Communicate your ideas and expectations clearly to the artist.
- Ask Questions: Don’t be afraid to ask questions about the process, aftercare, and potential risks.
7.5 Price
- Get a Quote: Get a quote from the artist before scheduling your appointment.
- Compare Prices: Compare prices from different artists to get a sense of the average cost for your design.
- Be Wary of Low Prices: Be wary of artists who offer prices that are significantly lower than average. This could be a sign of inexperience or poor quality.
Remember, a tattoo is a permanent piece of art, so it’s worth taking the time to find the right artist.
8. What Aftercare Instructions Should I Follow?
Proper aftercare is essential for ensuring that your tattoo heals properly and looks its best. Here are some general aftercare instructions:
8.1 Initial Care
- Keep the Tattoo Covered: Keep the tattoo covered with a bandage or plastic wrap for the first few hours after getting it.
- Gently Wash the Tattoo: Gently wash the tattoo with mild soap and warm water.
- Pat the Tattoo Dry: Pat the tattoo dry with a clean towel.
8.2 Ongoing Care
- Apply a Thin Layer of Ointment: Apply a thin layer of tattoo aftercare ointment to the tattoo several times a day.
- Keep the Tattoo Clean and Dry: Keep the tattoo clean and dry.
- Avoid Sun Exposure: Avoid prolonged sun exposure.
- Don’t Pick or Scratch the Tattoo: Don’t pick or scratch the tattoo.
- Avoid Soaking the Tattoo: Avoid soaking the tattoo in water for extended periods.
8.3 What are Signs of Infection?
Be aware of the signs of infection:
- Redness: Increased redness around the tattoo.
- Swelling: Swelling or puffiness.
- Pain: Increased pain or tenderness.
- Pus: Pus or discharge.
- Fever: Fever or chills.
If you experience any of these symptoms, seek medical attention immediately.
Following these aftercare instructions will help ensure that your tattoo heals properly and looks its best for years to come.
9. FAQ: Answers to Your Burning Questions About Tattoo Transfer Paper
Here are some frequently asked questions about tattoo transfer paper:
9.1 Can I Reuse Tattoo Transfer Paper?
No, tattoo transfer paper is designed for single-use only. Reusing tattoo transfer paper can lead to poor transfer quality and increase the risk of infection.
9.2 How Long Does a Tattoo Stencil Last?
A tattoo stencil can last for several hours if properly applied and cared for. However, it’s best to tattoo the design as soon as possible after applying the stencil to ensure the best results.
9.3 Can I Use a Regular Printer for Thermal Transfer Paper?
No, you cannot use a regular printer for thermal transfer paper. Thermal transfer paper requires a thermal printer that uses heat to transfer the design.
9.4 What is the Best Stencil Solution to Use?
The best stencil solution depends on personal preference and skin type. Some popular stencil solutions include Stencil Stuff, Electrum Stencil Primer, and Spirit Classic Stencil Transfer Cream.
9.5 How Do I Remove a Tattoo Stencil?
To remove a tattoo stencil, use a cotton ball soaked in isopropyl alcohol or stencil remover. Gently rub the stencil until it fades away.
9.6 Can I Shower After Applying a Tattoo Stencil?
It’s best to avoid showering immediately after applying a tattoo stencil to prevent it from smudging or fading. Wait at least a few hours before showering, and avoid direct contact with the stencil.
9.7 How Do I Prevent the Stencil from Smudging?
To prevent the stencil from smudging, use a high-quality stencil solution, apply thin layers of petroleum jelly, and avoid over-wiping the area during tattooing.
9.8 Can I Apply a Tattoo Stencil on Hairy Skin?
It’s best to shave the area of skin where the tattoo will be placed before applying the stencil. Hair can interfere with the transfer process and prevent the stencil from adhering properly.
9.9 What Do I Do If I Accidentally Applied the Stencil in the Wrong Place?
If you accidentally applied the stencil in the wrong place, remove it immediately with isopropyl alcohol or stencil remover. Clean the skin and reapply the stencil in the correct location.
9.10 How Do I Store Tattoo Transfer Paper?
Store tattoo transfer paper in a cool, dry place away from direct sunlight and heat. Keep the paper in its original packaging to protect it from damage.
10. Conclusion: Mastering Tattoo Transfer Paper for Stunning Results
Mastering the use of tattoo transfer paper is essential for any tattoo artist or DIY enthusiast looking to create professional-quality tattoos and crafts. By understanding the different types of transfer paper, following the proper steps, and utilizing pro tips, you can achieve stunning results every time. Remember to choose high-quality supplies, prioritize hygiene and safety, and practice regularly to improve your skills. Whether you’re a seasoned tattoo artist or just starting out, tattoo transfer paper is an indispensable tool that can help you bring your creative visions to life.
Ready to take your tattoo artistry to the next level? Explore our extensive collection of tattoo designs, connect with talented artists, and discover essential tips and tutorials at tattooat.com. Start your journey towards tattoo excellence today!
Address: 1825 SW Broadway, Portland, OR 97201, United States.
Phone: +1 (503) 725-3000.
Website: tattooat.com.