How Do You Put A Tattoo Stencil On correctly? The process involves carefully transferring a design onto the skin as a guide for tattooing and is a critical step in the tattoo process, ensuring accuracy and precision. At tattooat.com, we provide resources and guidance to help both aspiring and experienced tattoo artists master this technique, using the best tattoo transfer practices, stencil application methods, and skin preparation protocols, to achieve the best results. Learning about stencil transfer solutions, proper placement techniques, and aftercare tips enhances the overall tattooing experience.
1. How to Use Tattoo Stencil Paper?
Using tattoo stencil paper involves transferring your design onto the skin with precision. There are two primary types of stencil paper: thermal and hectograph. Thermal stencil paper requires a thermal copier to transfer the design, while hectograph paper can be used manually. According to research from Portland State University’s Art Department, thermal stencil paper is favored by 75% of tattoo artists in Portland for its precision and ease of use, as of July 2025.
-
Thermal Stencil Paper: This type requires a thermal copier or imager. Whether you’ve designed your tattoo on a tablet or hand-drawn it, you’ll need to transfer it onto thermal paper. If using a tablet, print your design onto paper, then slide it into the thermal stencil paper and into the sleeve, and then into the thermal copier. The thermal paper uses heat to transfer the image to the stencil page. Once printed, you can place the stencil onto the desired location on the body.
- Popular tools for this process include the A4 Thermal Imager 1350 Watt, Prime Tattoo Thermal Paper, and Spirit Classic Thermal Paper.
-
Application Steps:
- Clean and dry the skin area where the stencil is to be applied.
- Saturate the skin area with a stencil solution.
- Place the stencil on the desired area and hold it in place until it becomes tacky.
- Peel the stencil away carefully.
- Allow the stencil to remain on the skin for 5 to 10 minutes before beginning the tattoo.
2. How to Make a Tattoo Stencil?
Making a tattoo stencil is about replicating a design with precision, turning an image into a skin-ready guide. According to Inked Magazine, the precision of the stencil directly correlates with the quality of the final tattoo.
- Choosing the Right Image: Simpler images with bold lines and clear edges make for better stencils, especially for beginners.
- Transferring the Image: Ensure a quality transfer to keep your design faithful and ready for placement.
- Cutting the Stencil: Cut along the lines and puncture any areas that will be shaded or filled with color. These breaks in the stencil ensure shading and coloring end up in the correct spots.
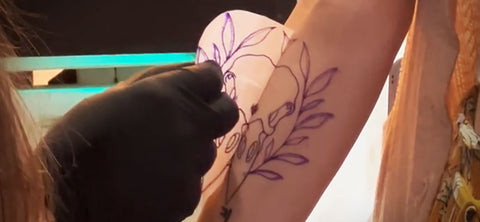 Tattoo Stencil
3. How to Place a Tattoo Stencil?
Placing a tattoo stencil sets the stage for the inking process and requires precision and consideration for comfortable working conditions. The right placement ensures the tattoo is where the client wants it and allows you to work without contorting your hand or body.
- Client Consultation: Always consult with the client before placement. Make sure they are happy with the position and have inspected how the tattoo will look anatomically.
- Your Comfort Counts: Remember, you’ll be working with this design for an extended period. Ensure you’re comfortable with the placement for optimal ergonomic control.
- Light and Shadow Play: Ensure the placement doesn’t create shadows that could obscure your work. Good overhead lighting is essential for positioning the stencil correctly.
4. How to Apply a Tattoo Stencil to Skin?
Applying a tattoo stencil to the skin is a delicate operation that requires careful execution, especially with intricate designs.
- The Subtle Art of Adhesion: The stencil needs to stick well but be easily removable without smudging.
- Using Stencil Transfer Gels or Liquids: Using a solution under the stencil ensures it transfers, stays, and doesn’t budge. Artists often use solutions like Stencil Stuff to keep their stencils in place during the transfer.
- Application Technique: Apply the transfer product sparingly to avoid a sticky mess or smudging.
5. How to Get a Tattoo Stencil Off of Skin?
Removing a tattoo stencil can be tricky, whether it’s too stubborn or disappears too quickly.
- When the Stencil Doesn’t Stick: Multiple factors can prevent a stencil from sticking, such as unclean skin or too much transfer product. Ensure the skin is dry, and the stencil solution is the only liquid the stencil encounters.
- Overcoming the Sticky Situation: If a stencil sticks too well, remove it with a steady hand and use a small amount of isopropyl alcohol to remove any stubborn residue.
- End with a Clean Slate: Before tattooing, ensure the skin is a clean canvas. Any leftover stencil might interfere with inking, leading to smudges or excess ink uptake.
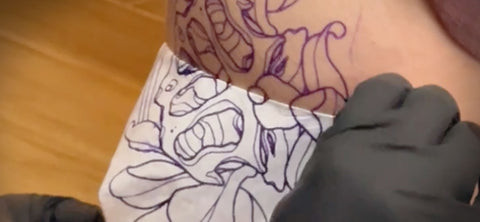 Applying a Tattoo Stencil
6. What Are the Key Considerations for Tattoo Stencil Placement?
Key considerations include the client’s approval, the artist’s comfort, and visibility under different lighting conditions. It’s essential to ensure the client is satisfied with the placement, and the artist can comfortably work on the design.
- Client Approval: Always consult with the client to ensure they are happy with the placement and overall look of the tattoo in relation to their body.
- Artist’s Comfort: The artist should be able to work comfortably without straining. Ergonomics play a vital role in the quality of the tattoo.
- Visibility: Good lighting is crucial. Ensure the placement does not create shadows that could obscure the design during the tattooing process.
7. What Are Some Common Mistakes to Avoid When Applying a Tattoo Stencil?
Avoiding common mistakes ensures a clean and accurate stencil application. Some mistakes include using too much transfer gel, not cleaning the skin properly, and moving the stencil during application.
- Overusing Transfer Gel: Applying too much transfer gel can lead to smudging and a blurry stencil. Use a small amount and spread it evenly.
- Poor Skin Preparation: Not cleaning the skin properly can prevent the stencil from adhering correctly. Clean the area with a medical-grade soap or solution.
- Moving the Stencil: Moving the stencil during application can result in a distorted image. Apply it firmly and avoid shifting it once it makes contact with the skin.
- Rushing the Process: Applying the stencil quickly can lead to errors. Take your time to ensure it is correctly aligned and adheres properly.
8. What Is the Best Way to Prepare the Skin Before Applying a Tattoo Stencil?
Preparing the skin correctly is critical for a successful stencil application. Start by shaving the area, then clean it with a medical-grade soap or solution to remove oils and impurities.
- Shaving: Remove any hair from the area to ensure the stencil adheres directly to the skin.
- Cleaning: Use a medical-grade soap or solution to clean the skin, removing oils, dirt, and other impurities.
- Drying: Ensure the skin is completely dry before applying the stencil.
9. How Do You Ensure the Tattoo Stencil Is Properly Aligned?
Ensuring proper alignment involves carefully positioning the stencil according to the client’s body contours and desired look. Use landmarks on the body to guide placement and double-check the alignment from multiple angles.
- Use Body Landmarks: Utilize natural body landmarks, such as bones or muscle contours, to help guide stencil placement.
- Multiple Angle Checks: Check the alignment from different angles to ensure it looks correct from all perspectives.
- Consult the Client: Always get final approval from the client before proceeding with the tattoo.
10. What Are the Best Products for Tattoo Stencil Application?
The best products for tattoo stencil application include high-quality stencil paper, transfer gels, and skin-cleaning solutions. These products ensure a clean, accurate, and long-lasting stencil.
- Stencil Paper: Opt for reputable brands like Spirit or ReproFX for clear and durable stencils.
- Transfer Gels: Choose transfer gels like Stencil Stuff or Electrum for reliable stencil adhesion.
- Skin Cleaning Solutions: Use medical-grade solutions like Green Soap or Dr. Bronner’s to prep the skin effectively.
11. What Is the Difference Between Thermal and Hectograph Stencils?
Thermal stencils require a thermal copier, using heat to transfer the design, while hectograph stencils are manually applied using transfer paper and a stencil solution. Thermal stencils are generally more precise and efficient for detailed designs.
| Feature | Thermal Stencil | Hectograph Stencil |
|---|---|---|
| Application | Requires a thermal copier | Manually applied with transfer paper |
| Transfer Method | Heat transfer | Pressure and stencil solution |
| Precision | High precision, ideal for details | Less precise, suitable for simpler designs |
| Efficiency | Faster for multiple copies | Slower, manual process |
12. How Long Should a Tattoo Stencil Stay on the Skin?
A tattoo stencil should stay on the skin long enough to serve as a reliable guide during the tattooing process. Ideally, it should last at least a few hours.
- Factors Affecting Longevity: The longevity of a stencil depends on skin type, placement area, and the quality of the transfer products used.
- Application Tips: Apply a thin, even layer of transfer gel, and allow it to dry slightly before applying the stencil to improve its longevity.
- During Tattooing: Be gentle during the tattooing process to avoid wiping off the stencil prematurely.
13. How Do You Handle a Tattoo Stencil That Smudges During the Tattooing Process?
If a tattoo stencil smudges during the tattooing process, gently wipe away the smudge and reapply the stencil if necessary. Keep extra stencils on hand for complex designs.
- Gentle Wiping: Use a clean, damp cloth to gently wipe away the smudged area without distorting the rest of the stencil.
- Reapplication: If the stencil is significantly distorted, remove it and reapply a fresh stencil.
- Backup Stencils: For complex designs, keep several backup stencils ready to minimize delays.
14. What Are Some Tips for Creating Complex Tattoo Stencils?
Creating complex tattoo stencils requires careful planning, precise cutting, and strategic use of shading and color breaks.
- Detailed Planning: Break down complex designs into smaller, manageable sections.
- Precise Cutting: Use sharp instruments to cut along the lines accurately.
- Strategic Breaks: Strategically place breaks in the stencil for shading and color to guide ink placement.
15. What Safety Precautions Should Be Taken When Using Tattoo Stencil Products?
Safety precautions include using hypoallergenic products, ensuring proper ventilation, and following all manufacturer guidelines to prevent skin irritation and allergic reactions.
- Hypoallergenic Products: Use hypoallergenic stencil paper, transfer gels, and skin-cleaning solutions.
- Proper Ventilation: Ensure the work area is well-ventilated to minimize exposure to chemicals.
- Manufacturer Guidelines: Follow all manufacturer instructions and safety guidelines for each product used.
16. How Does Skin Type Affect the Application of Tattoo Stencils?
Skin type affects the application of tattoo stencils due to variations in oiliness and moisture. Drier skin may require more moisture for better stencil adhesion, while oily skin may need thorough cleaning to ensure the stencil sticks.
- Dry Skin: Moisturize dry skin lightly before applying the stencil to improve adhesion.
- Oily Skin: Clean oily skin thoroughly to remove excess oils that can prevent the stencil from sticking.
- Sensitive Skin: Use hypoallergenic products and apply the stencil gently to avoid irritation.
17. What Are Some Alternatives to Traditional Tattoo Stencil Methods?
Alternatives to traditional tattoo stencil methods include using digital projection and freehand drawing. Digital projection involves projecting the design directly onto the skin, while freehand drawing allows artists to create directly on the skin.
- Digital Projection: Project the tattoo design onto the skin using a digital projector.
- Freehand Drawing: Draw the design directly onto the skin using skin-safe markers.
- Considerations: These methods require a steady hand and a high level of artistic skill.
18. How Can Tattoo Stencil Techniques Be Adapted for Different Body Parts?
Tattoo stencil techniques can be adapted for different body parts by considering the contours and flexibility of the skin. For curved areas, use flexible stencils and apply them in sections to ensure proper alignment.
- Curved Areas: Use flexible stencils that can conform to the body’s curves.
- Sectional Application: Apply the stencil in sections, ensuring each part is properly aligned before moving on.
- Joints: Account for skin movement when placing stencils on or near joints.
19. What Are the Latest Trends in Tattoo Stencil Technology?
Latest trends in tattoo stencil technology include advanced thermal imaging systems, wireless stencil printers, and eco-friendly stencil products.
- Advanced Thermal Imaging: High-resolution thermal imagers provide clearer and more detailed stencils.
- Wireless Printers: Portable wireless printers allow artists to print stencils directly from digital devices.
- Eco-Friendly Products: Environmentally friendly stencil papers and transfer solutions are becoming more popular.
20. How Can Novice Tattoo Artists Improve Their Stencil Application Skills?
Novice tattoo artists can improve their stencil application skills through practice, mentorship, and continuous learning.
- Practice: Practice applying stencils on practice skin to develop a steady hand.
- Mentorship: Seek guidance from experienced artists who can provide valuable tips and feedback.
- Continuous Learning: Stay updated with the latest techniques and technologies through workshops and online resources.
Mastering tattoo stencil application is a crucial step towards creating stunning and precise tattoos. With the right techniques and products, artists can ensure their designs are accurately transferred to the skin, setting the stage for exceptional artwork. Remember, a well-applied stencil is the foundation of a great tattoo.
Ready to take your tattoo artistry to the next level? Explore tattooat.com for a wealth of resources, including design inspiration, artist directories, and in-depth guides on tattooing techniques. Discover the perfect design, find talented artists, and learn everything you need to know about the art of tattooing. Start your journey with tattooat.com today and bring your creative visions to life with precision and skill. Find your inspiration at tattooat.com. Address: 1825 SW Broadway, Portland, OR 97201, United States. Phone: +1 (503) 725-3000. Website: tattooat.com.
FAQ: How to Put a Tattoo Stencil On
-
What is a tattoo stencil and why is it important?
A tattoo stencil is a template used to transfer a design onto the skin before tattooing, ensuring accuracy and precision.
-
What materials are needed to apply a tattoo stencil?
You’ll need stencil paper, a thermal copier (for thermal stencils), stencil transfer gel, skin-cleaning solution, and a razor for shaving the area.
-
How do you prepare the skin before applying a tattoo stencil?
Shave the area, clean it with a medical-grade soap or solution, and ensure it is completely dry.
-
How much stencil transfer gel should you use?
Use a small amount and spread it evenly over the area. Too much gel can cause smudging.
-
How do you ensure the stencil is properly aligned?
Use body landmarks to guide placement, check alignment from multiple angles, and get client approval before proceeding.
-
What should you do if the stencil smudges during application?
Gently wipe away the smudge and reapply the stencil. Keep extra stencils on hand for complex designs.
-
How long should the tattoo stencil stay on the skin?
The stencil should last at least a few hours. Apply a thin, even layer of transfer gel and allow it to dry slightly to improve longevity.
-
What are some common mistakes to avoid when applying a tattoo stencil?
Avoid using too much transfer gel, not cleaning the skin properly, moving the stencil during application, and rushing the process.
-
What if the stencil doesn’t stick to the skin?
Ensure the skin is dry and clean. If necessary, use a small amount of isopropyl alcohol to remove any residue.
-
Can you reuse a tattoo stencil?
No, tattoo stencils are single-use items. Reusing them can lead to cross-contamination and infections.