Making your own henna tattoo is a fun and creative way to adorn your skin with temporary art, and tattooat.com is here to guide you through the process. With the right ingredients and techniques, you can achieve beautiful, dark stains that last. Ready to unleash your inner artist? Let’s explore the world of homemade henna, covering everything from sourcing quality ingredients to mastering application techniques for stunning body art.
1. What Exactly is a Henna Tattoo and How Does it Work?
A henna tattoo is a temporary skin decoration made from the powdered leaves of the henna plant, offering a natural alternative to permanent tattoos. The henna powder is mixed into a paste, which then stains the skin a reddish-brown color. This stain occurs because the lawsone molecules in henna bind to the proteins in the skin’s outer layer.
Henna has been used for centuries in various cultures for celebrations, religious ceremonies, and body art. It’s a beautiful way to express yourself creatively, and it fades naturally as your skin exfoliates. Unlike permanent tattoos that involve injecting ink into the dermis, henna sits on the surface of the skin, making it a safe and temporary option. At tattooat.com, we celebrate the rich history and artistic expression of henna, offering resources for both beginners and experienced henna artists alike.
2. What are the Key Ingredients for Making Henna Tattoo Paste?
To create your own henna tattoo paste, you’ll need a few essential ingredients: henna powder, lemon juice, essential oils, and sugar. Each ingredient plays a vital role in achieving the best possible stain and consistency.
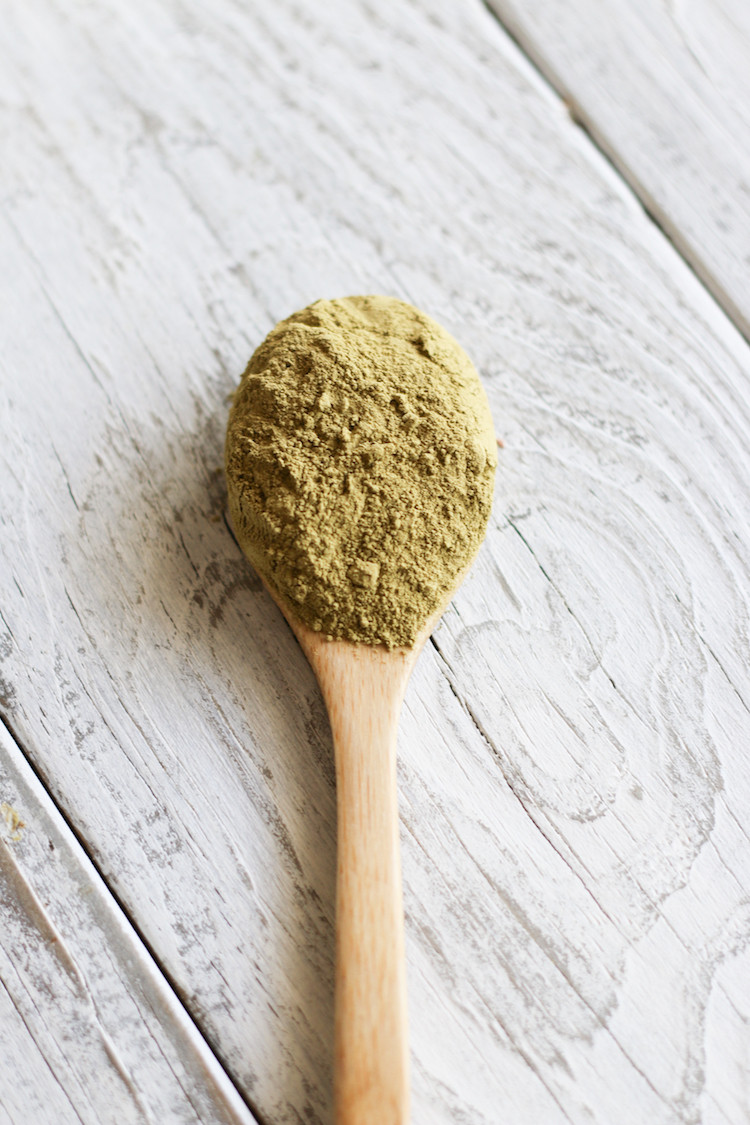
2.1. Henna Powder: The Foundation
The most crucial ingredient is high-quality henna powder, which should be finely sifted and free of additives. According to henna artists at Inked Magazine, the quality of henna powder greatly impacts the darkness and longevity of the stain. Look for henna powder specifically labeled for body art, as hair henna may contain chemicals that are unsafe for skin application.
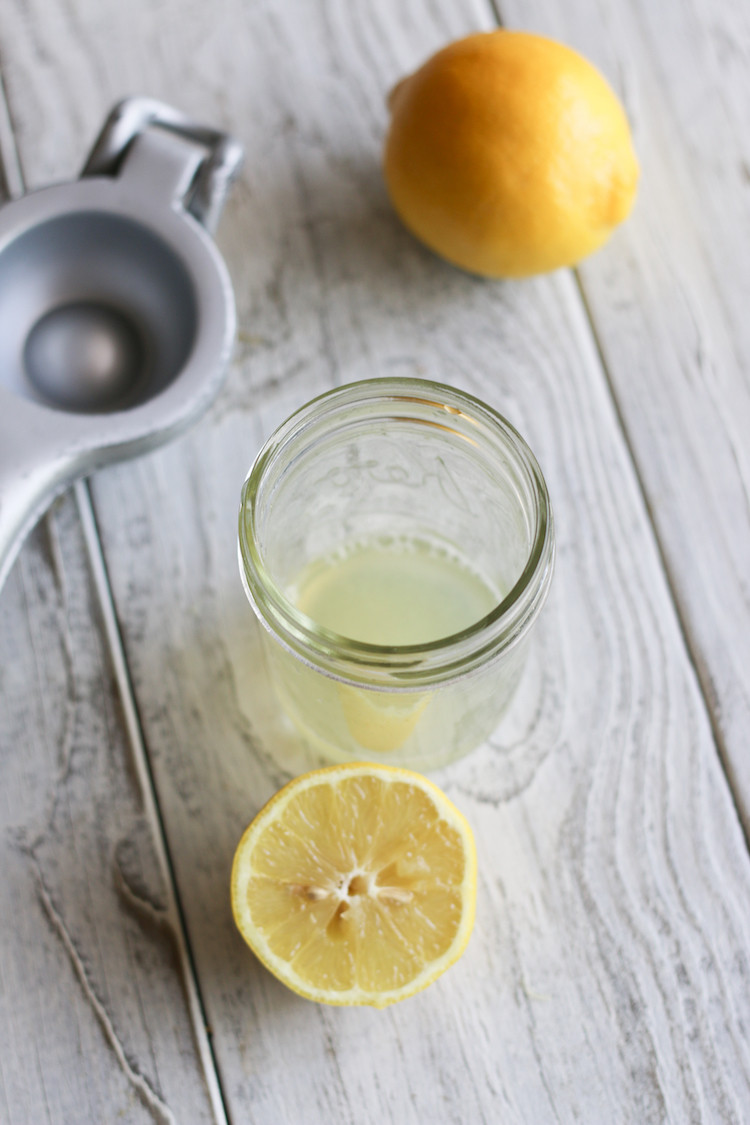
2.2. Lemon Juice: The Dye Activator
Lemon juice acts as a mild acid that helps release the dye molecules from the henna powder. It’s essential to use fresh lemon juice, as bottled versions may contain preservatives that interfere with the dye release process. The acidity of the lemon juice helps create a smooth paste and encourages the henna to stain the skin effectively.
2.3. Essential Oils: The Stain Enhancers
Essential oils, such as lavender, tea tree, or cajeput, enhance the henna stain by improving the dye’s ability to bind to the skin. These oils contain monoterpene alcohols, which aid in dye release. Not only do they boost the stain, but they also add a pleasant aroma to your henna paste. Always use body-art-quality essential oils to ensure safety.
2.4. Sugar: The Consistency Controller
Sugar helps create a smooth, pliable paste that adheres well to the skin. It keeps the henna moist, allowing for prolonged contact and a deeper stain. The consistency of the paste is vital for intricate designs, and sugar ensures that the henna doesn’t dry out too quickly.
| Ingredient | Purpose | Notes |
|---|---|---|
| Henna Powder | Provides the dye that stains the skin | Use body-art-quality henna powder for best results. |
| Lemon Juice | Activates the dye release in henna powder | Freshly squeezed lemon juice is recommended. |
| Essential Oils | Enhances the stain and adds fragrance | Lavender, tea tree, and cajeput are popular choices. |
| Sugar | Improves the paste’s consistency and adhesion to the skin | Use fine sugar for a smooth paste. |
3. How Do You Prepare Your Skin Before Applying Henna?
Preparing your skin properly is crucial for achieving a dark, long-lasting henna stain. Start by cleansing the area with soap and water to remove any oils, lotions, or dirt. Exfoliating the skin gently can also help remove dead skin cells, allowing the henna to penetrate better.
Avoid applying lotions or moisturizers before applying henna, as these can create a barrier that prevents the dye from staining the skin effectively. Make sure the area is completely dry before you begin the application process. According to dermatologists at Portland State University’s Dermatology Department, clean, dry skin is the ideal canvas for henna application.
4. What is the Step-by-Step Guide to Making Henna Paste?
Making your own henna paste is a rewarding experience. Follow these steps to create a perfect batch every time.
4.1. Gather Your Supplies
First, gather all your ingredients: henna powder, lemon juice, essential oil, and sugar. You’ll also need a mixing bowl, a spoon or whisk, plastic wrap, and a warm place to let the paste sit.
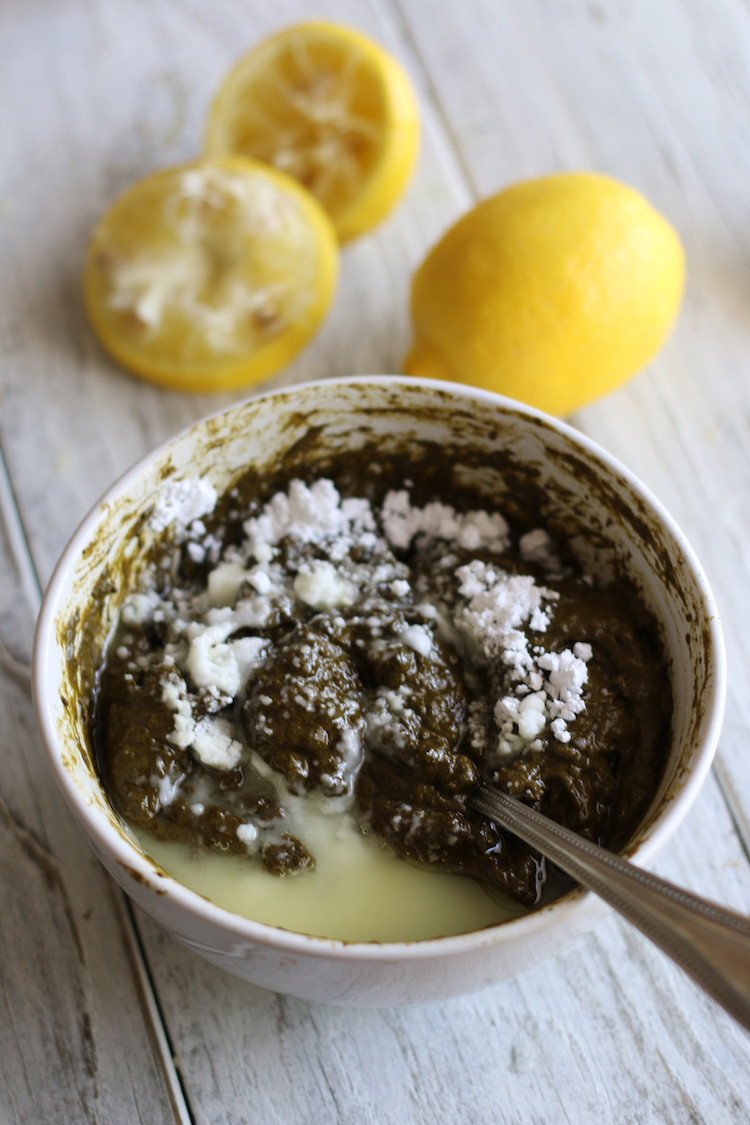
4.2. Mix the Henna Powder and Lemon Juice
In the mixing bowl, combine the henna powder and lemon juice. Start by adding the lemon juice gradually, mixing until you achieve a thick, mud-like consistency. Ensure there are no lumps in the paste.
4.3. Add Essential Oil and Sugar
Next, add the essential oil and sugar to the mixture. Stir well until everything is fully incorporated. The paste should be smooth and creamy.
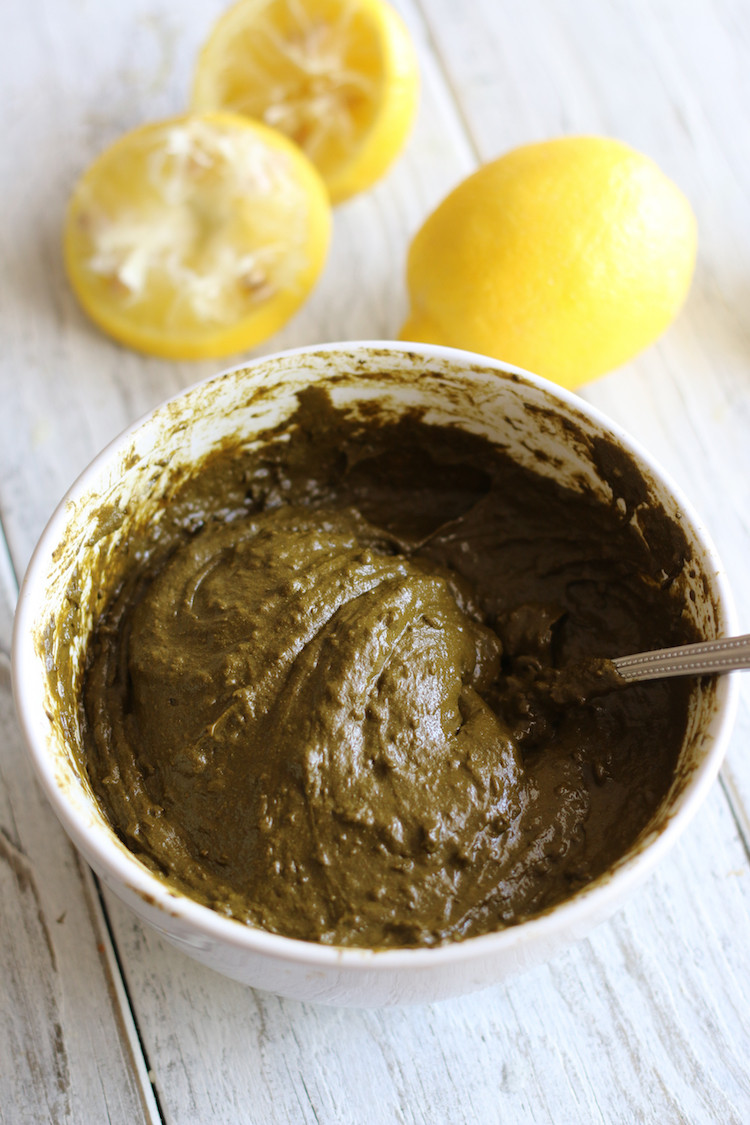
4.4. Let the Paste Rest
Cover the bowl with plastic wrap, pressing it directly onto the surface of the paste to prevent air from getting in. Let the paste sit in a warm place for 24 hours to allow the dye to release.
4.5. Check the Dye Release
After 24 hours, check the dye release by dabbing a small amount of paste onto your palm. If it leaves an orange stain within a few minutes, the paste is ready to use. If not, let it sit for a few more hours and test again.
4.6. Adjust the Consistency
Once the dye has released, you can adjust the consistency of the paste if needed. If it’s too thick, add a few drops of lemon juice. If it’s too thin, add a pinch of henna powder. Stir well until you achieve the desired consistency.
| Step | Description | Tips |
|---|---|---|
| Gather Supplies | Collect henna powder, lemon juice, essential oil, and sugar. | Ensure all ingredients are body-art quality. |
| Mix Henna and Lemon Juice | Combine henna powder and lemon juice in a bowl. | Mix gradually to avoid lumps. |
| Add Essential Oil and Sugar | Incorporate essential oil and sugar into the mixture. | Stir well for even distribution. |
| Let the Paste Rest | Cover and let the paste sit in a warm place for 24 hours. | This allows the dye to release fully. |
| Check Dye Release | Test the paste on your palm. | An orange stain indicates readiness. |
| Adjust Consistency | Add lemon juice or henna powder to adjust the consistency. | The paste should be smooth and creamy. |
 mixing henna paste for diy tattoo
5. What Tools Do You Need for Applying Henna?
Applying henna requires a few specialized tools to achieve precise and intricate designs. Here are the essentials:
5.1. Applicator Bottles or Cones
Applicator bottles or cones are used to apply the henna paste to the skin. Cones are typically made from cellophane or plastic sheets and are rolled into a cone shape. Bottles come with fine tips that allow for detailed work. Choose the tool that feels most comfortable for you.
5.2. Stencils
Stencils can be helpful for beginners or for creating complex designs. They provide a guide for applying the henna paste, ensuring accuracy and consistency. You can find a variety of stencils online or create your own using adhesive paper.
5.3. Cotton Swabs
Cotton swabs are useful for correcting mistakes and cleaning up edges. Dip them in lemon juice or water to gently remove any unwanted henna paste.
5.4. Sealant
A sealant, such as lemon juice mixed with sugar, helps keep the henna paste moist on the skin. This allows for a darker, longer-lasting stain. Apply the sealant gently over the henna design after it has dried slightly.
| Tool | Purpose | Tips |
|---|---|---|
| Applicator Bottles | Applying henna paste with precision | Choose a bottle with a fine tip for detailed work. |
| Cones | Applying henna paste in a traditional way | Practice rolling cones for the best results. |
| Stencils | Creating complex designs easily | Secure the stencil to the skin with adhesive for best results. |
| Cotton Swabs | Correcting mistakes and cleaning up edges | Dip in lemon juice or water for gentle removal. |
| Sealant (Sugar Mix) | Keeping henna paste moist for a darker stain | Apply gently over the henna design after it has dried slightly. |
6. How Do You Apply Henna for Best Results?
Applying henna is an art that requires patience and practice. Here are some tips for achieving the best results:
6.1. Practice Your Design
Before applying henna to your skin, practice your design on paper or a practice skin. This will help you get comfortable with the applicator and ensure that you are happy with the design.
6.2. Apply the Henna Paste
Using your applicator bottle or cone, carefully apply the henna paste to your skin, following your design or stencil. Apply a generous amount of paste, ensuring that it is evenly distributed.
6.3. Let the Henna Dry
Allow the henna paste to dry completely. This may take anywhere from 30 minutes to a few hours, depending on the humidity and temperature.
6.4. Apply Sealant
Once the henna paste has dried slightly, apply a sealant over the design. This will help keep the paste moist and ensure a darker stain.
6.5. Keep the Henna on Your Skin
For the best results, keep the henna paste on your skin for as long as possible, ideally 2-6 hours. The longer the paste stays in contact with your skin, the darker the stain will be.
| Step | Description | Tips |
|---|---|---|
| Practice Design | Rehearse your design on paper or practice skin. | This will improve your application technique. |
| Apply Henna Paste | Carefully apply henna paste to your skin. | Ensure even distribution. |
| Let Henna Dry | Allow the henna paste to dry completely. | This may take 30 minutes to a few hours. |
| Apply Sealant | Apply a sealant over the design. | This keeps the paste moist and enhances the stain. |
| Keep Henna on Skin | Keep henna paste on skin for 2-6 hours. | The longer it stays, the darker the stain. |
 applying henna tattoo from cone
7. What is the Aftercare for Henna Tattoos?
Proper aftercare is essential for a long-lasting, dark henna stain. Here are some tips to follow:
7.1. Avoid Water
After removing the henna paste, avoid washing the area with water for at least 12-24 hours. Water can interfere with the oxidation process, which is necessary for the stain to darken.
7.2. Apply Natural Oils
Apply natural oils, such as coconut oil or olive oil, to the area regularly. This will help keep the skin moisturized and prevent the stain from fading quickly.
7.3. Avoid Harsh Soaps and Chemicals
Avoid using harsh soaps, chemicals, or exfoliants on the hennaed area. These can strip the skin of its natural oils and cause the stain to fade faster.
7.4. Stay Warm
Keeping the area warm can help darken the stain. Wear gloves or socks to protect the design and keep it warm, especially during the first few days after application.
| Aftercare Tip | Description | Why It’s Important |
|---|---|---|
| Avoid Water | Refrain from washing the area for 12-24 hours. | Water can interfere with the oxidation process. |
| Apply Natural Oils | Apply coconut or olive oil regularly. | Keeps the skin moisturized and prevents fading. |
| Avoid Harsh Products | Steer clear of harsh soaps, chemicals, and exfoliants. | These can strip the skin of oils and cause the stain to fade faster. |
| Stay Warm | Keep the area warm. | Warmth can help darken the stain. |
8. How Can You Make Your Henna Stain Darker?
Achieving a dark henna stain requires a combination of proper paste preparation, application, and aftercare. Here are some additional tips to maximize your results:
8.1. Use High-Quality Henna Powder
Start with fresh, high-quality henna powder. The fresher the powder, the darker the stain.
8.2. Use the Right Essential Oils
Use essential oils that are known to enhance the henna stain, such as lavender, tea tree, or cajeput.
8.3. Keep the Paste Moist
Apply a sealant regularly to keep the henna paste moist on your skin. This will allow for prolonged contact and a darker stain.
8.4. Apply Heat
Apply gentle heat to the hennaed area using a hairdryer or by sitting in the sun. Heat helps the dye molecules penetrate the skin more effectively.
8.5. Avoid Over-Exfoliating
Avoid exfoliating the skin too frequently, as this can remove the stained skin cells and cause the design to fade faster.
| Tip | Description | Why It Works |
|---|---|---|
| High-Quality Henna | Use fresh, body-art-quality henna powder. | Fresher powder yields a darker stain. |
| Right Essential Oils | Opt for lavender, tea tree, or cajeput oil. | These oils enhance dye release and penetration. |
| Keep Paste Moist | Apply a sealant regularly. | Prolonged contact ensures a darker stain. |
| Apply Heat | Use a hairdryer or sun exposure for gentle warmth. | Heat facilitates dye penetration. |
| Avoid Over-Exfoliating | Limit exfoliation to prevent premature fading. | Protects the stained skin cells. |
9. What are the Common Mistakes to Avoid When Making Henna?
Making henna can be tricky, and there are several common mistakes to avoid for the best results:
9.1. Using Old or Low-Quality Henna Powder
Old or low-quality henna powder may not stain well, resulting in a faint or uneven design. Always use fresh, body-art-quality henna powder.
9.2. Using the Wrong Essential Oils
Using essential oils that are not safe for skin application can cause irritation or allergic reactions. Always use body-art-quality essential oils.
9.3. Not Letting the Paste Sit Long Enough
Failing to let the henna paste sit long enough for dye release can result in a weak stain. Allow the paste to sit for at least 24 hours in a warm place.
9.4. Washing the Area Too Soon
Washing the hennaed area too soon after removing the paste can interfere with the oxidation process and result in a lighter stain.
| Mistake | Consequence | Solution |
|---|---|---|
| Old/Low-Quality Henna | Faint or uneven stain | Use fresh, body-art-quality henna powder |
| Wrong Essential Oils | Skin irritation or allergic reactions | Use body-art-quality essential oils |
| Insufficient Paste Resting | Weak stain | Allow paste to sit for at least 24 hours in a warm place |
| Washing Area Too Soon | Lighter stain | Avoid washing the area for 12-24 hours after removing the paste |
10. What are Some Creative Henna Tattoo Designs?
Henna tattoos offer endless possibilities for creative expression. Here are some popular design ideas to inspire you:
10.1. Floral Patterns
Floral patterns are a classic choice for henna tattoos. They can be simple or intricate, and they look beautiful on hands, feet, and arms.
10.2. Geometric Designs
Geometric designs are modern and stylish. They can be symmetrical or asymmetrical, and they look great on any part of the body.
10.3. Mandala Art
Mandala art is intricate and spiritual. These designs often incorporate geometric shapes, floral patterns, and symbolic elements.
10.4. Tribal Patterns
Tribal patterns are bold and striking. They often incorporate geometric shapes and lines, and they can be customized to reflect your personal style.
| Design Idea | Description | Best Placement |
|---|---|---|
| Floral Patterns | Classic and beautiful designs featuring flowers and leaves | Hands, feet, arms |
| Geometric Designs | Modern and stylish designs with shapes and lines | Any part of the body |
| Mandala Art | Intricate and spiritual designs with geometric shapes and symbolic elements | Back, chest, arms |
| Tribal Patterns | Bold and striking designs with geometric shapes and lines | Arms, legs, back |
 creative henna tattoo designs for women
11. What is the History and Cultural Significance of Henna Tattoos?
Henna has a rich history and cultural significance that dates back thousands of years. It has been used in various cultures for celebrations, religious ceremonies, and body art.
11.1. Ancient Origins
Henna’s use can be traced back to ancient Egypt, where it was used to adorn the bodies of pharaohs and nobility. It was also used for medicinal purposes and as a cosmetic.
11.2. Cultural Traditions
In many cultures, henna is an integral part of wedding ceremonies. The bride’s hands and feet are often adorned with intricate henna designs, symbolizing good luck, prosperity, and fertility.
11.3. Modern Revival
Today, henna tattoos have experienced a modern revival, with people all over the world embracing this ancient art form. It’s a beautiful way to express yourself creatively and connect with cultural traditions.
| Aspect | Description | Cultural Significance |
|---|---|---|
| Ancient Origins | Used in ancient Egypt for pharaohs and nobility | Symbolized status and beauty |
| Cultural Traditions | Integral part of wedding ceremonies in many cultures | Symbolizes good luck, prosperity, and fertility |
| Modern Revival | Embraced globally as a form of creative expression | Connects individuals with cultural traditions and artistic expression |
12. Are There Any Risks Associated with Henna Tattoos?
While natural henna is generally safe, there are some risks to be aware of:
12.1. Allergic Reactions
Some people may be allergic to henna or the essential oils used in the paste. It’s always a good idea to do a patch test before applying henna to a large area of your skin.
12.2. Black Henna
Avoid “black henna,” which contains a chemical dye called paraphenylenediamine (PPD). PPD can cause severe skin reactions, blistering, and permanent scarring. True henna always stains the skin a reddish-brown color.
12.3. Skin Irritation
Using low-quality henna powder or harsh chemicals can cause skin irritation. Always use body-art-quality henna powder and natural ingredients.
| Risk | Description | Prevention |
|---|---|---|
| Allergic Reactions | Some individuals may be allergic to henna or essential oils | Perform a patch test before applying to a large area |
| Black Henna | “Black henna” contains PPD, causing severe skin reactions | Avoid “black henna” and ensure true henna is used |
| Skin Irritation | Low-quality henna powder or harsh chemicals can irritate the skin | Use body-art-quality henna powder and natural ingredients |
13. What is the Difference Between Natural Henna and Black Henna?
It’s essential to understand the difference between natural henna and black henna to protect your skin:
13.1. Natural Henna
Natural henna is made from the powdered leaves of the henna plant. It stains the skin a reddish-brown color and is generally safe to use.
13.2. Black Henna
Black henna contains a chemical dye called paraphenylenediamine (PPD). It stains the skin black quickly but can cause severe skin reactions, blistering, and permanent scarring. Black henna is illegal in many countries and should be avoided.
| Feature | Natural Henna | Black Henna |
|---|---|---|
| Ingredient | Powdered leaves of the henna plant | Contains paraphenylenediamine (PPD) |
| Stain Color | Reddish-brown | Black |
| Safety | Generally safe | Can cause severe skin reactions and scarring |
| Legality | Legal | Illegal in many countries |
14. Where Can You Find High-Quality Henna Supplies?
Finding high-quality henna supplies is essential for achieving the best results. Here are some reliable sources:
14.1. Specialty Henna Shops
Specialty henna shops offer a wide range of henna powders, essential oils, and application tools. These shops often provide expert advice and guidance.
14.2. Online Retailers
Online retailers, such as Amazon, Etsy, and specialized henna websites, offer a convenient way to purchase henna supplies. Be sure to read reviews and check the reputation of the seller before making a purchase.
14.3. Local Art Supply Stores
Local art supply stores may carry henna powder and essential oils. Check the labels carefully to ensure that the products are body-art quality.
| Source | Products Offered | Tips |
|---|---|---|
| Specialty Henna Shops | Henna powders, essential oils, application tools | Seek expert advice and guidance |
| Online Retailers | Convenient online shopping with a wide variety of products | Read reviews and check seller reputation |
| Local Art Supply Stores | May carry henna powder and essential oils | Ensure products are body-art quality |
15. How to Store Henna Paste Properly?
Proper storage of henna paste is crucial to maintain its effectiveness and ensure a dark stain. Here are some tips on how to store henna paste correctly:
15.1. Freezing Henna Paste
Freezing henna paste is an excellent way to preserve its quality for extended periods. Divide the paste into small, airtight containers or zip-top bags before freezing. This prevents the formation of ice crystals that can affect the paste’s consistency. When you’re ready to use the henna, thaw it in the refrigerator for several hours or overnight.
15.2. Refrigerating Henna Paste
If you plan to use the henna paste within a few days, you can store it in the refrigerator. Keep it in an airtight container to prevent it from drying out. However, refrigeration is not a long-term storage solution, as the paste will eventually lose its staining power.
15.3. Avoiding Direct Sunlight and Heat
Regardless of whether you freeze or refrigerate your henna paste, always avoid exposing it to direct sunlight or heat. These conditions can degrade the quality of the henna and reduce its ability to stain the skin effectively.
| Storage Method | Description | Benefits |
|---|---|---|
| Freezing | Divide into airtight containers/bags and freeze | Preserves quality for extended periods |
| Refrigerating | Store in an airtight container in the refrigerator for short-term storage | Maintains quality for a few days |
| Avoid Sunlight | Keep away from direct sunlight and heat | Prevents degradation of henna quality |
16. What Kind of Essential Oils Should You Use for Henna Tattoos?
Choosing the right essential oils is essential for enhancing the henna stain and ensuring a pleasant aroma. Here are some of the best essential oils to use for henna tattoos:
16.1. Lavender Essential Oil
Lavender essential oil is a popular choice for henna tattoos due to its calming scent and its ability to enhance the stain. It also has antiseptic properties, making it gentle on the skin.
16.2. Tea Tree Essential Oil
Tea tree essential oil is another excellent option for henna tattoos. It has strong antiseptic and antibacterial properties, which can help prevent infections. It also enhances the henna stain, resulting in a darker, longer-lasting design.
16.3. Cajeput Essential Oil
Cajeput essential oil is known for its strong aroma and its ability to improve circulation. It also enhances the henna stain, making it a favorite among henna artists.
| Essential Oil | Benefits | Considerations |
|---|---|---|
| Lavender | Calming scent, enhances stain, antiseptic properties | Safe for most skin types |
| Tea Tree | Antiseptic, antibacterial, enhances stain | Use with caution on sensitive skin; perform a patch test |
| Cajeput | Strong aroma, improves circulation, enhances stain | Use sparingly due to its potency; ensure it’s body-art quality |
 henna cones for diy tattoos
17. How Long Does a Henna Tattoo Typically Last?
The longevity of a henna tattoo can vary depending on several factors, including the quality of the henna paste, the application technique, and the aftercare routine. On average, a henna tattoo can last anywhere from one to three weeks.
17.1. Factors Affecting Longevity
The darkness and longevity of the henna stain depend on how well the skin is prepared, the quality of the henna paste, and the aftercare practices followed. Regular moisturizing and avoiding harsh soaps can prolong the life of your henna tattoo.
17.2. Skin Type
Different skin types may react differently to henna. Drier skin tends to hold the stain longer than oily skin.
17.3. Body Part
The location of the henna tattoo on your body can also affect its longevity. Areas with thicker skin, such as the palms and soles, tend to hold the stain longer than areas with thinner skin, such as the arms and torso.
| Factor | Influence on Longevity | Tips for Maximizing Longevity |
|---|---|---|
| Henna Quality | High-quality henna yields a darker, longer-lasting stain | Use fresh, body-art-quality henna powder |
| Skin Preparation | Proper skin preparation enhances stain absorption | Clean and exfoliate the skin before application |
| Aftercare | Proper aftercare prevents premature fading | Moisturize regularly and avoid harsh soaps |
| Skin Type | Drier skin holds the stain longer than oily skin | Adjust aftercare routine based on your skin type |
| Body Part | Thicker skin areas hold the stain longer | Apply henna to palms and soles for longer-lasting results |
18. Can You Use Henna on Other Parts of Your Body Besides Hands and Feet?
Yes, you can use henna on various parts of your body besides the hands and feet. Henna can be applied to the arms, legs, back, chest, and even the scalp, as long as you take certain precautions.
18.1. Safety Considerations
When applying henna to sensitive areas like the scalp or chest, ensure that the henna paste does not contain any harsh chemicals or irritants. Always use body-art-quality henna powder and essential oils.
18.2. Design Ideas
The possibilities for henna designs on different parts of the body are endless. Consider floral patterns on the arms, geometric designs on the back, or mandala art on the chest.
| Body Part | Design Ideas | Safety Considerations |
|---|---|---|
| Arms | Floral patterns, geometric designs, tribal patterns | Use body-art-quality henna powder and essential oils |
| Legs | Intricate patterns, geometric shapes, floral motifs | Avoid applying henna to broken or irritated skin |
| Back | Mandala art, geometric designs, large-scale patterns | Ensure the henna paste does not contain any harsh chemicals or irritants |
| Chest | Delicate designs, mandala patterns, floral motifs | Test a small area first to check for any allergic reactions |
| Scalp | Henna can be used as a natural hair dye | Use henna specifically formulated for hair and avoid harsh chemicals |
19. What are the Best Ways to Remove a Henna Tattoo If You Don’t Like It?
If you’re not satisfied with your henna tattoo or want to remove it sooner, there are several methods you can try:
19.1. Exfoliation
Exfoliating the skin regularly can help fade the henna stain more quickly. Use a gentle scrub or exfoliating cleanser to remove dead skin cells and gradually lighten the design.
19.2. Lemon Juice and Baking Soda
A mixture of lemon juice and baking soda can act as a natural bleaching agent. Apply the paste to the hennaed area, let it sit for a few minutes, and then rinse it off. Repeat this process daily until the stain fades.
19.3. Micellar Water
Micellar water is a gentle cleansing agent that can help remove the henna stain. Apply micellar water to a cotton pad and gently rub the hennaed area. Repeat this process several times a day.
| Removal Method | Description | Considerations |
|---|---|---|
| Exfoliation | Regular exfoliation with a gentle scrub | Avoid over-exfoliating to prevent skin irritation |
| Lemon Juice and Baking Soda | A mixture of lemon juice and baking soda applied as a paste | Can be drying; moisturize the skin afterward |
| Micellar Water | Gentle cleansing with micellar water | Repeat several times a day for best results |
20. What are the Benefits of Using Natural Henna Over Chemical Dyes?
Choosing natural henna over chemical dyes offers several advantages for your skin and overall health:
20.1. Safety
Natural henna is generally safe for most people, as it is derived from plant-based ingredients. Chemical dyes, on the other hand, can contain harsh chemicals that can cause skin irritation, allergic reactions, and even long-term health problems.
20.2. Natural Ingredients
Natural henna is made from simple, natural ingredients like henna powder, lemon juice, essential oils, and sugar. Chemical dyes often contain synthetic chemicals, preservatives, and artificial colors.
20.3. Environmental Friendliness
Natural henna is biodegradable and does not contribute to environmental pollution. Chemical dyes can release harmful chemicals into the environment during production and disposal.
| Benefit | Natural Henna | Chemical Dyes |
|---|---|---|
| Safety | Generally safe, plant-based ingredients | May contain harsh chemicals that cause skin irritation and allergic reactions |
| Natural Ingredients | Simple, natural ingredients like henna powder, lemon juice, and essential oils | Often contain synthetic chemicals, preservatives, and artificial colors |
| Environmental Impact | Biodegradable and environmentally friendly | Can release harmful chemicals into the environment during production and disposal |
Navigating the world of henna tattoos can be exciting, and tattooat.com is your go-to resource for inspiration, guidance, and high-quality information. Whether you’re looking to create your own henna paste or explore stunning design ideas, we’ve got you covered.
Ready to embark on your henna journey? Visit tattooat.com today to discover a wealth of designs, connect with talented artists, and learn everything you need to know about this ancient art form. Unleash your creativity and express yourself with confidence at tattooat.com.
Address: 1825 SW Broadway, Portland, OR 97201, United States
Phone: +1 (503) 725-3000
Website: tattooat.com
FAQ: Making Your Own Henna Tattoo
1. Can I use any type of henna powder for skin tattoos?
No, you should only use henna powder specifically labeled for body art. Hair henna may contain additives that are not safe for skin application.
2. What essential oils are best for henna tattoos?
Lavender, tea tree, and cajeput essential oils are excellent choices for henna tattoos. They enhance the stain and add a pleasant aroma.
3. How long should I leave the henna paste on my skin?
For the best results, leave the henna paste on your skin for 2-6 hours. The longer it stays, the darker the stain will be.
4. How do I make the henna stain darker?
Use high-quality henna powder, the right essential oils, keep the paste moist, and apply gentle heat to the hennaed area.
5. Is black henna safe to use?
No, black henna is not safe to use. It contains a chemical dye called paraphenylenediamine (PPD) that can cause severe skin reactions and scarring.
6. How do I store leftover henna paste?
You can store leftover henna paste in the freezer for 6-12 months. Divide it into airtight containers or zip-top bags before freezing.
7. Can I use henna on my hair as well as my skin?
Yes, you can use henna on your hair as a natural dye. However, use henna specifically formulated for hair and avoid harsh chemicals.
8. How long does a henna tattoo last?
A henna tattoo typically lasts one to three weeks, depending on the quality of the henna paste, application technique, and aftercare routine.
9. Can I remove a henna tattoo if I don’t like it?
Yes, you can remove a henna tattoo by exfoliating the skin regularly, using a mixture of lemon juice and baking soda, or applying micellar water.
10. What are the benefits of using natural henna over chemical dyes?
Natural henna is safer, made from natural ingredients, and environmentally friendly compared to chemical dyes.