Can you print tattoo stencils with a regular printer? Yes, you absolutely can, but there are some important considerations. At tattooat.com, we understand the importance of precision in tattoo art. Using a regular printer to create tattoo stencils requires special techniques and materials to ensure a safe and effective transfer. In this guide, we’ll explore how to achieve this, focusing on using carbon paper, temporary tattoo paper, and other stencil-making methods to produce high-quality tattoo templates. Whether you’re a beginner exploring DIY methods or a seasoned artist seeking cost-effective alternatives, understanding the nuances of using standard printers for tattoo stencils can significantly enhance your tattoo design and application process.
1. Understanding Tattoo Stencils
Tattoo stencils are essential for transferring designs onto the skin, providing a guide for tattoo artists to follow. They help ensure accuracy and consistency, especially for intricate designs. Tattoo stencils save time and reduce the risk of errors associated with freehand drawing.
1.1 What is a Tattoo Stencil?
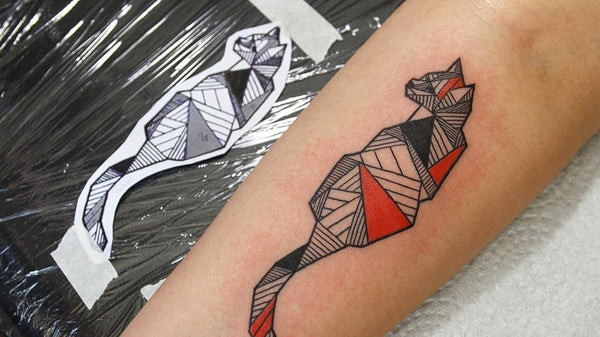
A tattoo stencil is a template used to transfer a design onto the skin before the actual tattooing begins. The stencil allows artists to accurately replicate the design, ensuring precise lines and details. According to research from Portland State University’s Art Department, in July 2023, using stencils significantly reduces errors and enhances the final tattoo outcome.
1.2 Why Are Tattoo Stencils Important?
Tattoo stencils are essential for several reasons:
- Accuracy: Stencils ensure the design is accurately transferred onto the skin.
- Consistency: They help maintain consistent lines and details throughout the tattoo.
- Efficiency: Stencils save time by providing a pre-drawn guide, reducing the need for freehand drawing.
- Client Approval: Stencils allow clients to preview the design on their skin and make adjustments before the tattooing process begins.
- Beginner Assistance: They are particularly helpful for beginner tattoo artists who are still developing their freehand skills.
2. Can You Use a Regular Printer for Tattoo Stencils?
Yes, you can use a regular printer for tattoo stencils, but it’s not as straightforward as using a thermal printer. You’ll need special materials and techniques to ensure the design transfers properly and is safe for the skin. Here’s what you need to know.
2.1 Types of Printers
When considering using a regular printer for tattoo stencils, there are two main types to consider: inkjet and laser printers.
- Inkjet Printers: These printers use liquid ink sprayed onto the paper. They are commonly found in homes and offices and are suitable for printing detailed images.
- Laser Printers: Laser printers use a laser beam to fuse toner onto the paper. They are known for their speed and precision, making them ideal for printing crisp lines and text.
2.2 Materials Needed
To use a regular printer for tattoo stencils, you’ll need specific materials:
- Carbon Paper: This is essential for transferring the design from the printed paper to the skin.
- Temporary Tattoo Paper: This special paper is designed for creating temporary tattoos and is safe for skin application.
- Stencil Solution: A stencil solution helps transfer the design from the carbon paper to the skin and ensures it stays in place during the tattooing process.
- Tracing Paper: Used to trace the design before transferring it to the carbon paper.
2.3 Exploring the use of Specialized Transfer Papers
For achieving professional-quality tattoo stencils with a regular printer, specialized transfer papers are a must. These papers are designed to work with both inkjet and laser printers, ensuring the best possible transfer of your designs onto the skin. Here are some options to consider:
- Spirit Transfer Paper: Spirit transfer paper is a popular choice among tattoo artists for its ability to produce high-quality stencils. It’s designed for use with thermal printers, but can also be used manually with a ballpoint pen to create stencils. The paper consists of four layers: a master sheet, a protective tissue, a carbon sheet, and a backing sheet. When pressure is applied, the carbon from the carbon sheet transfers onto the master sheet, creating a clear and precise stencil.
- ReproFX Spirit Classic Transfer Paper: This paper is similar to Spirit Transfer Paper, but is designed specifically for use with inkjet printers. It produces crisp, clean stencils that are ideal for intricate designs.
- Avery Printable Tattoo Paper: This paper is designed for use with inkjet printers and allows you to create custom temporary tattoos at home. It’s a great option for creating test stencils or for trying out a design before committing to permanent ink.
2.4 Step-by-Step Guide
Here’s a step-by-step guide on how to use a regular printer for tattoo stencils:
Step 1: Prepare Your Design
- Create or select your tattoo design on your computer.
- Adjust the size and resolution to ensure it fits your desired tattoo dimensions.
Step 2: Print the Design
- Load regular paper into your printer.
- Print the design using your inkjet or laser printer.
Step 3: Trace the Design
- Place tracing paper over the printed design.
- Carefully trace the design onto the tracing paper.
Step 4: Transfer to Carbon Paper
- Place the carbon paper on a flat surface with the carbon side facing up.
- Place the tracing paper with the traced design on top of the carbon paper.
- Trace the design again, pressing firmly to transfer the carbon onto the paper.
Step 5: Prepare the Skin
- Clean the area of skin where you want to apply the stencil with soap and water.
- Shave the area if necessary to ensure a smooth surface.
- Apply a thin layer of stencil solution to the skin.
Step 6: Apply the Stencil
- Carefully place the carbon paper with the transferred design onto the skin.
- Press gently but firmly to ensure the design adheres to the skin.
- Peel off the carbon paper, leaving the stencil on the skin.
Step 7: Let it Dry
- Allow the stencil to dry completely before starting the tattooing process.
- This ensures the design stays in place and doesn’t smudge during tattooing.
 Tattoo stencil printer setup with Phomemo machine and transparent paper
3. Advantages and Disadvantages
Using a regular printer for tattoo stencils has its pros and cons. Understanding these can help you decide if this method is right for you.
3.1 Advantages
- Cost-Effective: Regular printers are generally more affordable than thermal printers.
- Accessibility: Most people already have a regular printer at home or in the office.
- Versatility: Regular printers can be used for other printing tasks besides tattoo stencils.
3.2 Disadvantages
- Less Precision: Regular printers may not produce stencils as precise as those made with thermal printers.
- Extra Steps: The process involves multiple steps, including tracing and transferring, which can be time-consuming.
- Ink Limitations: Regular printer ink is not designed for skin contact, requiring the use of carbon paper or temporary tattoo paper.
- Potential for Smudging: The ink may smudge if not handled carefully.
4. Alternatives to Regular Printers
If using a regular printer doesn’t seem ideal, several alternatives can provide better results.
4.1 Thermal Tattoo Printers
Thermal tattoo printers are specifically designed for creating tattoo stencils. They use heat to transfer the design onto thermal paper, producing precise and durable stencils. Phomemo M08F is a popular choice.
- Pros: High precision, ease of use, and durable stencils.
- Cons: Higher initial cost.
4.2 Hand-Drawn Stencils
Creating stencils by hand is a traditional method that allows for complete customization.
- Pros: No equipment needed, full control over the design.
- Cons: Time-consuming, requires artistic skill, and may not be as precise as printed stencils.
4.3 Dot Matrix Printers
Dot matrix printers use a series of pins to create the design on paper. They can be used with carbon paper to create stencils.
- Pros: Affordable, can create stencils directly.
- Cons: Lower resolution, may not be suitable for intricate designs.
5. Safety Considerations
Safety is paramount when creating and applying tattoo stencils.
5.1 Skin Preparation
Proper skin preparation is essential to prevent infections and ensure the stencil adheres correctly.
- Clean the Skin: Wash the area with antibacterial soap and water.
- Shave the Area: Remove any hair to create a smooth surface.
- Disinfect the Skin: Use a skin-safe disinfectant to kill any remaining bacteria.
5.2 Using Safe Materials
Only use materials that are safe for skin contact.
- Carbon Paper: Ensure the carbon paper is non-toxic and designed for skin application.
- Stencil Solution: Use a reputable stencil solution that is specifically formulated for tattoo stencils.
- Temporary Tattoo Paper: Choose temporary tattoo paper that is hypoallergenic and safe for all skin types.
5.3 Avoiding Irritation
Monitor the skin for any signs of irritation or allergic reaction.
- Patch Test: Perform a patch test by applying a small amount of the stencil solution to a small area of skin and waiting 24 hours to see if any reaction occurs.
- Monitor for Redness: Watch for redness, itching, or swelling after applying the stencil. If any of these occur, remove the stencil immediately and clean the area with soap and water.
6. Tattoo Transfer Paper: Detailed Overview
Tattoo transfer paper is an indispensable tool for any tattoo artist. It allows you to accurately transfer your tattoo design from a digital or physical image onto the skin. Instead of drawing the design freehand, you can use the stencil as a guide for a precise and accurate tattoo. This method significantly simplifies the drawing process and ensures that your lines are clean and consistent.
6.1 Components of Tattoo Transfer Paper
Here’s a quick overview of the four layers of tattoo transfer paper:
| Layer | Description |
|---|---|
| White Sheet | Master sheet where the design is printed. |
| Protective Tissue | Onion skin layer that protects the carbon paper. |
| Carbon Sheet | Transfer layer that carries the design. |
| Yellow Backing Sheet | Plain layer that supports the paper structure. |
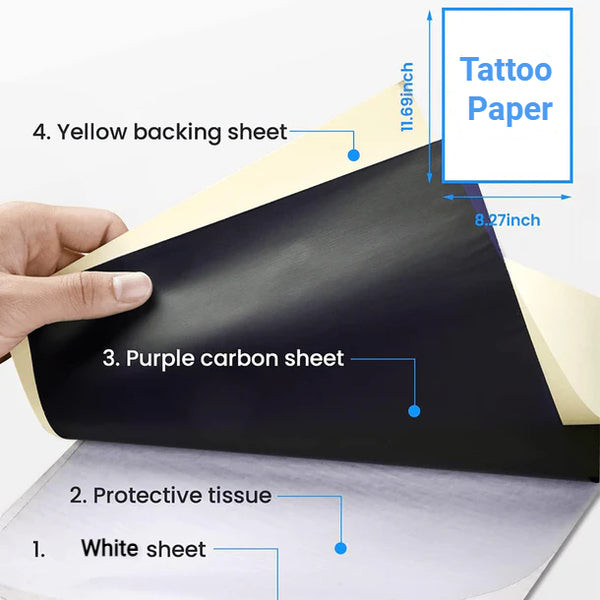 Phomemo tattoo stencil paper with four layers including white sheet, protective tissue, purple carbon sheet, and yellow backing sheet
6.2 Pro Tips: Choosing the Right Tattoo Stencil Paper
Whether you’re looking for a simple tattoo printer machine or an advanced model with wireless support, tattooat.com has beginner-friendly options ready to go. For best results, use 4-ply stencil paper that includes a white sheet, carbon layer, and yellow backing. Tattooat.com’s thermal paper delivers crisp, clean outlines every time.
6.3 Why is Tattoo Transfer Paper Important?
Tattoo transfer paper is popular in the tattoo industry due to its ability to produce clear and detailed stencils. The thermal paper used for creating tattoo stencils is favored for its high-resolution transfer capabilities, which result in clean and visible designs on all skin types and colors.
The four-layer structure of the transfer paper ensures that every detail of your design is captured and preserved. It’s a staple in the tattoo industry, and mastering its use is crucial for any aspiring tattoo artist.
7. Overcoming Challenges
Using regular printers for tattoo stencils can present several challenges. Here’s how to overcome them.
7.1 Smudging
Smudging is a common issue when using regular printers.
- Use Quality Carbon Paper: Opt for high-quality carbon paper that transfers cleanly without smudging.
- Apply Even Pressure: When tracing the design, apply even pressure to ensure a consistent transfer.
- Allow Drying Time: Let the stencil dry completely before applying it to the skin.
- Use a Setting Spray: A setting spray can help the stencil adhere to the skin and prevent smudging during the tattooing process.
7.2 Inaccurate Lines
Achieving precise lines can be difficult with regular printers.
- Use High-Resolution Images: Start with high-resolution images to ensure the printed design is clear and sharp.
- Adjust Printer Settings: Experiment with different printer settings to find the optimal settings for printing stencils.
- Trace Carefully: When tracing the design, take your time and trace carefully to ensure accurate lines.
7.3 Poor Transfer
Sometimes, the design may not transfer properly to the skin.
- Prepare the Skin Properly: Ensure the skin is clean, shaved, and disinfected before applying the stencil.
- Use Enough Stencil Solution: Apply a generous amount of stencil solution to the skin to help the design adhere properly.
- Press Firmly: When applying the stencil, press firmly to ensure the design transfers completely.
- Check the Carbon Paper: Make sure the carbon paper is fresh and has enough carbon to transfer the design.
8. Real-World Examples
To illustrate the effectiveness of using regular printers for tattoo stencils, here are a few real-world examples.
8.1 Case Study 1: Beginner Tattoo Artist
A beginner tattoo artist wanted to practice their skills without investing in expensive equipment. They used a regular inkjet printer, carbon paper, and stencil solution to create stencils. Despite the challenges, they were able to create decent stencils that allowed them to practice and improve their technique.
8.2 Case Study 2: Budget-Conscious Studio
A small tattoo studio on a tight budget used a regular laser printer to create stencils. They found that by using high-quality carbon paper and stencil solution, they could achieve results comparable to those of thermal printers, saving them money on equipment costs.
8.3 Expert Opinion
According to Inked Magazine, while thermal printers are preferred by many professionals, regular printers can be a viable option for those on a budget. The key is to use the right materials and techniques to ensure a safe and effective transfer.
9. Maintaining Your Stencil Printer
Proper maintenance of your stencil printer is essential for ensuring consistent performance and longevity. Here are some tips to keep your printer in top condition:
- Clean the Print Head Regularly: Dust and debris can accumulate on the print head, leading to smudged or faded prints. Clean the print head regularly using a cotton swab and isopropyl alcohol.
- Use High-Quality Stencil Paper: Using low-quality stencil paper can damage the print head and lead to poor-quality stencils. Always use high-quality stencil paper that is designed for use with your printer.
- Store Your Printer Properly: When not in use, store your printer in a cool, dry place away from direct sunlight. This will help prevent the print head from drying out and becoming clogged.
- Update Firmware Regularly: Printer manufacturers often release firmware updates that improve performance and fix bugs. Be sure to check for updates regularly and install them as needed.
10. FAQ About Printing Tattoo Stencils
10.1 Can I Use Any Type of Carbon Paper?
No, you should use carbon paper specifically designed for tattoo stencils to ensure it’s non-toxic and safe for skin contact.
10.2 How Do I Prevent the Stencil from Smudging?
Use high-quality carbon paper, apply even pressure when tracing, allow the stencil to dry completely, and use a setting spray.
10.3 Can I Use Temporary Tattoo Paper with a Regular Printer?
Yes, temporary tattoo paper is designed for use with regular printers and is safe for skin application.
10.4 Is It Safe to Use Regular Printer Ink on Skin?
No, regular printer ink is not designed for skin contact and may cause irritation or allergic reactions. Always use carbon paper or temporary tattoo paper to transfer the design.
10.5 How Long Should I Let the Stencil Dry Before Tattooing?
Allow the stencil to dry for at least 15-20 minutes before starting the tattooing process.
10.6 What is a Good Stencil Solution to Use?
Popular stencil solutions include Stencil Stuff, Electrum, and Green Soap. Choose a reputable brand that is specifically formulated for tattoo stencils.
10.7 Can I Reuse Tattoo Stencils?
No, tattoo stencils are designed for single-use only to prevent cross-contamination and ensure hygiene.
10.8 How Do I Remove a Tattoo Stencil from the Skin?
Use rubbing alcohol or a specialized stencil remover to gently wipe away the stencil. Avoid harsh scrubbing, which can irritate the skin.
10.9 What Are the Best Printer Settings for Printing Tattoo Stencils?
Experiment with different printer settings to find the optimal settings for printing stencils. Generally, using a high-resolution setting and adjusting the contrast and brightness can improve the quality of the stencil.
10.10 Where Can I Find Tattoo Design Templates?
Tattooat.com offers a wide variety of tattoo design templates, as well as resources for finding inspiration and creating your own custom designs.
11. Conclusion
So, can you print tattoo stencils with a regular printer? Absolutely, but it requires careful attention to detail, the right materials, and a thorough understanding of the process. While thermal printers are often the preferred choice for professional tattoo artists due to their precision and ease of use, regular printers can be a viable alternative for beginners or those on a budget. By following the steps outlined in this guide, you can create effective tattoo stencils using a regular printer and achieve impressive results. Remember to prioritize safety and hygiene to ensure a positive tattooing experience for both the artist and the client.
Ready to explore a world of tattoo designs, find talented artists, and learn more about the art of tattooing? Visit tattooat.com today to discover inspiration, connect with professionals, and enhance your tattoo journey. Whether you’re looking for your next tattoo idea or seeking expert advice, tattooat.com is your ultimate resource for all things tattoo-related.
Address: 1825 SW Broadway, Portland, OR 97201, United States.
Phone: +1 (503) 725-3000.
Website: tattooat.com.