Taking care of a new tattoo is crucial for ensuring it heals properly and looks its best for years to come, and at tattooat.com we are dedicated to walking you through the process. So, can you take the plastic off your new tattoo? Yes, but the timing depends on the type of bandage used, so understanding the correct aftercare steps, including when to remove the initial bandage, is vital for preventing infection and promoting optimal healing; with the right knowledge, you can confidently navigate the aftercare process and protect your investment in body art. Dive in and learn everything there is to know about tattoo bandages, aftercare, and beyond.
1. Understanding Tattoo Bandages
Tattoo bandages serve as the first line of defense for your new ink, but knowing when and how to remove them is key to a successful healing journey.
1.1. Types of Tattoo Bandages
Different bandages require different removal timelines.
| Bandage Type | Description | Removal Time |
|---|---|---|
| Adhesive Film | Clear, breathable film like Saniderm or Tegaderm. | Up to 3 days, unless leakage occurs. |
| Traditional Bandage | Ointment, plastic wrap, and tape. | 1-2 hours. |
| Second Skin | Similar to adhesive film, flexible and waterproof. | Typically, 3-7 days, follow artist’s instructions. |
| Gauze | Woven or non-woven fabric, often used with ointment. | Remove within a few hours, as advised by your tattoo artist. |
| Medical Adhesive | Designed for wound care, breathable and flexible. | Follow specific instructions provided by your tattoo artist, usually 1-3 days. |
1.2. The Purpose of a Tattoo Bandage
Bandages are used to protect your fresh tattoo from bacteria, friction, and environmental contaminants, and they also absorb any excess ink, blood, and fluids, preventing these substances from drying on your skin, which can lead to scabbing and potential infection.
1.3. Risks of Leaving a Bandage on Too Long
Leaving a bandage on for longer than recommended can create a breeding ground for bacteria. Trapped moisture can lead to infections, irritation, and delayed healing. Conversely, removing the bandage too early exposes the tattoo to potential harm.
2. Adhesive Film Bandages: Saniderm and Tegaderm
Adhesive film bandages like Saniderm and Tegaderm offer a convenient and protective method for initial tattoo aftercare.
2.1. How They Work
These bandages are breathable yet waterproof, creating a sealed environment that allows the tattoo to heal while protecting it from external contaminants; the film keeps the area moist, which promotes faster healing and reduces scabbing.
2.2. When To Remove
Generally, you can leave Saniderm or Tegaderm on for up to 3 days. However, it’s crucial to monitor the bandage closely, and if you notice any leakage of fluids or water seeping inside, remove it immediately.
2.3. Step-by-Step Removal Guide
- Wash Your Hands: Before touching the bandage, wash your hands thoroughly with soap and warm water to prevent introducing bacteria to the area.
- Find an Edge: Locate an edge of the bandage and gently start peeling it back.
- Peel Slowly: Slowly peel the bandage, pulling it in the direction of hair growth to minimize discomfort.
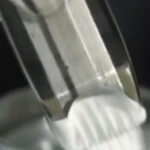
- Wash the Tattoo: Once the bandage is removed, wash the tattoo with mild antibacterial soap and warm water.
- Pat Dry: Pat the area dry with a clean, soft cloth or paper towel.
- Moisturize: Apply a thin layer of fragrance-free lotion to keep the skin moisturized.
2.4. What To Do After Removal
After removing the adhesive film, continue with regular aftercare by washing the tattoo 1-3 times daily with antibacterial soap and applying a thin layer of fragrance-free lotion.
3. Traditional Bandages: Ointment, Plastic Wrap, and Tape
Traditional bandages, consisting of ointment, plastic wrap, and tape, are another common method for protecting new tattoos.
3.1. Why They Are Used
These bandages provide a barrier against bacteria and protect the tattoo from friction, but they are not breathable like adhesive films.
3.2. Optimal Removal Time
Remove the traditional bandage after 1 to 2 hours. Leaving it on longer can trap moisture and increase the risk of infection.
3.3. Removal Instructions
- Prepare: Gather your supplies, including mild antibacterial soap, warm water, and a clean, soft cloth or paper towel.
- Wash Your Hands: Wash your hands thoroughly to avoid introducing bacteria.
- Carefully Remove: Gently peel off the plastic wrap and tape.
- Wash the Tattoo: Use warm water and antibacterial soap to wash the tattoo, removing any blood, ink, or plasma.
- Pat Dry: Pat the tattoo dry with a clean cloth or paper towel.
- Apply Ointment: Apply a very thin layer of tattoo aftercare ointment, such as A&D ointment or Aquaphor.
3.4. Switching to Lotion
After the first 2-3 days, discontinue using ointment and switch to a fragrance-free lotion.
4. Post-Removal Aftercare: Essential Steps
Proper aftercare is crucial for ensuring your tattoo heals well and looks its best.
4.1. Washing Your Tattoo
Wash your tattoo 1-3 times daily with mild antibacterial soap and warm water. This helps remove bacteria, blood, and plasma, reducing the risk of infection and promoting healing.
4.2. Moisturizing Your Tattoo
Apply a thin layer of fragrance-free lotion to your tattoo 2-3 times a day, or whenever it feels dry. Moisturizing prevents the skin from drying out, which can lead to cracking, scabbing, and itching.
4.3. What To Avoid
- Scratching or Picking: Avoid scratching or picking at the tattoo, as this can cause scarring and ink loss.
- Sun Exposure: Protect your tattoo from direct sunlight, which can cause fading and damage.
- Soaking in Water: Avoid swimming, hot tubs, and long baths until the tattoo is fully healed.
- Tight Clothing: Wear loose-fitting clothing to avoid irritating the tattoo.
4.4. Signs of Infection To Watch Out For
Recognizing the signs of infection is crucial for prompt treatment. Here are some indicators to watch out for:
- Excessive Redness: Increased redness around the tattoo.
- Swelling: Significant swelling that doesn’t subside.
- Pain: Increased pain or throbbing.
- Pus: Yellow or green discharge.
- Fever: Feeling feverish or having chills.
- Hot to the Touch: The area around the tattoo feels unusually warm.
If you notice any of these symptoms, consult a healthcare professional immediately.
5. Common Tattoo Healing Problems and Solutions
Even with the best aftercare, issues can sometimes arise during the healing process.
5.1. Itching
Itching is a common symptom of healing tattoos, and to relieve itching, apply a fragrance-free lotion to keep the skin moisturized, and gently pat the tattoo instead of scratching it.
5.2. Scabbing
Some scabbing is normal, but excessive scabbing can lead to ink loss, and to manage scabbing, keep the tattoo moisturized to prevent it from drying out and cracking, and avoid picking at the scabs.
5.3. Ink Bleeding
Minor ink bleeding can occur, especially in the first few days, but to minimize ink bleeding, avoid over-moisturizing the tattoo and wear loose-fitting clothing.
5.4. Allergic Reactions
Allergic reactions to tattoo ink are rare but possible. Symptoms include rash, itching, and swelling. If you suspect an allergic reaction, consult a healthcare professional.
6. Tattoo Aftercare Products: Choosing the Right Ones
Selecting the right aftercare products can significantly impact the healing process.
6.1. Antibacterial Soaps
Choose a mild, fragrance-free antibacterial soap like Dial or Provon to clean your tattoo. These soaps effectively remove bacteria without causing irritation.
6.2. Ointments
Ointments like A&D ointment and Aquaphor are commonly used in the initial days of tattoo aftercare. They create a protective barrier and keep the area moisturized.
6.3. Lotions
After the first few days, switch to a fragrance-free lotion like Eucerin or Lubriderm. These lotions provide essential moisture without causing irritation.
6.4. Sunscreens
Once your tattoo is fully healed, protect it from sun damage by applying a high-quality sunscreen with an SPF of 30 or higher.
7. Lifestyle Adjustments During Tattoo Healing
Certain lifestyle adjustments can promote faster and more effective healing.
7.1. Clothing Choices
Wear loose-fitting, breathable clothing to avoid irritating the tattoo. Avoid tight clothing that can rub against the area and cause friction.
7.2. Diet and Hydration
A healthy diet and adequate hydration support overall skin health and can aid in the healing process. Consume foods rich in vitamins and minerals and drink plenty of water.
7.3. Avoiding Excessive Exercise
Avoid excessive exercise during the initial healing phase, as sweat and friction can irritate the tattoo. If you do exercise, gently clean the tattoo afterward.
7.4. Sleep Positions
Choose sleep positions that avoid putting pressure on the tattoo. If possible, sleep on your back or side to prevent rubbing against bedding.
8. Tattoo Healing Timelines
Understanding the typical healing timeline can help you know what to expect.
8.1. Initial Days (1-3 Days)
The tattoo is fresh, and the skin may be red, swollen, and tender. Follow the initial aftercare instructions provided by your artist, focusing on cleaning and moisturizing.
8.2. Middle Phase (3-14 Days)
The tattoo may start to itch and peel, similar to a sunburn. Continue washing and moisturizing the area, and avoid scratching or picking.
8.3. Final Healing Phase (2-4 Weeks)
The outer layers of skin have healed, but the deeper layers may still be recovering. Continue moisturizing and protecting the tattoo from sun exposure.
8.4. Factors Affecting Healing Time
- Tattoo Placement: Areas with more movement or friction may take longer to heal.
- Tattoo Size and Style: Larger and more intricate tattoos may require more time to heal.
- Individual Health: Overall health and immune function can impact healing time.
- Aftercare Compliance: Following aftercare instructions diligently promotes faster healing.
9. Special Considerations for Different Tattoo Types
Different tattoo styles and placements may require specific aftercare considerations.
9.1. Black and Grey Tattoos
Black and grey tattoos generally heal faster than color tattoos, but they still require diligent aftercare to prevent infection and maintain their appearance.
9.2. Color Tattoos
Color tattoos may take longer to heal due to the increased amount of ink. Protect them from sun exposure to prevent fading.
9.3. Fine Line Tattoos
Fine line tattoos require extra care to prevent the delicate lines from blurring. Avoid over-moisturizing, which can cause the ink to spread.
9.4. Large Tattoos
Large tattoos require more extensive aftercare due to the larger area of skin involved. Keep the area clean and moisturized, and avoid activities that can cause friction or irritation.
9.5. Tattoo Placement: Ribs, Feet, and Hands
- Ribs: Tattoos on the ribs can be painful and may take longer to heal due to the skin’s proximity to bone and frequent movement.
- Feet: Foot tattoos are prone to infection due to their location and constant exposure to shoes and socks. Keep them clean and dry.
- Hands: Hand tattoos also require extra care, as hands are frequently washed and exposed to environmental contaminants.
10. Debunking Common Tattoo Aftercare Myths
Many myths surround tattoo aftercare, so let’s debunk some of the most common ones.
10.1. “Letting a Tattoo Air Dry Is Best”
While it’s important to let the tattoo breathe, allowing it to air dry completely can lead to dryness and cracking, so moisturizing is essential.
10.2. “Sunscreen Is Unnecessary”
Sunscreen is crucial for protecting healed tattoos from fading and damage. Apply a high-quality sunscreen whenever you’re exposed to the sun.
10.3. “All Ointments Are the Same”
Different ointments have different ingredients and purposes. Choose ointments specifically designed for tattoo aftercare.
10.4. “Picking Scabs Helps Them Heal Faster”
Picking scabs is detrimental to healing and can cause scarring and ink loss. Always let scabs fall off naturally.
11. Consulting Your Tattoo Artist: When To Seek Professional Advice
Your tattoo artist is your best resource for personalized aftercare advice.
11.1. Importance of Following Artist’s Instructions
Always follow your artist’s specific aftercare instructions, as they are tailored to your tattoo and skin type.
11.2. When To Contact Your Artist
Contact your artist if you experience signs of infection, allergic reactions, or other concerning symptoms.
11.3. What To Expect During a Follow-Up Appointment
During a follow-up appointment, your artist can assess the healing progress and provide additional guidance.
12. The Future of Tattoo Aftercare: Innovations and Trends
The world of tattoo aftercare is constantly evolving, with new products and techniques emerging, and as of July 2025, research from Portland State University’s Art Department indicates growing interest in using nanotechnology to create more effective and longer-lasting tattoo aftercare products.
12.1. New Bandage Technologies
Advanced bandage technologies are being developed to promote faster healing and reduce the risk of infection.
12.2. Advanced Aftercare Products
Innovative aftercare products, such as balms and serums with natural ingredients, are gaining popularity.
12.3. Laser Tattoo Aftercare
Laser treatments are being used to enhance tattoo healing and improve the appearance of older tattoos.
13. Showcasing Your Tattoo: Long-Term Care Tips
Once your tattoo is fully healed, long-term care is essential for maintaining its appearance.
13.1. Sun Protection
Continue to protect your tattoo from sun exposure by applying sunscreen regularly.
13.2. Moisturizing Routine
Maintain a regular moisturizing routine to keep the skin hydrated and prevent fading.
13.3. Touch-Up Appointments
Consider touch-up appointments to refresh the colors and lines of your tattoo over time.
13.4. Lifestyle Considerations
Healthy lifestyle choices, such as a balanced diet and adequate hydration, support long-term skin health and tattoo appearance.
14. Tattoo Culture and Community
Tattoos are not just art; they are a form of self-expression and a connection to a vibrant community.
14.1. The Significance of Tattoos
Tattoos hold personal and cultural significance, representing stories, memories, and beliefs.
14.2. The Tattoo Community in the USA
The tattoo community in the USA is diverse and inclusive, with talented artists and passionate enthusiasts.
14.3. Tattoo Conventions and Events
Tattoo conventions and events provide opportunities to connect with artists, learn about new techniques, and celebrate tattoo culture.
15. Finding Inspiration and Artists on Tattooat.com
Discover a world of tattoo designs, artists, and inspiration on Tattooat.com.
15.1. Exploring Tattoo Designs
Browse a vast library of tattoo designs, categorized by theme, style, and body placement, to find the perfect inspiration for your next tattoo.
15.2. Discovering Talented Artists
Connect with talented tattoo artists across the USA through detailed profiles showcasing their portfolios and specialties.
15.3. Reading Informative Articles
Access a wealth of informative articles about tattoo aftercare, history, and trends to enhance your knowledge and appreciation of tattoo art.
Ready to dive deeper into the world of tattoos? Visit tattooat.com today and explore our extensive collection of designs, connect with talented artists, and learn everything you need to know about tattoo culture and aftercare; find your next inspiration and confidently embark on your tattoo journey with tattooat.com, your trusted guide in the art of ink. For any questions or assistance, reach out to us at Address: 1825 SW Broadway, Portland, OR 97201, United States or call us at Phone: +1 (503) 725-3000.
FAQ: Your Questions About Tattoo Bandage Removal Answered
1. Is it normal for fluid to build up under Saniderm?
Yes, it’s normal for fluid (plasma and ink) to build up under Saniderm, and as long as there are no leaks, it’s okay to leave the bandage on.
2. What happens if water gets inside the bandage?
If water gets inside the bandage, remove it immediately to prevent infection.
3. Can I re-bandage my tattoo after removing the initial bandage?
No, do not re-bandage the tattoo after removing the initial bandage, and instead, allow it to breathe and follow the aftercare instructions.
4. How often should I wash my new tattoo?
Wash your new tattoo 1-3 times per day with mild antibacterial soap and warm water.
5. What type of lotion should I use on my tattoo?
Use a fragrance-free, hypoallergenic lotion like Eucerin or Lubriderm on your tattoo.
6. Can I use sunscreen on my new tattoo?
Do not use sunscreen on a new tattoo until it is fully healed, but after it’s healed, apply sunscreen to protect it from sun damage.
7. Is it normal for my tattoo to itch?
Yes, it’s normal for your tattoo to itch during the healing process, but avoid scratching it.
8. How long does it take for a tattoo to fully heal?
Most tattoos heal within 2 to 4 weeks, but healing time can vary.
9. What should I do if I think my tattoo is infected?
If you think your tattoo is infected, consult a healthcare professional immediately.
10. Can I go swimming after getting a tattoo?
Avoid swimming in pools, oceans, and hot tubs until your tattoo is fully healed.