Thinking about getting a tattoo but intrigued by a more hands-on, DIY approach? Stick And Poke Tattoos, also known as hand-poked tattoos, offer a unique and increasingly popular way to adorn your skin. Maybe you’re drawn to the rebellious spirit, the punk rock roots, or simply the affordability and accessibility of creating art on your body from the comfort of your own space. While professional tattoos are amazing, sometimes the allure of crafting something yourself, in your own time, is undeniable.
Stick and poke tattoos involve manually pushing tattoo ink into the skin using a needle, without the aid of a tattoo machine. This method has been around for centuries and is experiencing a resurgence in popularity today. If you’re considering venturing into the world of stick and poke tattoos, understanding the process, safety, and best practices is crucial.
A minimalist stick and poke tattoo design, showcasing the DIY aesthetic of hand-poked ink, created by artist Tullen.
What are Stick and Poke Tattoos?
Stick and poke tattoos are exactly what they sound like – tattoos created by hand, using a single needle to “stick” ink into the skin, poke by poke, to form a design. This contrasts with machine tattoos, where a tattoo machine rapidly moves needles in and out of the skin. The stick and poke method is slower and more deliberate, giving the artist more control over each individual dot of ink.
Historically, stick and poke tattoos have been practiced in various cultures around the world, often using rudimentary tools and natural pigments. In modern times, they’ve become associated with DIY culture, punk rock, and a rejection of mainstream tattoo conventions. However, regardless of the aesthetic or motivation, safety and hygiene should always be paramount when performing any type of tattoo, including stick and poke.
Why Choose Stick and Poke Tattoos?
Several factors contribute to the growing appeal of stick and poke tattoos:
- DIY and Personalization: The DIY nature is a major draw. You are directly involved in every step of the process, from design to execution. This hands-on approach can be incredibly rewarding and allows for a deeply personal connection to your tattoo.
- Accessibility and Affordability: Compared to professional tattoos, stick and poke tattoos can be much more affordable as you are primarily paying for supplies rather than an artist’s time and studio fees. You can also do them in the comfort and privacy of your own home.
- Simplicity and Minimalist Aesthetic: Stick and poke tattoos often lend themselves to simpler designs and a more minimalist aesthetic. Clean lines, geometric shapes, and small symbols are particularly well-suited to this technique.
- Pain Level: Many people find stick and poke tattoos to be less painful than machine tattoos. The slower, manual process can feel gentler on the skin.
- Creative Expression: For those who are artistically inclined, stick and poke offers a unique avenue for creative expression and self-decoration.
 Hand poked face by Alpha Omega
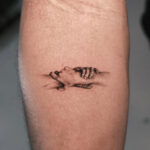
A close-up of a hand-poked face tattoo, demonstrating the precision and detail achievable with the stick and poke method, by artist Alpha Omega.
Safety First: Essential Precautions for Stick and Poke Tattoos
While stick and poke tattoos can be a fun and creative outlet, safety must be your top priority. Improper technique and unsanitary conditions can lead to infections and other health risks. Here are crucial safety guidelines to follow:
- Sterile Equipment: Always use sterile, single-use needles. Purchase needles specifically designed for tattooing. Do not reuse needles under any circumstances.
- Tattoo Ink Only: Use only professional tattoo ink. Never use pen ink, India ink, or any other non-sterile or potentially toxic substances. Tattoo ink is specifically formulated for safe use in the skin.
- Sanitize Everything: Thoroughly sanitize your workspace, hands, and skin before, during, and after the tattooing process. Use isopropyl alcohol (at least 70%) to disinfect surfaces and skin.
- Gloves are Essential: Wear nitrile gloves throughout the entire process to prevent contamination and protect yourself and your skin.
- Proper Technique: Research and understand the correct technique for stick and poke tattooing. This involves knowing the proper depth and angle to insert the needle. Start with simple designs and practice on fake skin if possible.
- Avoid Mucous Membranes: Do not tattoo near mucous membranes (eyes, mouth, genitals).
- Aftercare is Critical: Proper aftercare is just as important as the tattooing process itself. Follow strict aftercare instructions to ensure your tattoo heals properly and to prevent infection.
Hand poked ‘Bite me’ sweethearts by the Tatt Bratt
Playful stick and poke “Bite me” sweetheart tattoos, showcasing a fun and whimsical style, created by The Tatt Bratt.
Step-by-Step Guide: Getting Started with Stick and Poke Tattoos
If you’ve decided to try stick and poke tattooing, here’s a step-by-step guide to help you get started safely:
Supplies You’ll Need:
- Sterile Tattoo Needles: Choose appropriate needle sizes for your design (round liners are common for outlines).
- Tattoo Ink: Purchase professional tattoo ink in the desired color.
- Isopropyl Alcohol (70% or higher): For sanitizing.
- Nitrile Gloves: To maintain sterility.
- Medical Covering Cloth/Barrier Film: To protect your workspace.
- Disposable Razor: To shave the area (if needed).
- Stencil Paper and Transfer Lubricant (Optional): For transferring complex designs.
- Ink Cups: To hold small amounts of ink.
- Wipes/Paper Towels: For cleaning and wiping away excess ink and blood.
- Aftercare Balm: Fragrance-free and designed for tattoo aftercare.
- Regenerative Tattoo Film (Optional): For initial protection during healing.
- Grip (Optional): To improve needle handling and comfort.
- Wooden Depressor or Tongue Depressor (Optional): Can be used to spread balm or ink.
- Stencil Solution (if using stencil paper): To apply the stencil to the skin.
Step-by-Step Instructions:
- Choose Your Design and Placement: Start with a simple design. Choose a location that is easily accessible and not near mucous membranes.
- Prepare Your Workspace: Clean and sanitize a flat surface. Cover it with a medical covering cloth or barrier film.
- Gather Supplies: Lay out all your sterile supplies on the clean workspace.
- Prepare Your Skin: Shave the area if necessary. Clean the skin thoroughly with soap and water, then sanitize with isopropyl alcohol. Let it air dry.
- Apply Stencil (Optional): If using a stencil, apply stencil transfer lubricant to the skin, apply the stencil, and let it set.
- Wash and Glove Up: Wash your hands thoroughly with soap and water for at least a minute. Dry your hands with a clean paper towel and put on nitrile gloves.
- Prepare Your Needle and Ink: Take a sterile needle out of its packaging. If using a grip, attach it to the needle. Pour a small amount of tattoo ink into an ink cup.
- Start Poking: Dip the tip of the needle into the ink. Stretch the skin taut with your non-dominant hand. Using a light and consistent motion, begin poking along your design. Aim for a depth of about 1-2mm into the skin. You should feel a slight “pop” as the needle enters the skin.
- Wipe Away Excess Ink: Wipe away excess ink and blood with a clean, damp wipe as you go to see your progress.
- Continue Poking: Continue poking along your design, redipping the needle in ink as needed. Work slowly and patiently.
- Clean and Sanitize Again: Once you’ve completed your tattoo, clean the area thoroughly with sterile water or a mild, fragrance-free soap and water. Pat dry with a clean paper towel.
- Apply Aftercare: Apply a thin layer of aftercare balm to the tattoo.
- Apply Tattoo Film (Optional): If using regenerative tattoo film, apply it according to the product instructions to protect the tattoo during the initial healing phase.
Hand poked ‘Bite me’ sweethearts by the Tatt Bratt
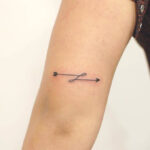
A delicate hand-poked north star tattoo on the ankle, showcasing the subtle and refined results possible with stick and poke, created by billions of galaxies.
Aftercare is Key to Healing and Longevity
Proper aftercare is crucial for preventing infection and ensuring your stick and poke tattoo heals well and looks its best. Follow these aftercare guidelines diligently:
- Keep it Clean: Gently wash your tattoo twice a day with mild, fragrance-free soap and water. Pat it dry with a clean paper towel.
- Moisturize: Apply a thin layer of aftercare balm several times a day to keep the tattoo moisturized.
- Avoid Sun Exposure: Keep your new tattoo out of direct sunlight. UV rays can fade tattoo ink and hinder healing.
- No Soaking: Avoid soaking your tattoo in water (baths, swimming, hot tubs) until it is fully healed. Showers are fine.
- Don’t Pick or Scratch: As your tattoo heals, it will likely scab and may itch. Do not pick at scabs or scratch the tattoo, as this can damage the design and increase the risk of infection.
- Wear Loose Clothing: Avoid tight clothing that can rub against your new tattoo.
- Stay Hydrated and Healthy: A healthy body heals better. Drink plenty of water and maintain a healthy lifestyle to support the healing process.
Touch-Ups and Healing Expectations
It’s common for stick and poke tattoos to require touch-ups, especially after the initial healing phase. Due to the manual process, some areas may fade or appear lighter than others. Wait at least a few weeks for your tattoo to fully heal before considering any touch-ups. This allows the skin to regenerate completely and gives you a clear picture of the final result.
Healing time for stick and poke tattoos varies but generally takes about 2-4 weeks. During this time, you may experience redness, swelling, and scabbing. This is all part of the normal healing process. If you notice signs of infection, such as excessive redness, swelling, pain, pus, or fever, seek medical attention immediately.
Stick and poke tattoos can be a rewarding and creative way to express yourself. By prioritizing safety, using proper techniques, and practicing diligent aftercare, you can create unique and personal body art from the comfort of your own home. Remember to start simple, be patient, and always prioritize your health and safety throughout the process.