Looking to add a touch of sparkle and fun to your next party, event, or even just a playful afternoon? DIY Glitter Tattoos are the perfect solution! These temporary tattoos are easy to create, customizable, and a hit with kids and adults alike. Get ready to learn how to make your own dazzling glitter tattoos with this simple guide.
Creating glitter tattoos at home is surprisingly straightforward and requires just a few readily available materials. Whether you’re planning a birthday bash, a festive gathering, or simply want to indulge in some creative fun, glitter tattoos offer a unique and eye-catching form of temporary body art. They are a fantastic alternative to face paint and provide long-lasting sparkle without the permanence of real tattoos.
Here’s what you’ll need to get started on your glitter tattoo adventure:
- Adhesive stencils: These are crucial for creating crisp and defined tattoo designs. You can find pre-cut stencils in various shapes and patterns, or opt for stencil rolls to cut your own custom designs.
- Eyelash glue (or white glue): This acts as the adhesive that holds the glitter to the skin. Eyelash glue is skin-safe and designed for cosmetic use, making it a popular choice. Alternatively, regular white craft glue can also work effectively.
- Cosmetic glitter: Choose fine cosmetic-grade glitter for the best and safest results. You can select different colors to create vibrant and multi-colored tattoos.
 Close-up of glitter tattoo materials including stencils, eyelash glue, and various colors of cosmetic glitter.
Now, let’s dive into the easy steps to create your own glitter tattoos:
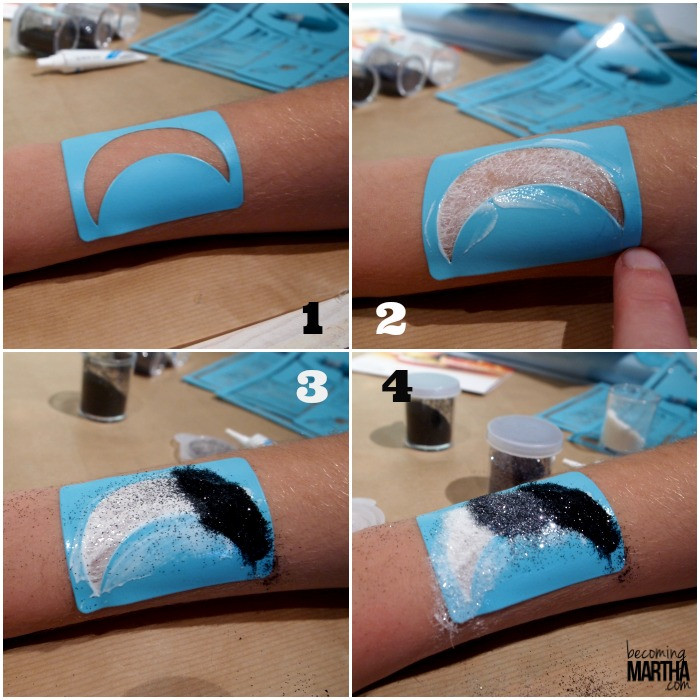
- Apply the stencil: Carefully peel off the backing of your chosen stencil and firmly apply it to clean, dry skin. Ensure all edges of the stencil are adhered to prevent glue from seeping underneath.
- Apply a thin layer of glue: Using a small brush or applicator, carefully apply a thin, even layer of eyelash glue or white glue to the exposed skin within the stencil. Avoid applying too much glue, as it can seep under the stencil edges and cause the design to blur.
- Apply glitter: While the glue is still wet, generously sprinkle cosmetic glitter over the glued area. Make sure to completely cover the glue for maximum sparkle.
- Remove excess glitter: Gently tap off any excess glitter. For a layered color effect, you can apply multiple glitter colors, blending them lightly for a vibrant look.
- Remove the stencil: Once you are satisfied with the glitter coverage, carefully peel off the stencil to reveal your dazzling glitter tattoo design.
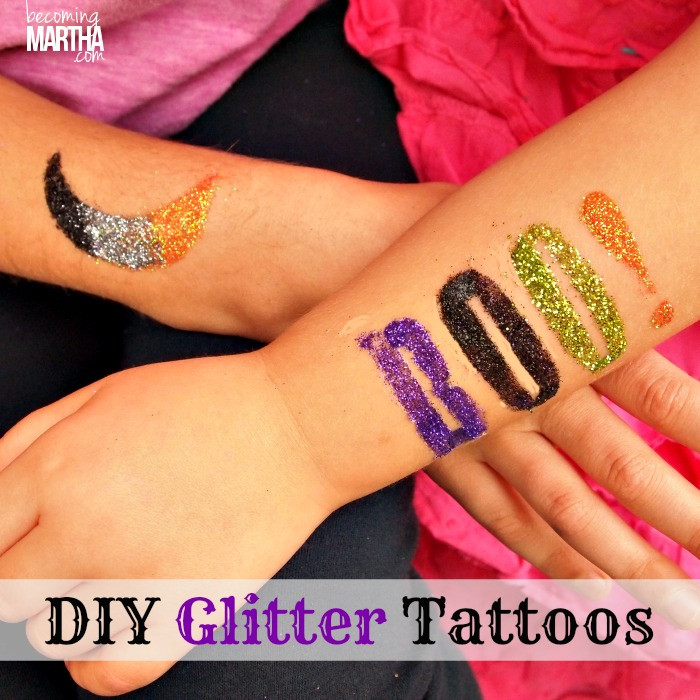
 Two young girls proudly displaying their newly applied glitter tattoos, one a moon and the other a 'BOO!' design, on their arms.
Glitter tattoos are not only fun to create but also surprisingly durable. Once the glue dries, the glitter adheres firmly to the skin, resisting smudging and fallout. While they are temporary and can be removed with soap and water or baby oil, they can last for several days, allowing you to enjoy your sparkly body art for an extended period. To prolong the life of your glitter tattoo, avoid excessive rubbing and keep it away from harsh soaps or direct scrubbing.
Whether you’re looking for a fun activity for kids, a unique party favor, or a touch of sparkle for a special occasion, DIY glitter tattoos are a fantastic choice. They are simple, safe, and offer endless creative possibilities. Experiment with different stencil designs, glitter colors, and placement to create your own unique and shimmering temporary tattoos!