Congratulations on creating your custom Flowcode! But the journey doesn’t end in the digital realm. To truly leverage the power of your Flowcode, you need to bring it into the physical world. Think of it as giving your digital creation a “Flowcode Tattoo” – a permanent mark in the real world that connects users to your online content. This guide will walk you through the essential steps to seamlessly print and activate your Flowcode QR code, ensuring top-tier execution and maximum engagement.
Why Physical Flowcodes are Essential
Creating a Flowcode is just the first step. Until your Flowcode QR code exists in a tangible form, interacting with your target audience remains purely theoretical. The activation process is incomplete without bridging the digital and physical divide. Effectively printing your Flowcode is the key to unlocking real-world engagement. Let’s explore how to download, format, and print your Flowcode successfully in a few straightforward steps, transforming your digital asset into a powerful physical tool – your very own “flowcode tattoo” for the real world.
For platform-specific instructions, refer to these guides:
i. Microsoft Word
ii. Google Documents
iii. Canva
 Printing your Flowcode for physical activation
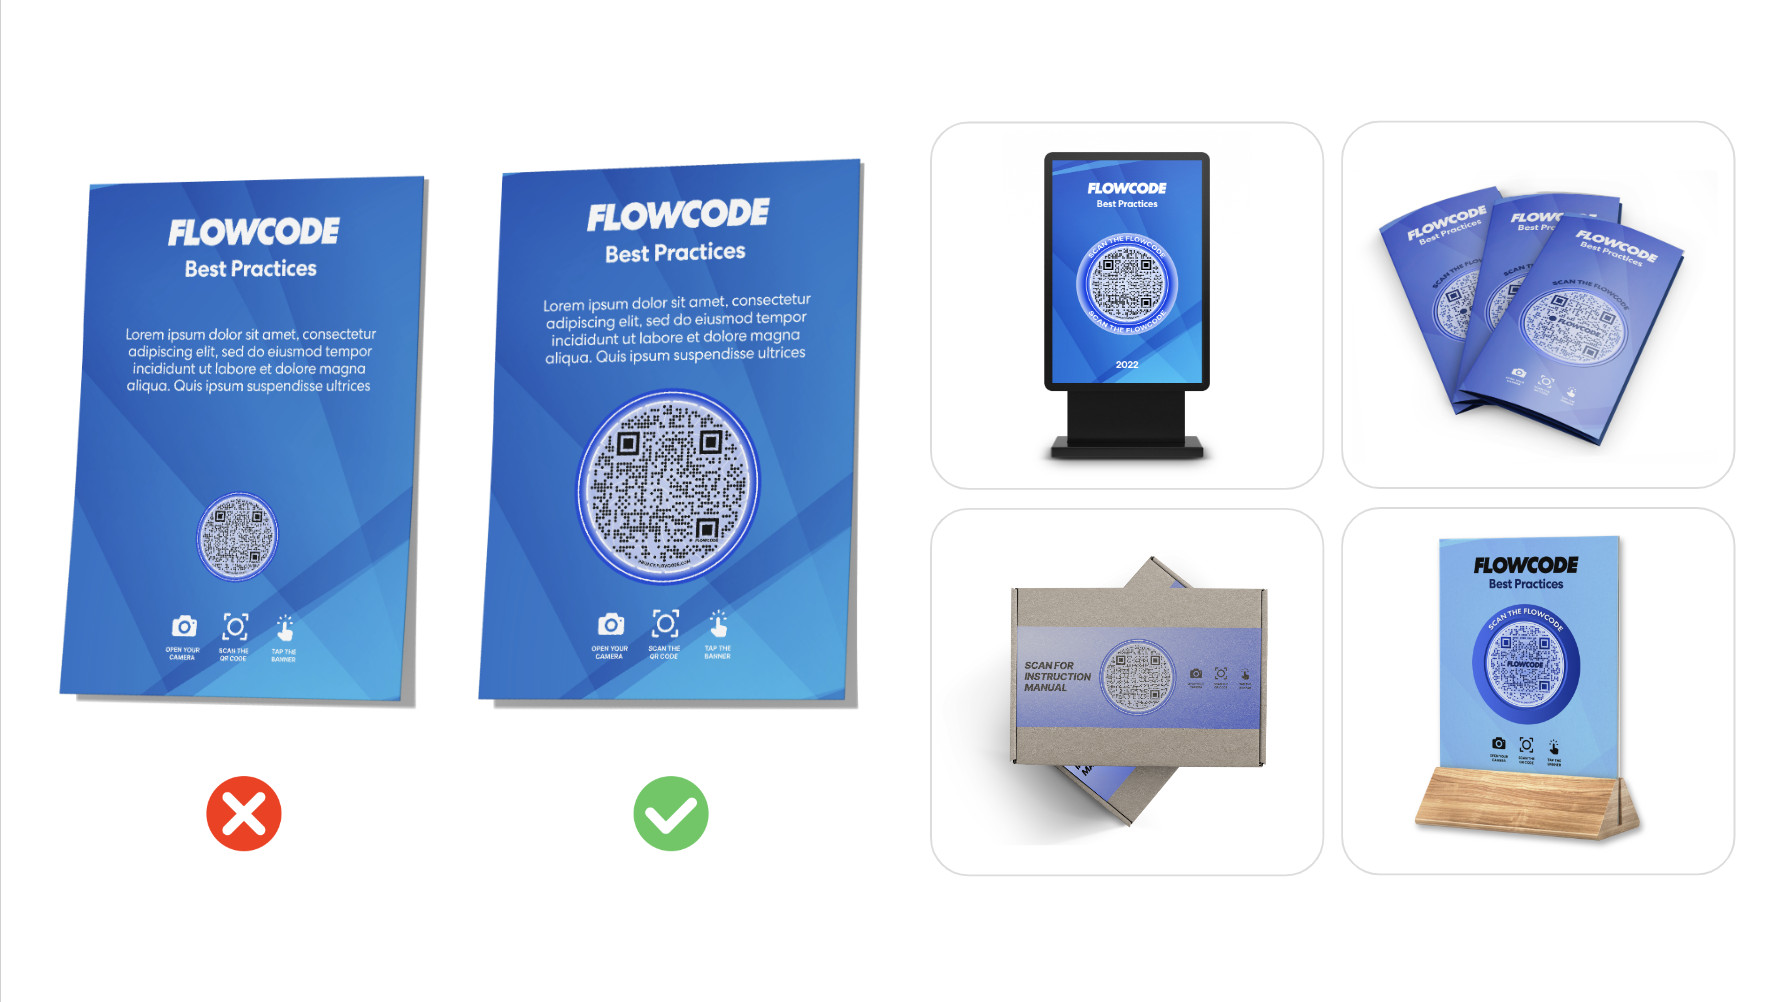
Best Practices for Printing Your Flowcode “Tattoo”
To ensure your Flowcode “tattoo” – your printed QR code – is effective, consider these crucial best practices for size, format, and placement. These guidelines will optimize user experience and maximize engagement with your codes across various printed materials like postcards, flyers, menus, and business cards.
Size, Format, and Placement for Optimal Scannability
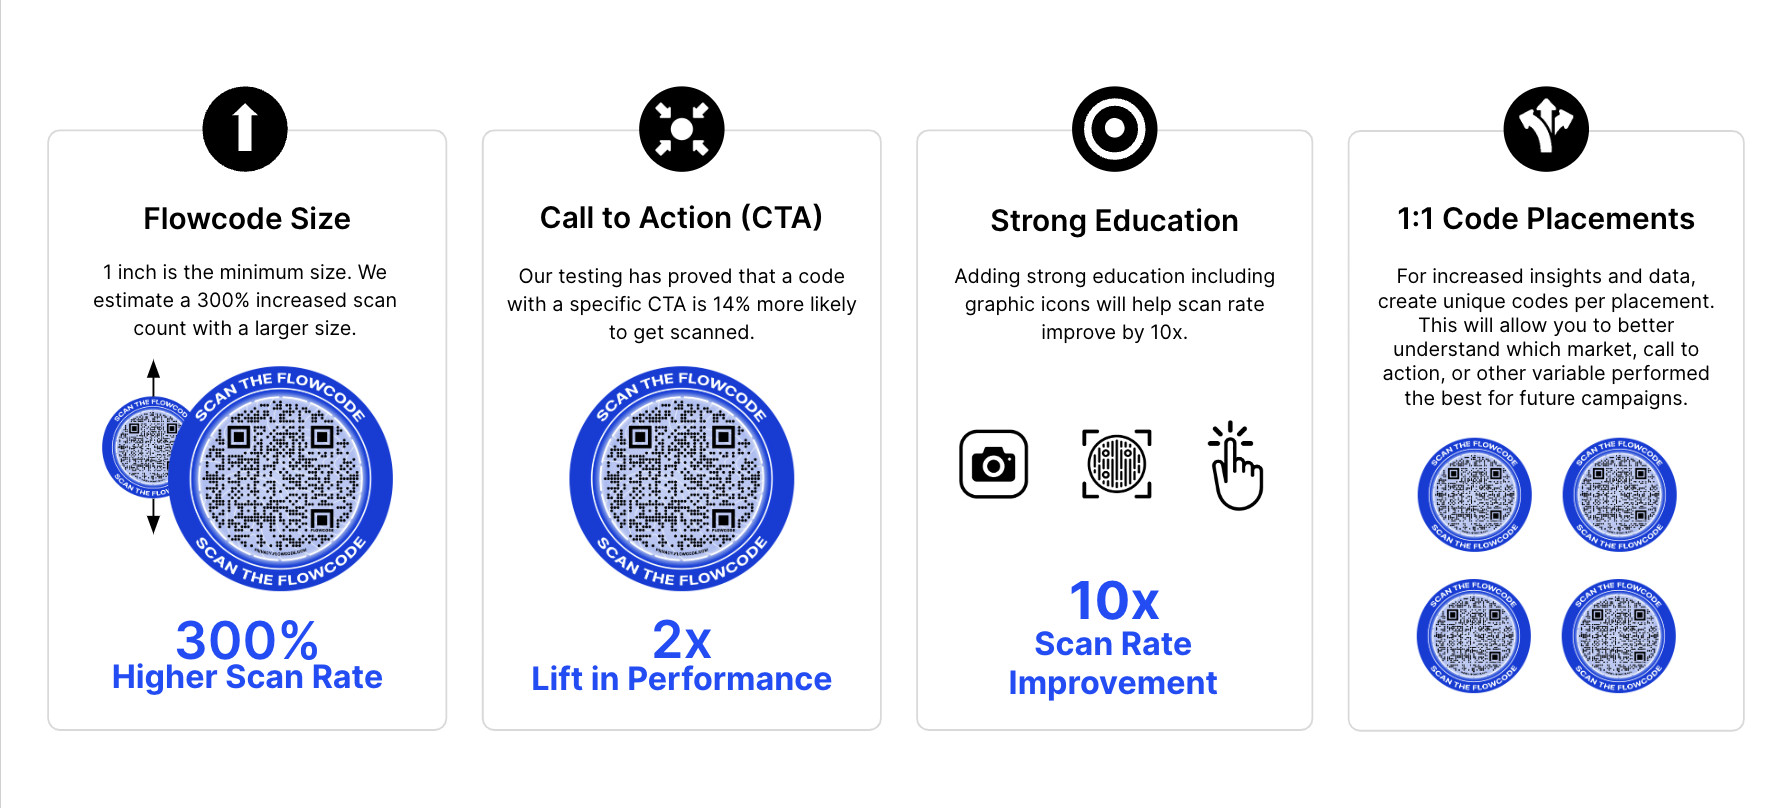
When it comes to the size of your Flowcode “tattoo,” bigger often means better. Ensure your Flowcode is easily noticeable and scannable from a typical viewing distance.
-
Minimum Size: The smallest recommended size for a printed Flowcode is 1 inch by 1 inch (eye to eye). This ensures scannability without requiring users to get too close.
-
Larger Size, Higher Scans: Enlarging your Flowcode can significantly boost scan rates. We estimate up to a 300% increase in scans simply by increasing the size. Think of it as making your “flowcode tattoo” more prominent and inviting.
-
Distance Scaling: For Flowcodes intended to be scanned from a distance, size is paramount. If your Flowcode will be scanned from 10 feet away, it should be at least 1 foot in size to maintain scannability.
-
Surface Area Ratio: Aim for your Flowcode to occupy at least 25% of the total print surface area. This ensures it’s visually dominant and easy to locate, contributing to a seamless scanning experience.
-
Strategic Placement: Integrate your Flowcodes as a core element of your print content. This signals the code’s importance and builds trust, encouraging interaction. Don’t just tack it on; make it integral to the design.
-
Eye-Level Positioning: Consider user interaction. Place Flowcodes at eye level to facilitate easy scanning without requiring awkward angles, zooming, or bending. Think about the user’s natural line of sight.
The placement and prominence of your Flowcode “tattoo” on product packaging and marketing materials directly influence user engagement.
Color & Print Material Considerations
Choosing the right color and print material is just as important as size and placement for your Flowcode “tattoo”.
-
Matte Finish is Key: Opt for a ‘matte’ or ‘dull’ finish on your print material. Glossy finishes can create glare and reflections, hindering the device camera’s ability to read the code accurately.
-
Durable Print Material: For flyers and promotional materials, using heavier paper stock enhances durability, ensuring your Flowcode “tattoo” remains intact and maintains a high-quality appearance over time.
-
RGB vs CMYK for Color Accuracy: Be mindful of color modes. For certain print materials like newspapers and magazines, ensure codes are printed in single-color black, not four-color (4c). Conversion to CMYK color mode is often necessary for accurate printing, especially for these materials.
-
Small Code Optimization: For Flowcodes printed in small areas or on materials prone to ink bleed, use a single-color black design, ideally without a logo and with less dense data points for clearer reproduction.
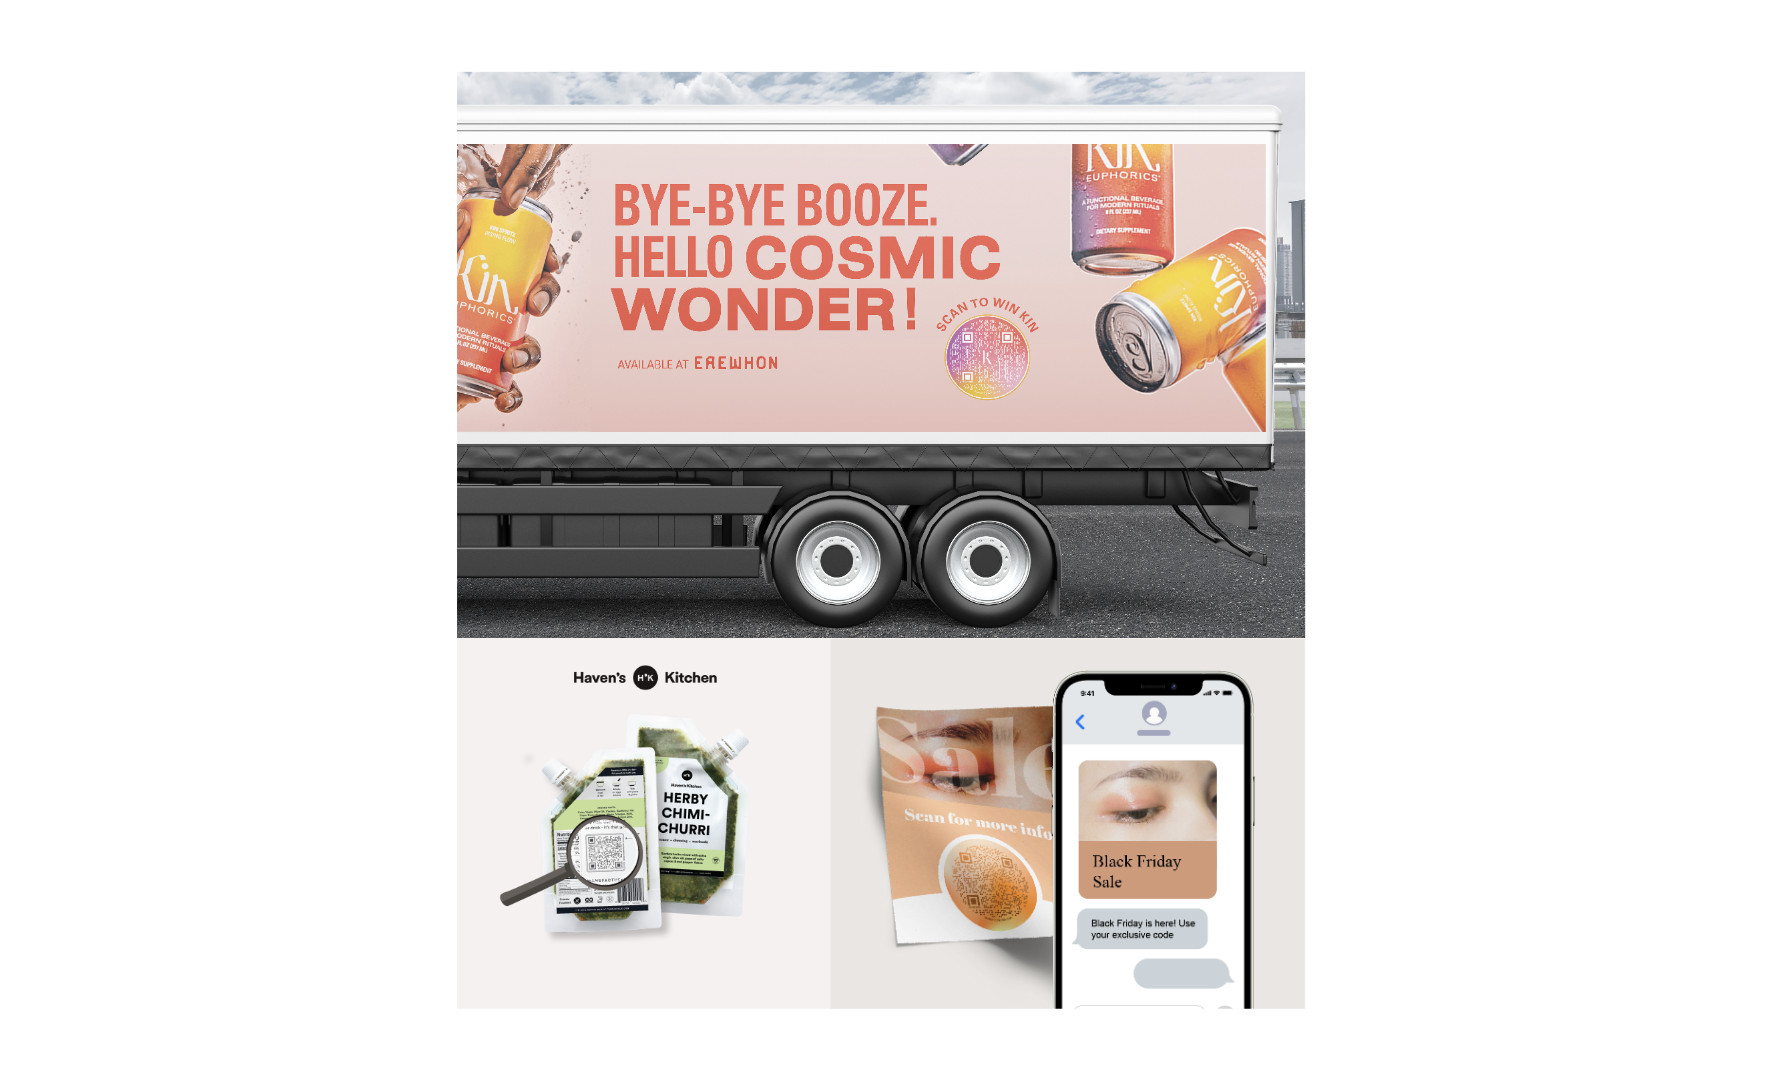
 Example of well-printed Flowcodes on marketing material
Education & Call-To-Action (CTA) for Increased Interaction
Don’t assume everyone knows how to interact with a Flowcode “tattoo”. Guide your audience and incentivize engagement with clear instructions and compelling calls to action.
-
Compelling Calls-To-Action (CTAs): Motivate users to scan by clearly stating the benefit. Offer rewards like exclusive content, contest entries, or special promotions. Integrating CTAs can often double engagement rates. Make it clear what they gain by scanning your “flowcode tattoo.”
-
Educational Text for Clarity: Provide simple instructions for users unfamiliar with QR codes. Text like “Scan with your phone’s camera” or “Point, Scan, Tap” can significantly improve scan rates, especially among less tech-savvy audiences. Clear education can increase scan rates tenfold.
-
Embedded CTAs on Your Flowcode: Flowcode offers the flexibility to embed CTAs or educational text directly within the border of your code, making the instruction an integral part of the visual.
-
Surrounding CTAs on Print: Alternatively, place CTAs and educational prompts strategically around your Flowcode “tattoo” on your printed materials. Use icons like cameras or pointers to visually guide users and enhance understanding.
Quality Assurance: Scan Testing is Crucial
Before mass printing, always test your Flowcode “tattoo” thoroughly. Scan test with different devices, and ideally, perform a scan test on a sample print to ensure scannability before committing to a large print run. This quality assurance step is vital to prevent wasted prints and missed opportunities.
Unlock Deeper Insights with 1:1 Code Placements
For advanced campaign tracking and deeper engagement insights, consider creating unique Flowcodes for each placement. This enables direct attribution and comparative analysis of different placements and messaging. By using unique “flowcode tattoos,” you can accurately assess how variations in messaging, design, and placement impact campaign performance, providing valuable data for optimization.
 Examples of Flowcode best practices in action