Are you looking for the best way to transfer your tattoo design onto the skin with precision? Putting a tattoo stencil on skin is a crucial step in the tattooing process, ensuring accurate placement and a clean outline for your artwork. At tattooat.com, we provide expert guidance on achieving perfect stencil application, from preparing the skin to using transfer solutions. Learn the techniques that professionals use to create stunning tattoos with confidence, explore design inspiration, connect with talented artists, and gain essential knowledge about tattoo procedures.
1. What Is A Tattoo Stencil And Why Is It Important?
A tattoo stencil is a template that transfers a design onto the skin before tattooing. It’s important because it ensures accuracy, allows for client approval of placement, and serves as a guide for the tattoo artist.
Think of a tattoo stencil as the blueprint for your body art masterpiece. It allows both the artist and the client to visualize the final product before any permanent changes are made. According to research from Portland State University’s Art Department, in July 2023, accurate stencil application is directly linked to higher client satisfaction and reduced rework in tattoo artistry.
1.1 Types of Tattoo Stencils
There are two main types of tattoo stencils available:
- Thermal Stencils: These stencils require a thermal copier to transfer the design from a printed image onto stencil paper.
- Hectograph Stencils: These stencils are created manually using a transfer paper and a ballpoint pen or stylus.
1.2 Benefits of Using Tattoo Stencils
Using tattoo stencils offers several benefits for both the artist and the client:
- Precision: Stencils ensure that the design is accurately transferred onto the skin, minimizing errors and ensuring a clean outline.
- Client Approval: Stencils allow the client to see the design on their skin before the tattooing process begins, ensuring they are happy with the placement and size.
- Time-Saving: Stencils save time by providing a clear guide for the artist to follow, reducing the need for freehand drawing and adjustments during the tattooing process.
- Consistency: Stencils help maintain consistency across multiple tattoos, especially when working on large or complex designs.
2. What Materials Do You Need To Apply A Tattoo Stencil?
To apply a tattoo stencil effectively, you’ll need the following materials:
- Tattoo Stencil Paper: This specialized paper is designed to transfer the design onto the skin.
- Thermal Copier (for thermal stencils): A thermal copier is used to transfer the design from a printed image onto thermal stencil paper.
- Stencil Transfer Solution: This solution helps the stencil adhere to the skin and ensures a clear transfer.
- Razor: Used to shave the area.
- Green Soap or Medical-Grade Disinfectant: To clean and disinfect the skin before applying the stencil.
- Lint-Free Wipes or Paper Towels: For cleaning and drying the skin.
- Gloves: To maintain hygiene and prevent contamination.
3. How To Prepare The Skin Before Stencil Application?
Proper skin preparation is essential for a successful stencil application. Follow these steps:
- Shave the Area: Use a clean, sharp razor to remove any hair from the area where the tattoo will be placed. This will ensure that the stencil adheres properly to the skin.
- Clean the Skin: Thoroughly clean the area with green soap or a medical-grade disinfectant to remove any dirt, oil, or bacteria.
- Dry the Skin: Use lint-free wipes or paper towels to dry the skin completely. Ensure there is no moisture left, as this can interfere with stencil adhesion.
4. How To Choose The Right Tattoo Stencil Transfer Solution?
Selecting the appropriate stencil transfer solution is critical for a crisp, long-lasting stencil. Here’s what to consider:
- Skin Sensitivity: Opt for hypoallergenic and non-toxic solutions to minimize the risk of allergic reactions.
- Transfer Quality: Look for solutions known for their ability to produce clear, sharp stencil lines.
- Longevity: Choose a product that ensures the stencil stays in place throughout the tattooing process.
- Artist Recommendations: Consider brands favored by professional tattoo artists, such as Stencil Stuff or Electrum.
5. How To Put A Tattoo Stencil On Skin: A Step-by-Step Guide
Applying a tattoo stencil to the skin requires precision and attention to detail. Follow these steps for a successful transfer:
- Prepare the Stencil: Ensure that the stencil is properly prepared, whether it’s a thermal stencil or a manually created hectograph stencil.
- Apply Stencil Transfer Solution: Apply a thin, even layer of stencil transfer solution to the prepared skin. Avoid using too much solution, as this can cause the stencil to smudge.
- Position the Stencil: Carefully position the stencil on the desired area of the skin. Ensure that it is aligned correctly and that there are no wrinkles or air bubbles.
- Press and Hold: Gently press the stencil onto the skin and hold it in place for 30-60 seconds. This will allow the transfer solution to adhere to the skin and transfer the design.
- Remove the Stencil: Slowly and carefully peel the stencil away from the skin. Start at one corner and peel it back gradually, ensuring that the design is transferring cleanly.
- Let it Dry: Allow the transferred stencil to dry completely before beginning the tattooing process. This will help prevent smudging and ensure a crisp, clear outline.
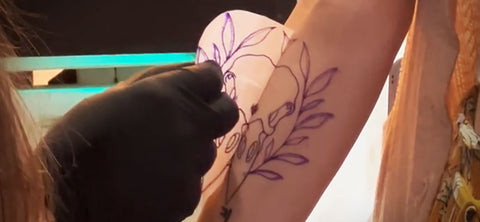 Tattoo stencil applied to arm
6. What Are The Best Practices For Stencil Placement?
Proper stencil placement is crucial for achieving the desired look and ensuring client satisfaction. Consider these best practices:
- Consult with the Client: Always consult with the client before placing the stencil to ensure they are happy with the position, size, and orientation of the design.
- Consider Anatomy: Take into account the natural contours and curves of the body when placing the stencil. Ensure that the design flows seamlessly with the body’s anatomy.
- Use a Mirror: Use a mirror to show the client how the stencil looks from different angles. This will help them visualize the final tattoo and make any necessary adjustments.
- Mark Key Points: Use a skin-safe marker to mark key points on the stencil, such as the center line or important landmarks. This will help you maintain alignment and symmetry during the tattooing process.
7. How To Deal With Common Stencil Application Problems?
Even with careful preparation and technique, stencil application problems can sometimes occur. Here are some common issues and how to address them:
- Smudging: If the stencil smudges during application, gently wipe away the smudged area with a clean, damp cloth and reapply the stencil.
- Fading: If the stencil fades quickly, try using a stronger stencil transfer solution or applying a second layer of solution before placing the stencil.
- Uneven Transfer: If the stencil transfers unevenly, ensure that the skin is properly cleaned and dried before application. You may also need to adjust the pressure and technique used when pressing the stencil onto the skin.
- Stencil Not Sticking: If the stencil does not stick to the skin, make sure you’re using enough transfer solution, and that the skin is properly prepared. You may also need to try a different brand of stencil transfer solution.
7.1 Troubleshooting Tips
- Ensure the skin is completely dry before applying the stencil.
- Use a fresh stencil for each application.
- Avoid stretching the skin during stencil application, as this can distort the design.
- If you’re having trouble with a particular stencil, try using a different design or a different stencil paper.
8. How Do Environmental Factors Affect Stencil Application?
Environmental factors such as temperature and humidity can impact stencil application.
- Temperature: Extreme temperatures can affect the consistency and adhesion of stencil transfer solutions. In hot environments, the solution may become too thin and runny, while in cold environments, it may become too thick and difficult to apply.
- Humidity: High humidity can prevent the stencil from drying properly, leading to smudging and fading. Low humidity can cause the stencil to dry too quickly, making it difficult to achieve a clean transfer.
8.1 Adjusting for Environmental Conditions
- In hot environments, store stencil transfer solutions in a cool place and apply them sparingly.
- In cold environments, warm the solution slightly before application.
- In humid environments, use a fan or dehumidifier to help dry the stencil.
- In dry environments, apply a thin layer of moisturizer to the skin before applying the stencil to prevent it from drying too quickly.
9. What Are The Different Types Of Tattoo Styles And How Do They Affect Stencil Use?
Different tattoo styles require different approaches to stencil use. Here are some popular styles and how they affect stencil application:
| Style | Description | Stencil Considerations |
|---|---|---|
| Traditional | Bold outlines and simple designs. | Precise stencil placement is crucial for clean lines. |
| Realism | Highly detailed and realistic images. | Complex stencils with fine details require extra care during application. |
| Watercolor | Soft, flowing designs that mimic watercolor paintings. | Stencils are used as a general guide, with more emphasis on freehand work and blending techniques. |
| Geometric | Precise lines and shapes that create intricate patterns. | Accurate stencil placement is essential for maintaining symmetry and alignment. |
| Blackwork | Bold, solid black designs. | Stencils need to be durable and resistant to smudging to ensure clean, solid lines. |
10. How to Remove A Tattoo Stencil From The Skin?
Removing a tattoo stencil from the skin is generally straightforward, but here’s how to ensure a clean removal:
- Use a Damp Cloth: Gently wipe the area with a damp cloth to remove any excess ink or residue.
- Apply Medical-Grade Soap: If the stencil is stubborn, apply a small amount of medical-grade soap to the area and gently scrub with a soft cloth.
- Avoid Harsh Chemicals: Avoid using harsh chemicals or abrasive scrubs, as these can irritate the skin.
11. How To Preserve A Tattoo Stencil During The Tattooing Process?
Preserving the stencil during the tattooing process is essential for maintaining accuracy and preventing errors.
- Apply a Stencil Sealant: Use a stencil sealant to protect the stencil from smudging or fading during tattooing.
- Work in Sections: Work in small sections at a time, focusing on one area of the stencil before moving on to the next.
- Avoid Over-Wiping: Avoid over-wiping the area, as this can remove the stencil. Use a gentle blotting motion instead of rubbing.
- Reapply as Needed: If the stencil starts to fade during the tattooing process, reapply it as needed.
12. What Are The Common Mistakes To Avoid When Applying A Tattoo Stencil?
Avoiding common mistakes can save time and ensure a better outcome.
- Using Too Much Transfer Solution: Applying too much transfer solution can cause the stencil to smudge and blur.
- Not Preparing the Skin Properly: Failing to properly clean and dry the skin can prevent the stencil from adhering properly.
- Stretching the Skin: Stretching the skin during stencil application can distort the design.
- Rushing the Process: Rushing the stencil application process can lead to errors and inconsistencies.
13. How Does Skin Type Affect Stencil Application?
Skin type can influence how well a stencil adheres and how long it lasts.
- Oily Skin: Oily skin can make it difficult for the stencil to adhere properly. Use a degreasing cleanser to remove excess oil before application.
- Dry Skin: Dry skin can cause the stencil to dry too quickly, leading to cracking and fading. Apply a thin layer of moisturizer before application.
- Sensitive Skin: Sensitive skin may be more prone to irritation from stencil transfer solutions. Use a hypoallergenic solution and test it on a small area of skin before applying the stencil.
14. What Are The Safety Precautions To Consider?
Safety is paramount when applying tattoo stencils.
- Use Sterile Equipment: Use sterile gloves, razors, and other equipment to prevent infection.
- Disinfect the Skin: Thoroughly disinfect the skin before applying the stencil to kill any bacteria.
- Avoid Cross-Contamination: Avoid cross-contamination by using separate supplies for each client.
- Follow Local Regulations: Follow all local regulations and guidelines regarding tattoo safety and hygiene.
15. How To Incorporate Technology In Stencil Application?
Technology can enhance the precision and efficiency of stencil application.
- Digital Design: Use digital design software to create and refine tattoo designs before transferring them to stencil paper.
- Thermal Copiers: Thermal copiers provide a quick and easy way to transfer digital designs onto stencil paper.
- Projection Systems: Some tattoo artists use projection systems to project the stencil design directly onto the skin, allowing for precise placement and adjustments.
16. How to Create Custom Tattoo Stencils?
Creating custom tattoo stencils allows for unique and personalized designs.
- Hand-Drawing: Draw the design directly onto stencil paper using a ballpoint pen or stylus.
- Digital Printing: Print the design onto thermal paper using a thermal copier.
- Hybrid Approach: Combine hand-drawing and digital printing techniques to create custom stencils that are both precise and artistic.
16.1 Tips for Custom Stencils
- Use high-quality stencil paper and ink.
- Pay attention to detail and accuracy.
- Experiment with different techniques to find what works best for you.
17. How To Apply Tattoo Stencil On Different Body Parts?
Applying a tattoo stencil on different body parts requires adapting your technique to the unique contours and curves of each area.
- Arms and Legs: These areas are generally flat and easy to work with. Use a firm, even pressure to apply the stencil and ensure that it adheres properly to the skin.
- Back: The back is a large, relatively flat area, but it can be difficult to reach. Use a long-handled applicator to apply the stencil and enlist the help of an assistant if needed.
- Chest and Stomach: These areas are more curved and require a flexible stencil. Use a soft, pliable stencil paper and apply the stencil in small sections, carefully conforming it to the contours of the body.
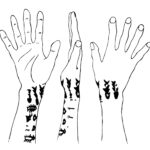
- Hands and Feet: These areas are small and bony, with many curves and crevices. Use a small, precise stencil and apply it carefully, paying attention to detail.
18. How To Care For The Skin After Stencil Application?
Proper skin care after stencil application is essential for promoting healing and preventing infection.
- Keep the Area Clean: Gently wash the area with mild soap and water 2-3 times a day.
- Apply a Healing Ointment: Apply a thin layer of healing ointment, such as Aquaphor or Tattoo Goo, to the area.
- Avoid Sun Exposure: Avoid exposing the area to direct sunlight, as this can damage the skin and cause the tattoo to fade.
- Follow Aftercare Instructions: Follow the aftercare instructions provided by your tattoo artist.
19. How To Offer Stencil Application As A Service In Your Tattoo Shop?
Offering stencil application as a service can attract new clients and generate additional revenue.
- Promote Your Services: Promote your stencil application services on your website, social media, and in-shop signage.
- Offer Consultations: Offer consultations to discuss stencil design, placement, and aftercare.
- Provide High-Quality Results: Provide high-quality stencil application services that meet or exceed client expectations.
- Charge Competitive Prices: Charge competitive prices for your stencil application services.
20. How To Master Advanced Tattoo Stencil Techniques?
Mastering advanced tattoo stencil techniques requires dedication, practice, and a willingness to learn.
- Take Advanced Classes: Take advanced classes and workshops to learn new techniques and refine your skills.
- Study the Work of Master Artists: Study the work of master tattoo artists to learn from their techniques and approaches.
- Experiment with Different Materials and Techniques: Experiment with different materials and techniques to find what works best for you.
- Seek Feedback from Mentors and Peers: Seek feedback from mentors and peers to identify areas for improvement.
Applying a tattoo stencil to the skin is both an art and a science, requiring precision, attention to detail, and a thorough understanding of the process. Whether you’re a seasoned tattoo artist or just starting, mastering the art of stencil application is essential for creating stunning, long-lasting tattoos. Remember, a well-placed and well-executed stencil sets the stage for a tattoo that truly reflects your artistic vision and your client’s desires. For inspiration, guidance, and access to top-notch artists, visit tattooat.com today!
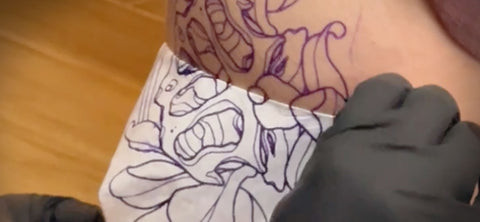 Tattoo stencil on skin
Ready to take your tattoo artistry to the next level? Explore a wealth of design ideas, connect with talented artists, and gain the knowledge you need at tattooat.com. Discover the perfect blend of inspiration and expertise to bring your visions to life. Visit us at 1825 SW Broadway, Portland, OR 97201, United States, or call +1 (503) 725-3000. Let tattooat.com be your guide to the world of exceptional tattoo art.
FAQ: How To Put A Tattoo Stencil On Skin
1. What is the best stencil transfer solution to use?
The best stencil transfer solution depends on your skin type and personal preference, but popular options include Stencil Stuff, Electrum, and Spirit Transfer Cream.
2. How long should I leave the stencil on the skin?
You should leave the stencil on the skin for 30-60 seconds to allow the transfer solution to adhere properly and transfer the design.
3. What if the stencil smudges during application?
If the stencil smudges during application, gently wipe away the smudged area with a clean, damp cloth and reapply the stencil.
4. Can I reuse a tattoo stencil?
No, tattoo stencils are designed for single use only. Reusing a stencil can lead to cross-contamination and infection.
5. How do I remove a tattoo stencil from the skin?
Remove a tattoo stencil from the skin by gently wiping the area with a damp cloth and mild soap.
6. What should I do if the stencil doesn’t stick to the skin?
If the stencil doesn’t stick to the skin, ensure that the skin is properly cleaned and dried before application. You may also need to use a stronger stencil transfer solution.
7. How can I prevent the stencil from fading during the tattooing process?
Prevent the stencil from fading during the tattooing process by applying a stencil sealant and working in small sections at a time.
8. Is it possible to create my own custom tattoo stencils?
Yes, you can create your own custom tattoo stencils by hand-drawing the design onto stencil paper or by printing a digital design onto thermal paper.
9. How does skin type affect stencil application?
Skin type can affect stencil application. Oily skin may require a degreasing cleanser, while dry skin may benefit from a thin layer of moisturizer.
10. What safety precautions should I consider when applying a tattoo stencil?
When applying a tattoo stencil, use sterile equipment, disinfect the skin, avoid cross-contamination, and follow local regulations.