Goat Tattoos, while not the kind you might see in a tattoo parlor, are a crucial part of goat ownership, especially if you’re planning to register your herd. Just like any form of tattooing, goat tattoos serve as a permanent form of identification. If you’re like many goat owners who’ve put off this task, you might be wondering, “How do I even tattoo a goat?” Don’t worry, it’s definitely possible to catch up, and this guide will walk you through everything you need to know about goat tattoos for registration and identification purposes. Whether you’re registering miniature dairy goats or any other breed, understanding goat tattoos is essential.
Understanding the Purpose of Goat Tattoos
Before diving into the how-to, let’s clarify what a goat tattoo actually signifies. Think of it as a permanent ID for your goat, similar to branding livestock. This tattoo, applied to the ear or tail web, identifies both the individual goat and its owner. For registration purposes, breed associations require specific tattoo placements and codes.
Typically, a goat tattoo is divided into two parts, each placed in a specific ear:
- Right Ear: This ear receives the farm tattoo, which is your personal identifier registered with the breed association. It’s like your ranch’s brand.
- Left Ear: The left ear tattoo contains the year letter and the goat’s birth order number. This combination helps identify the goat within a specific birth year on your farm.
This system allows for clear and permanent identification, which is vital for registration, tracking lineage, and ensuring accurate records for your goat herd.
 A close up of a goat's ear showing a fresh green tattoo, indicating the year and birth order.
When to Tattoo Your Goat
Timing is flexible when it comes to goat tattoos. You can tattoo a goat kid as early as when they are being disbudded, or you can tattoo adult goats. Younger goats might be physically easier to handle, which can simplify the tattooing process. However, goats of any age can be successfully tattooed. The key is to ensure the process is done correctly and with care, regardless of the goat’s age.
Where to Place a Goat Tattoo: Ear vs. Tail Web
There are two accepted locations for goat tattoos:
- Ears: The inner ear is the most common location. It provides a relatively flat and accessible surface for tattooing.
- Tail Web: For breeds like Lamancha goats, which have very small ears (“gopher ears”), the tail web is the alternative location. The underside of the tail, where skin is exposed, provides a suitable area for the tattoo.
The choice between ear and tail web often depends on breed characteristics. For most breeds with standard ear sizes, the ear is preferred due to its visibility. Regardless of location, the code remains the same: farm tattoo in the right, year and birth order in the left (or corresponding positions if using the tail web – right side farm, left side year/number, relative to the goat).
 A young goat kid with a fresh ear tattoo visible, demonstrating the typical tattoo placement in the ear.
Remember the specific breakdown for ear tattoos:
- Right Ear: Farm Tattoo (Registered herd identifier)
- Left Ear: Year Letter & Birth Order Number (Individual goat identification)
Dairy goat associations use a rotating letter system to designate the birth year. Here’s a sample of yearly goat tattoo letters to help you decode or plan your tattoos:
- 2010: A
- 2011: B
- 2012: C
- 2013: D
- 2014: E
- 2015: F
- 2016: H
- 2017: J
- 2018: K
- 2019: L
- 2020: M
- 2021: N
- 2022: P
- 2023: R
- 2024: S
- 2025: T
- 2026: V
- 2027: W
- 2028: X
- 2029: Y
- 2030: Z
Essential Goat Tattoo Supplies: What You’ll Need
To perform a goat tattoo correctly, you’ll need to gather the right supplies. A goat tattoo kit typically includes the essential tools, but you can also assemble them individually.
Here’s a list of goat tattoo supplies:
- Tattoo Plyers: This is the tool that holds the tattoo digits and applies the tattoo. Consider a quality Goat Tattoo Kit for convenience.
- Tattoo Numbers: You’ll need a set of numbers to indicate the birth order of your goats. Depending on your kidding frequency, having multiple sets of key numbers might be useful.
- Tattoo Letters: Letters are necessary for your farm tattoo and the year designation.
- Tattoo Ink (Paste Preferred): Green tattoo ink is highly recommended for dark-skinned goats as it provides good contrast and visibility. Black ink can be used for white-skinned goats. Paste ink works better than liquid as it stays in place more effectively.
- Toothbrush: A toothbrush is ideal for applying tattoo ink to the digits and working the ink into the tattoo punctures.
- Rubbing Alcohol: Essential for cleaning the goat’s ear or tail web and sterilizing the tattoo equipment (numbers, letters, plyers).
- Baking Soda (Optional): Baking soda can help dry the ink and set the tattoo, potentially enhancing visibility.
- Gloves: Goat tattooing is messy! Gloves will protect your hands from the ink.
- Practice Material: Cardboard or heavy paper is useful for practicing your tattoo setup and ensuring correct letter/number order before applying it to your goat.
For larger herds, consider investing in two tattoo plyers. Dedicate one for your farm tattoo to avoid frequent changes, and use the other for individual goat IDs. Also, ensure you have enough number digits if you tattoo many kids each year, especially for double-digit birth order numbers.
 Goat tattoo plyers with letters and numbers inserted, ready for application, showcasing the equipment needed for goat tattooing.
Step-by-Step Guide: How to Tattoo a Goat
Now, let’s get into the practical steps of tattooing your goat. Follow these steps carefully for a successful and legible goat tattoo.
Step 1: Prepare the Tattoo Plyers
Insert the correct letters and numbers into the tattoo plyers. Double-check that you have your farm tattoo for the right ear and the year letter and birth order number for the left ear. Ensure they are facing the correct way to read properly once tattooed.
Step 2: Test on Practice Material
Before tattooing your goat, test the loaded plyers on cardboard or paper. This step confirms that the characters are in the correct order, facing the right direction, and that the plyers are working correctly.
Step 3: Secure the Goat
Goats, understandably, don’t enjoy ear tattooing. Secure your goat to minimize movement. Options include having a helper hold the goat, using a disbudding box for kids, a milk stand, or tying them securely to a fence. Expect some jerking and movement.
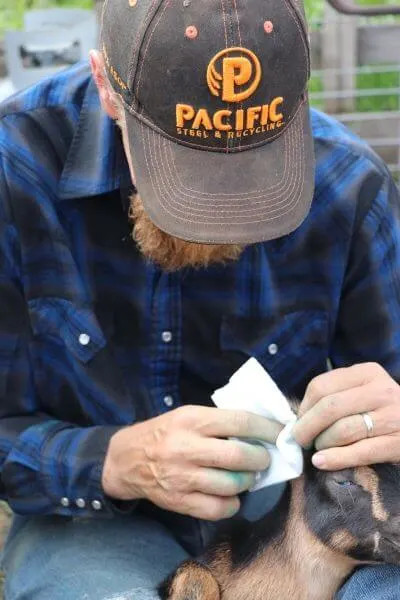 A person cleaning a goat's ear with rubbing alcohol in preparation for tattooing.
Step 4: Clean the Tattoo Area
Thoroughly clean the inside of the goat’s ear or tail web with rubbing alcohol. This removes dirt, wax, and debris, ensuring a clean surface for the tattoo and helping to prevent infection.
Step 5: Apply Tattoo Ink
Using a toothbrush, apply a generous amount of green (or black) tattoo paste to the cleaned area. Work the ink into the skin, between the veins and cartilage in the ear. Avoid tattooing over veins, cartilage ridges, moles, scars, or freckles, as these can interfere with tattoo clarity and healing, and hitting a vein can cause excessive bleeding.
Step 6: Ink the Tattoo Digits
Apply tattoo paste to the tips of the letters and numbers in the plyers using your toothbrush. This ensures sufficient ink transfer during application. Paste ink is preferable as it adheres better to the digits.
Step 7: Position the Plyers Correctly
Remember: farm tattoo goes in the right ear, and year letter/birth order number in the left ear. Position the plyers around the ear or tail web from the underside, with the needles on the inside of the ear.
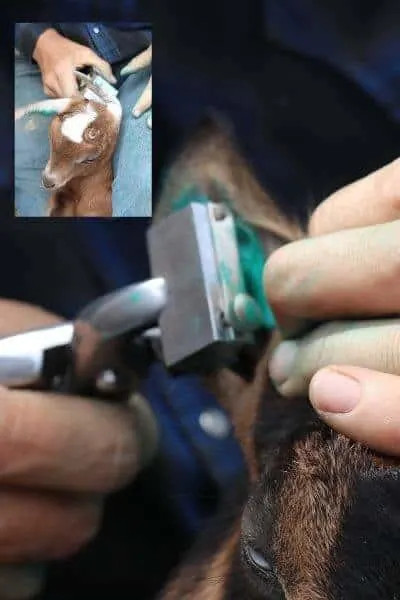 Tattoo plyers positioned around a goat's ear, ready to apply the tattoo, demonstrating correct tool placement.
Step 8: Apply the Tattoo
Close the plyers firmly and quickly to create a clean puncture. If the needles pierce through the ear and get stuck, gently separate the ear from the needles before fully opening the plyers.
Step 9: Work Ink into Punctures
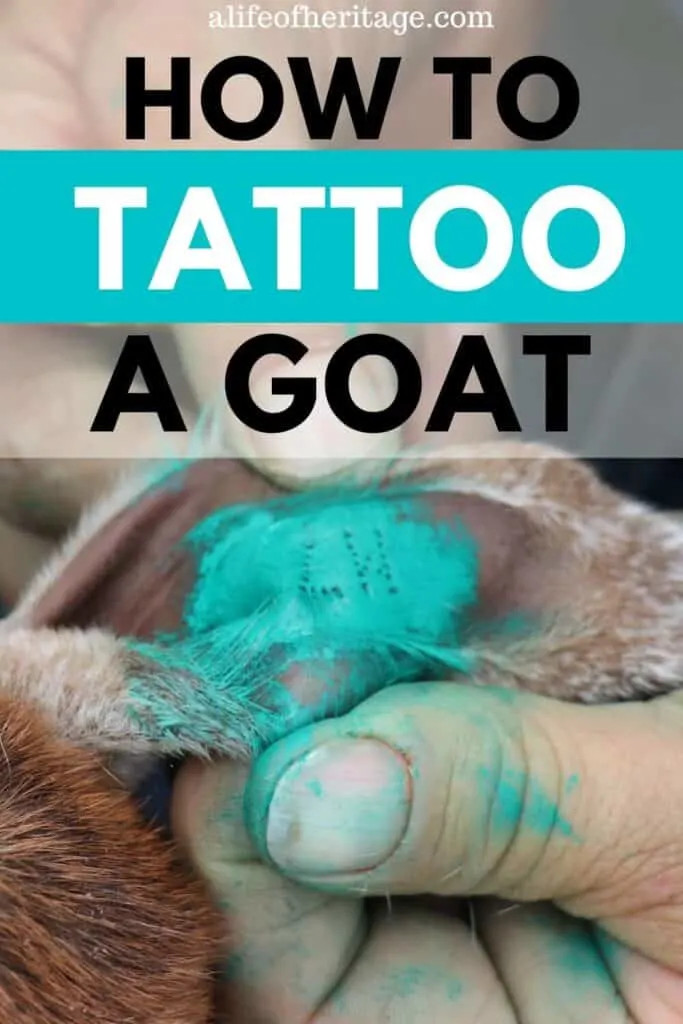
Immediately after applying the tattoo, vigorously rub more tattoo ink over the punctured area with your thumb or toothbrush for several seconds. This ensures the ink penetrates the punctures and creates a clear, lasting tattoo.
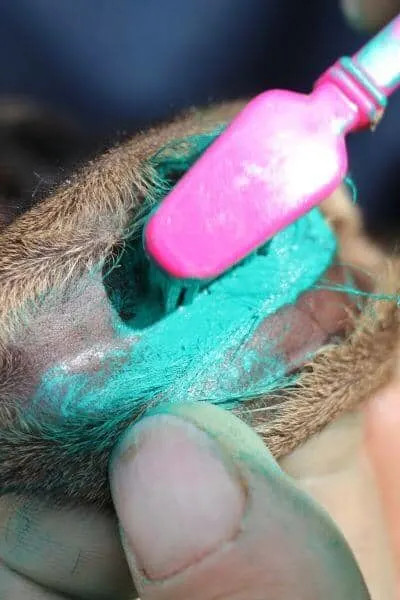 A hand using a toothbrush to rub green tattoo paste into the fresh tattoo punctures on a goat's ear.
Step 10: Optional Baking Soda Application
For potentially better tattoo visibility, rub baking soda over the inked area. This helps to dry the ink and set the tattoo.
Step 11: Record Tattoo Information
Immediately record the tattoo details, including kidding dates, offspring information, and assigned tattoo numbers, in your goat management binder or record-keeping system. Accurate records are crucial for registration and herd management.
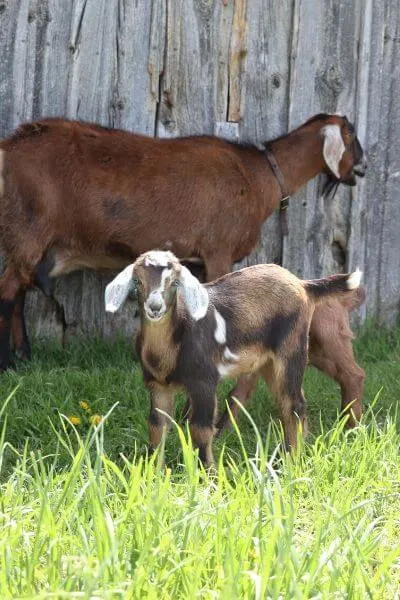
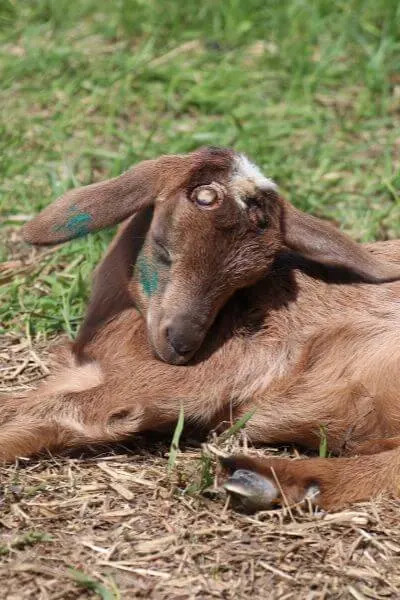 A goat kid with a newly applied ear tattoo, shortly after the tattooing and disbudding process, showing a young goat successfully tattooed.
Dairy Goat Identification and Registration
Once tattooed, your goat is officially identifiable and ready for registration with the appropriate dairy goat association. The tattoo will heal over 5-21 days. Avoid touching or disturbing it during healing. Tattoo ink may fade slightly over time.
To read a goat tattoo, especially on dark-skinned goats, use a flashlight held to the backside of the ear to illuminate the tattoo from behind for better visibility.
With these steps and information, you are now well-equipped to tattoo your goats for registration and permanent identification, ensuring accurate records and traceability for your herd.