I recently had the pleasure of connecting with an incredibly talented photographer named Nicole from Lilac and Fern Photography at a Collaboration Over Competition event. While she specializes as a boudoir photographer, it’s clear she is a true artist with a remarkable vision.
Just a few days after our initial meeting, Nicole reached out to me via Instagram with a fascinating question: did I design “floral tattoos”? I was familiar with the concept and had been intrigued by the idea of creating them, but truthfully, at that point, I had never actually made one. She explained that in the past, she had collaborated with Emily Rose Floral Design in Fort Collins, Colorado (@emilyroseflorals), where Emily would craft these stunning floral designs for her boudoir photography sessions. The vibrant colors and unique textures of the flowers, she noted, added an exquisite and captivating dimension to the inherent elegance of her photographs. Always eager for a new creative challenge, I told Nicole that I was excited to explore the world of floral tattoos and would figure out how to design them.
About a week later, feeling more prepared after watching video tutorials and practicing techniques, I contacted Nicole to let her know I was ready to try. Nicole found a wonderful model, the beautiful Skye Dzhidzhiteshvili (@skyegigi93), and we arranged to meet at her studio. The results of our collaboration were truly amazing!
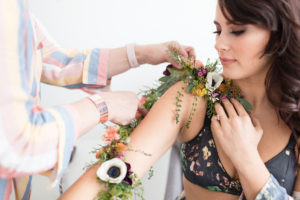 Close-up shot of a floral tattoo on a model's arm featuring purple, pink, and white flowers
The video tutorial I watched suggested using clear Elmer’s glue as an adhesive for the floral tattoo, claiming it was skin-safe and non-irritating. I had tested this method with a small floral tattoo on myself at home, and it seemed to work. However, applying a full-size floral tattoo proved to be a different story. The Elmer’s glue simply didn’t provide a strong enough hold on Skye’s skin. Fortunately, both Nicole and Skye were incredibly patient and understanding. Their positive attitudes created a relaxed environment where I felt comfortable learning and experimenting without the pressure of a paying client. This experience was invaluable, allowing me to learn and refine my technique in a supportive setting.
Having worked as a floral designer for over 25 years, I thrive on the constant learning and skill development inherent in this profession. Every day brings new discoveries and opportunities to perfect my craft. Just as no two flowers are exactly alike, each floral design presents its own set of unique challenges. Embarking on the creation of something entirely novel like Color Flower Tattoos was an incredibly stimulating and rewarding experience.
My first encounter with floral tattoos was through Instagram, where I admired the work of Sue McLeary (@passionflowersue). I have extensive experience designing corsages and flower crowns, both traditional and unconventional. Typically, these pieces are constructed by wiring and taping each individual flower. I instinctively knew that this method wouldn’t work for floral tattoos. It would create a bulky, unnatural look that wouldn’t lay gracefully against the skin, and it would be uncomfortable to wear.
Nicole shared that Emily Rose, the previous floral designer she collaborated with, used a type of medical-grade tape and glued the flowers directly onto the tape while on set and applied it to the model. She mentioned that this process could sometimes take several hours to complete. The thought of requiring a model to endure such a lengthy application process seemed impractical. While Elmer’s glue wasn’t the answer, it confirmed that I was on the right path with adhesive.
Seeking guidance, I reached out to Sue McLeary, and to my surprise and delight, she graciously responded! I am a huge admirer of her work; in the floral design industry, she is a true icon. I was amazed that she took the time to message me back and was so willing to offer her expertise. Sue confirmed that she also uses medical-grade tape, just like Nicole’s previous collaborator. This crucial piece of information sparked an idea. I realized I could combine my floral design methods with Sue’s adhesive technique to create color flower tattoos that could be pre-designed in my studio and then securely applied to the skin.
 A floral tattoo featuring vibrant red, yellow, and orange flowers on a model's shoulder
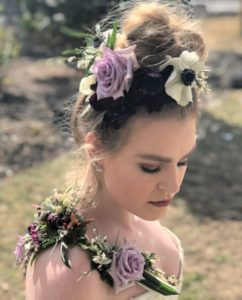
For my second attempt at perfecting color flower tattoos, my daughter Sophie generously volunteered as my “guinea pig.” I was thrilled with the outcome of this second try, and we had so much fun during the photoshoot! She even wore my old wedding dress for the occasion. While I won’t reveal all my secrets just yet, I can confidently say that attempt number two was a resounding success! The floral tattoo stayed perfectly in place, and importantly, I was able to create the entire design in advance at my studio. As you can see in the photos, I also experimented with a “floral fascinator” for Sophie’s hair, but that’s a story for another blog post!
As you can see, Nicole beautifully captured Skye and her color flower tattoo in her photographs. I am utterly captivated by this innovative form of wearable floral art. Imagine the possibilities! Picture a New Year’s Eve Ball or a Masquerade Ball where guests are adorned with fresh color flower tattoos! I envision tables displaying an array of pre-made floral tattoos for guests to choose from, with assistants on hand to apply them. WOW! That is a floral design job I would absolutely love to be a part of!